Table of Contents
Preferences
Preferences
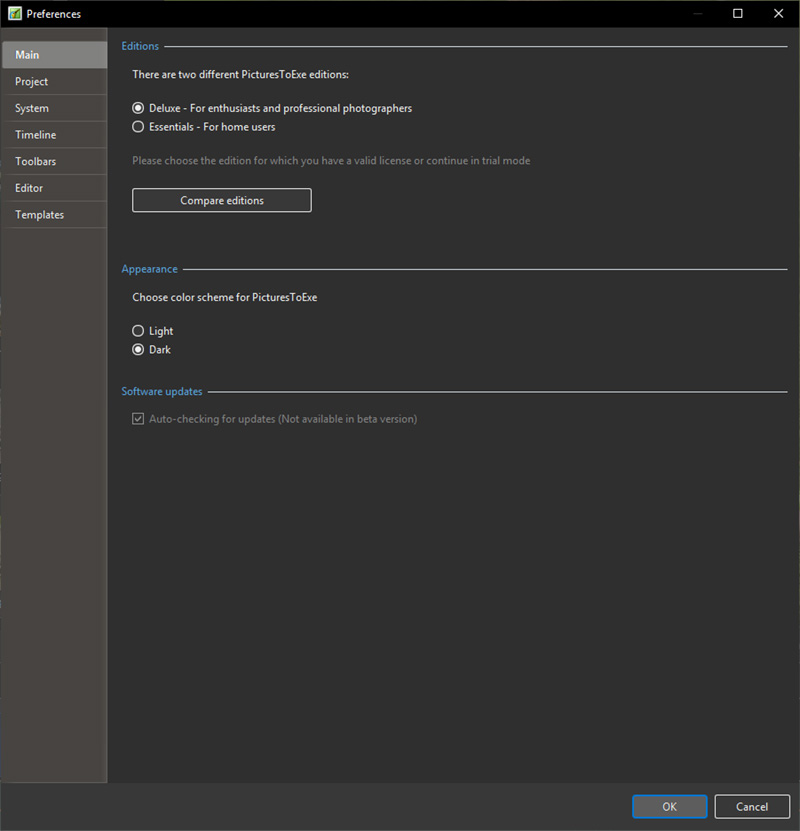
The last option in the Settings menu is Preferences. This option allows the user to set up a number of program functions which will apply to all projects until these are altered. When the “Settings/Preferences” option is selected, the following dialog box will open :
The dialog box contains 7 tabs which control various functions of the program. Each of these tab functions is explained below.
Editions
Editions
Two different versions of PicturesToExe are available for purchase, the Deluxe version which includes all of the program functions and a simplified “Essentials” version. By clicking the “compare editions” button, the list of function which each version supports is shown and prospective purchasers can select which version they wish to purchase. For users who have already purchased a PicturesToExe licence, the version they wish to use should be selected and then no further change to this tab is required.
Compare Editions: Compare Editions Link
Appearance
- Choose from Light or Dark colour scheme
Software Updates
Tick for Automatic Checking for Updates
Project
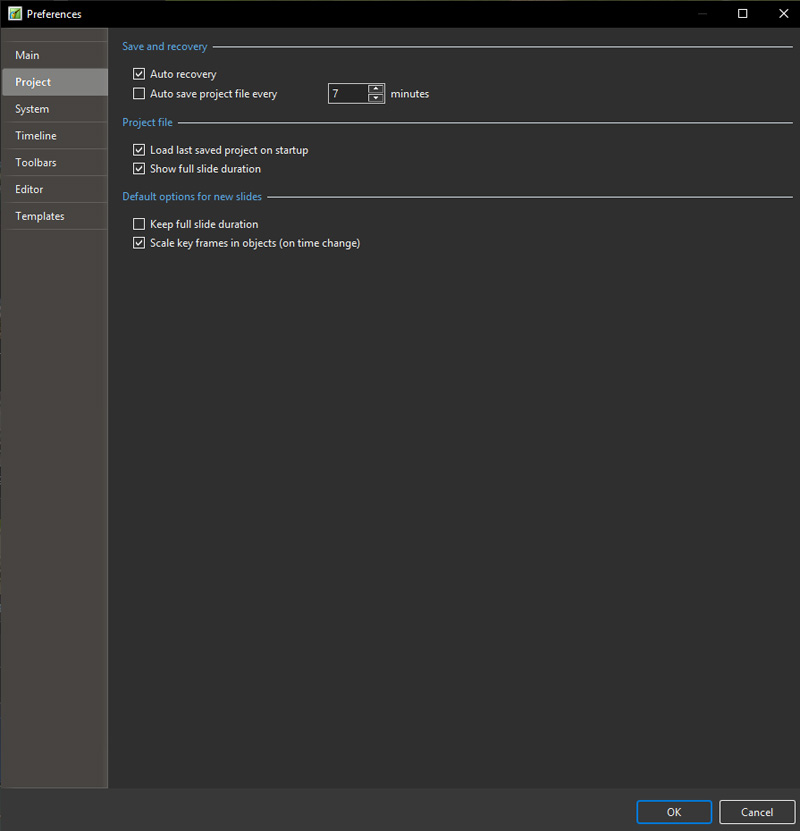
Save and Recovery
It is recommended that both “Auto recovery” and “Auto save project every” x minutes are selected. Typically the default setting of 5 minutes is a reasonable setting but the user may select any time which is considered appropriate to the project being worked on
Project file
This has 2 options :
- Load last project on startup - If this option is ticked, details of the last project worked on will be loaded on startup of PicturesToExe. This can be an advantage if the user is working on one project over a period of time and just want to continue where they last left off. However if a new project is started each time PicturesToExe is opened, it is probably better to deselect this option.
- Show full slide duration - This option enables the full slide duration (slide time plus following transition) to be shown on each slide when in the Slide list view. For example if a slide has a duration of 7.0s and the following slide has a transition time of 3s, then the bottom right hand corner of the slide will show a full slide duration of 10s (see below).
Default option for new slides
This has 2 options :
- Keep full slide duration - This function is included for use with the insertion of video files. If selected it enables a video clip to run for its full duration without being cut off by the following slide transition. It also ensures that moving the slide to another location in the Slide list, will maintain the full slide duration regardless of any change in the following slide's Transition Time
- Scale frames in objects (on time change) - If key frames are added to slide in the “Objects and Animation” window, selecting this option will ensure that any change in the overall duration of the slide will result in the key frame positions being scaled to match the revised duration. Whether this option is selected is a function of the type of animation being used. Generally it is probably a good idea to select this option for shows in which animations do not have to take place at precise points in a slide duration.
- Note that the minimum resolution for a Key Frame is 0.001s. If a Time Change with Scaling is applied to an Object with Complex Animations containing Key Frames at very small intervals then this minimm value could cause problems.
- When this option is UNTICKED a “+” symbol will appear after the time of certain Key Frames in the Options and Animation window. (Start and end of both Transition Time).
System
Double Click in the Slide List
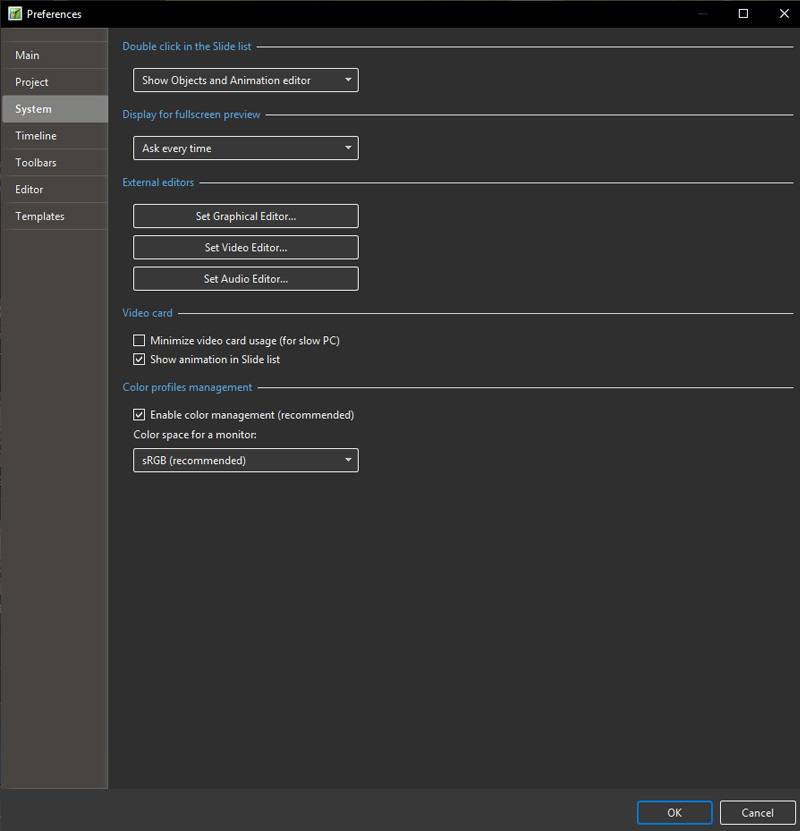
This section provides 3 options which can be selected if a slide is double-clicked in the Slide list. These are :
- Show slide properties window - (Note: this is really the “Slide Options” window). Selecting this reveals options for dealing with a slide such as adjusting its transition;
- Show Slide Style window - This reveals the window for selecting slide style parameters;
- Show Objects and animation editor - This opens the O&A editor window allowing other images to be added and key points set.
Display for Full Screen Preview
- Applicable to users with two monitors. When a show is run the output can be set to appear on either Display 1 or Display 2 or the user can select which to use.
External Editors
This section enables the user to set up default programs for graphical editor, video editor and audio editor.
- For example if “Set Graphical Editor” is selected, a secondary dialog box will open as shown below in which the default graphical editor set up in the operating system is chosen, or alternatively a specific graphical editor can be selected by navigating to the folder where the exe file for this editor resides and selecting the program exe file. Note that once the various editors are selected, an image or video file can be edited by either right-clicking on the image and selecting “Edit file” or by pressing CTRL + W.
- Audio files can only be sent to an Audio Editor from the File List by right clicking on an Audio File and choosing “Edit File”. Care should be taken to use the “Save As” option in the Audio Editor to not overwrite the original file.
Video Card
The last section deals with video card issues and provides 3 options :
- Minimize video card usage (for slow PC)- This enables shows with complex animations to be run an PCs with reduced performance video cards.This option affects only the main program of PicturesToExe.
- This forces PicturesToExe to unload the preview of a slideshow in the main window when the user opens the Objects and animation editor. When the editor is closed, PicturesToExe automatically activates the preview in the main window again. This reduces usage of video memory on some old video cards, but it slightly delays opening/closing of the Objects and animation editor. This option is obsolete and not recommended for modern video cards.
- Show real slides in Slide List - It is recommended to select this option as it enables all the images added to a base image to be shown on a slide in the slide list;
- Show animation in Slide list - This enables animation in the slide list so that moving a slide from one position to another is animated.
Colour Profiles Management
Colour Management
PicturesToExe 9 now includes full colour management.
- Support of embedded colour profiles in JPEG and PNG images.
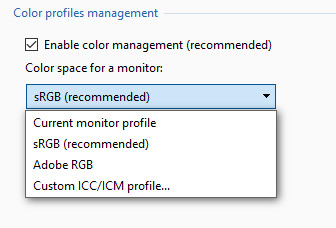
- Support of colour space of a monitor (output):
- sRGB (by default)
- Current monitor profile
- Adobe RGB
- Custom ICC/ICM profile
- You can use command line parameters for live control of colour management in created EXE presentations:
-noicc - disable colour management and colour profiles of images (works as PTE 8).
-icc srgb - use sRGB colour space
-icc adobergb - use AdobeRGB colour space
-icc - use current monitor profile
-icc profilename.icc/icm - use custom colour profile which is located in same folder with EXE.
- So this gives you great possibilities. For example, people send EXE presentations to a camera club for AV competition. If you have a calibrated AdobeRGB projector, you can force to run these EXE presentations in Adobe RGB colour space with wide-gamut. It will give excellent results, if AV authors will use Adobe RGB images in EXE files.
- PicturesToExe performs colour managements for all objects (images, videos, text, rectangles, background).
- PicturesToExe performs colour management in real time. It doesn't affect the performance. PicturesToExe use source images with colour profiles and adapts them to colour space of destination monitor in real time on the fly.
- PicturesToExe Essentials doesn't offer any color management options in the Preferences. Color management works automatically with default settings. PicturesToExe Essentials reads color profiles from JPEG images and automatically converts all non-sRGB images to sRGB color space
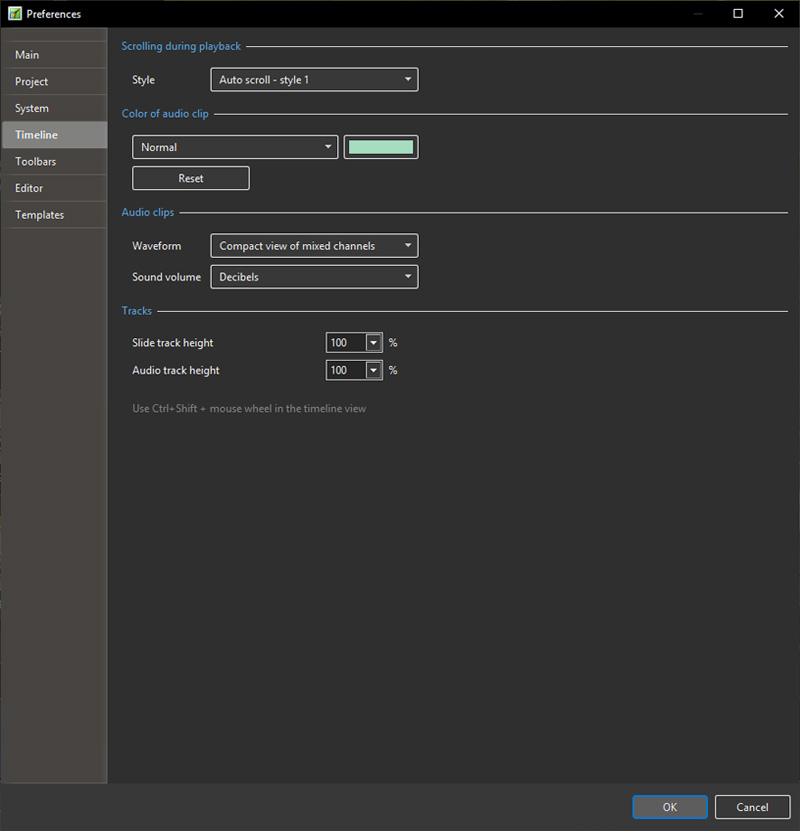
Timeline
Scrolling During Playback
- This section controls the type of scrolling of the timeline. Scrolling can be disabled or selected to one of two methods. “Autoscroll - style 1” is abrupt when the end of the screen is reached and style 2 provides a gradual scroll.
Colour of Audio Clip
- This section controls the color of various parts of the audio waveform when viewed in the timeline window.
Audio Clips
- This section controls the appearance of the audio waveform and whether values for amplitude are in percent (percentage) or decibels (dB).
Tracks: Track Height
- This section controls the heights of the Slide and audio tracks in the timeline view. although values can be selected here, the user is advised to use the shortcut keys of CTRL + Shift + mouse wheel to alter track heights. The slide or audio track must be selected first.
Toolbars
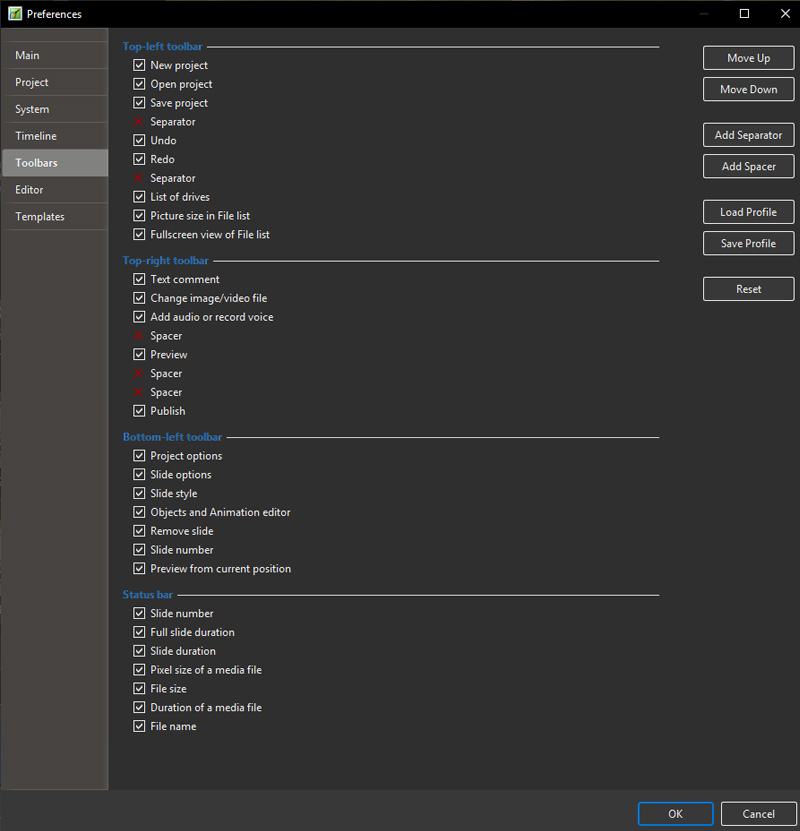
In Main Menu / Settings / Preferences / Toolbars you can configure the position of Toolbars and Tools.
Tick or untick any box to turn a Tool on or off.
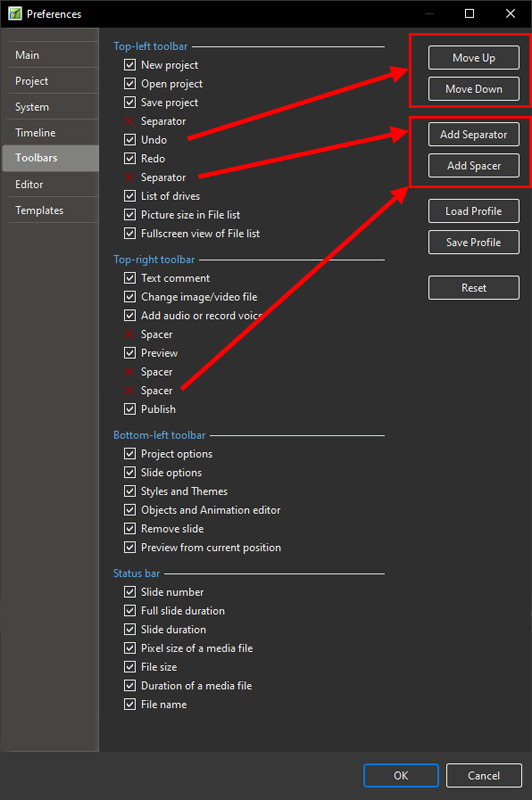
Highlight any Tool and it can be Moved within its Default Toolbar or to a different Toolbar.
It is not possible to move Tools to or from the Status Bar. It is only possible to “Show/Hide” Status Bar Tools.
Separators and Spacers can be moved in the same way. Extra Separators and Spacers can be added.
- Toolbars Profiles (User Profiles) can be Saved and Loaded to suit the user.
- The Reset Button allows the return to Pictures To Exe Default Status.
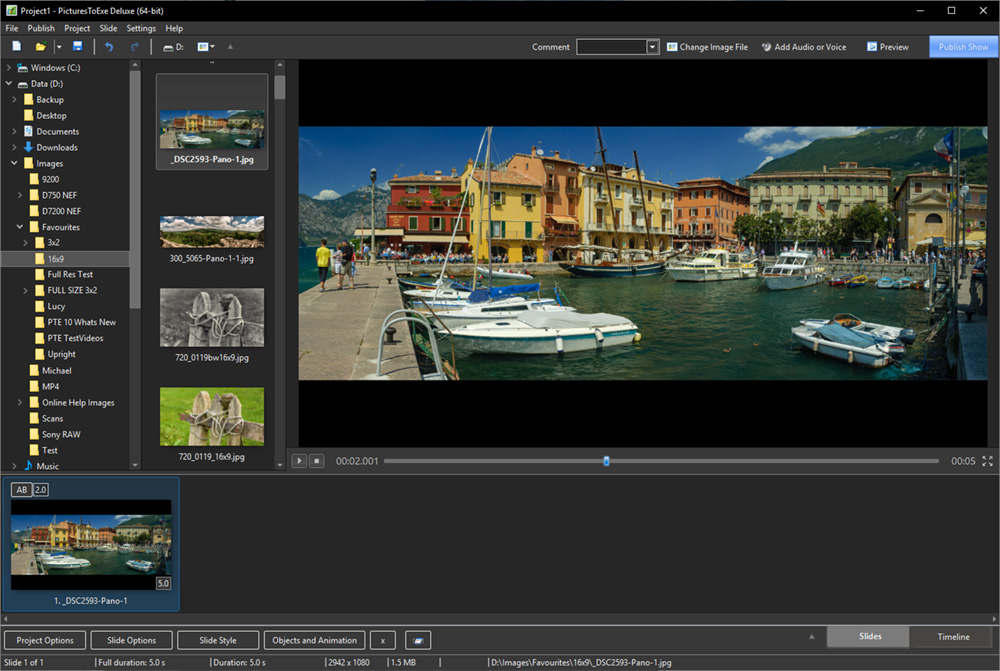
- The example below shows a Slide View with all Tools Active (ticked).
Editor
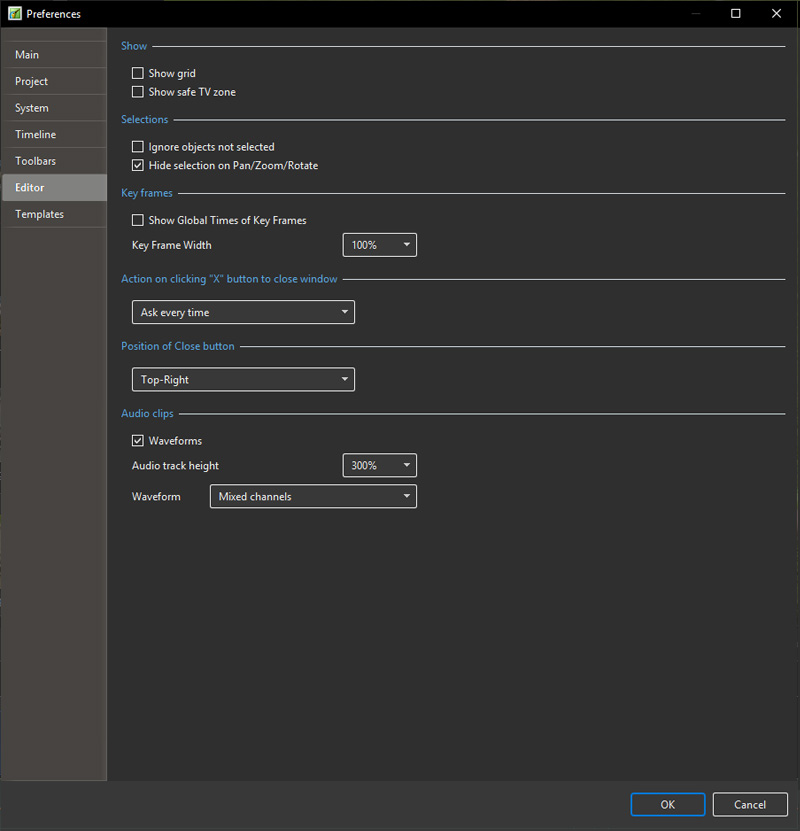
The “Editor” tab is shown below. This tab controls features associated with the “Object and Animation” editor window.
Show
This section has two options which control aspects of the O&A window. These are :
- Show grid - This enables a grid to appear in the O&A window to assist in the accurate placing of inserted objects;
- Show safe TV zone - Selecting this option provides an indication of the probable margins of a TV screen for those projects which are to be converted for display on a TV. Placing objects outside these boundaries will result in them not displaying. An alternative to this is to use the “% of the slide to show main image” setting in Project Options/Default Tab.
Selections
This section has two options which are :
- Ignore objects not selected - When selected, objects which are behind another object in the “Objects and Animation” window can be selected and cltered without affecting the object which is in front (see a more detailed explanation in Selection and Transparency) .
- Hide selection on pan/zoom/rotate - When selected, the selection handles of the object selected will be hidden when an object is moved.
(Can also be changed directly in the O&A window by using the “Tools” button)
Key Frames
- Show Global Times of Key Frames determines if the times are shown from the beginning of the Slide or the beginning of the Project.
- Key Frame Width The width of the Key Frame in the Objects and Animations Window can be user defined
Templates
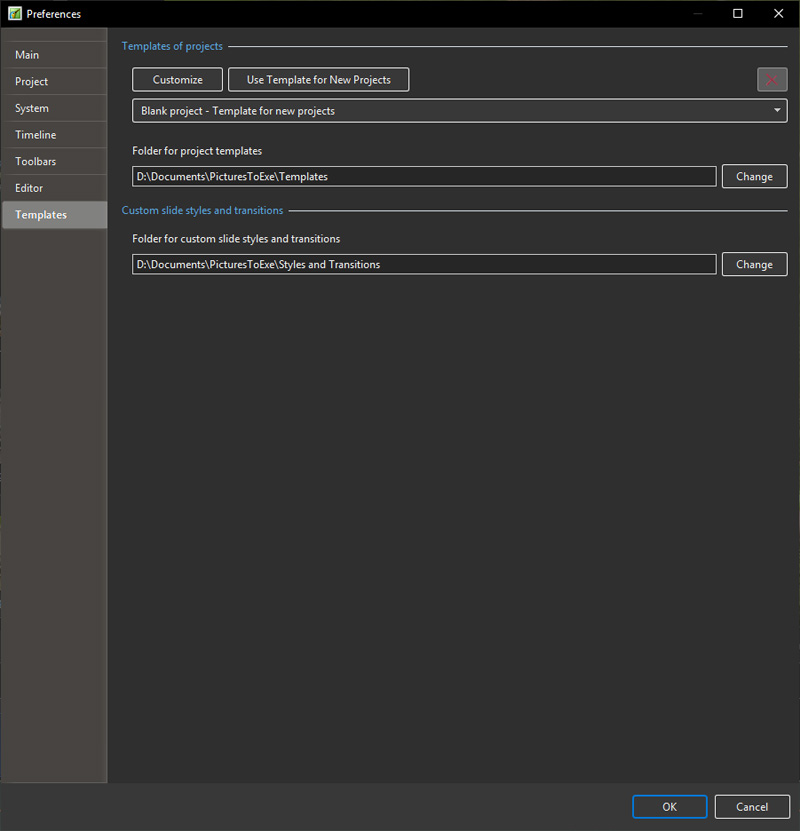
Templates of Projects
This deals with the management of templates. A template can be considered as a set of project settings which can be used over and over again without the user having to reset project parameters. For example a user might want to make all his shows where the slide aspect ratio is always 3:2, the slide standard duration is 7s and a standard transition of gradual fade in are required. To do this, set up each of the required settings in “Project Options” and then use the menu option File/Templates/Create Template from this show. In the “Templates” tab, the “custom” button can be used to access all the project settings, the resultant show parameters saved as a template, and the “Use Template for New Projects” button to make this the default template. Of course a number of different templates can be created for different type of show. At the bottom of this section is the location where saved templates will be created. This default folder can be changed by the user if required.
Custom Slide Styles and Transitions
- Specify the location of storage for Custom Slide Styles and Transitions
- Sub Folders for:
- Mirror
- Themes
- Custom Transitions
- Slide Styles
