Table of Contents
Adding Video
Supported file types
A full list of supported video containers:
avi, mpg, mpeg, mov, mp4, m4v, mkv, divx, xvid, 3gp, wmv, flv, rm, rmvb, mts, m2ts, m2v, m2t, ts, webm
Adding Video to the Project
Video can be added to a PicturesToExe Project in the same way as images can be added.
- Via the File List
- By dragging and dropping into the Slide List
- By adding as an Object in Objects and Animation
Convert / Trim Video
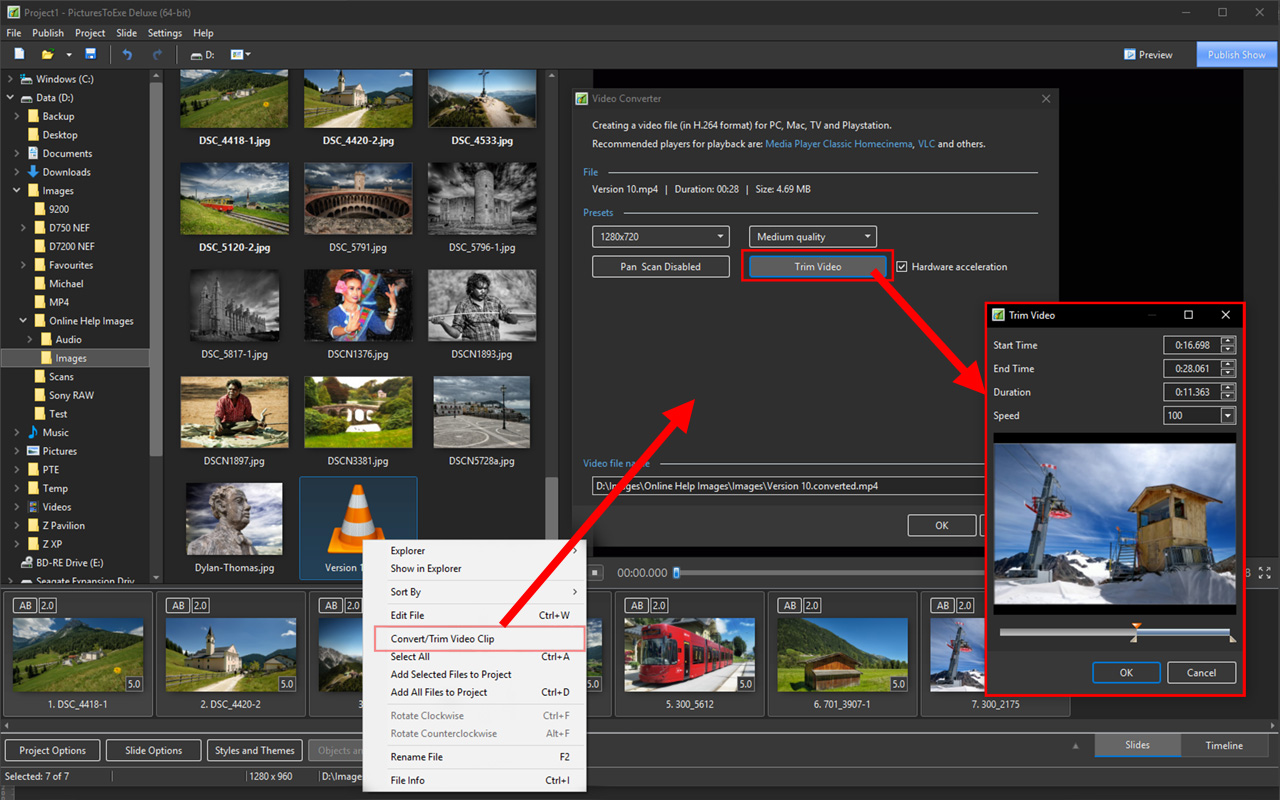
- Right Click on a Video in the File List and choose “Convert / Trim Video”
- Choose a Preset Resolution or “Custom”
- Use the Trim Video to adjust the length of the Clip by setting any combination of Start Time, End Time, Duration and Speed
- Click on OK to commit the settings
Add Video to Slide List
This can be done as follows.
- Select an unconverted video (or videos) from the File List and Right Click on it. Choose “Add Selected Files to Project”. You are asked if you want to Optimize the file. Choose “Optimize”. The file will be added to the Slide list while the Optimization is carried out in the background. When Optimization is complete the Converted File is shown in the Slide List. (The conversion might take several minutes).
- Select a Converted Video (or Videos) from the File List and Right Click on it. Choose “Add Selected Files to Project”. The converted file is added to the Slide List.
- Drag an unconverted video (or videos) from the File List into the Slide List. You are asked if you want to Optimize the file. Choose “Optimize”. The file will be added to the Slide list while the Optimization is carried out in the background. When Optimization is complete the Converted File is shown in the Slide List. (The conversion might take several minutes).
- Drag a Converted Video (or Videos) from the File List into the Slide List.
When Video Files are added to the Slide List the Slide Duration is calculated according to the Video Duration and can differ according to the setting of the “Default Options for New Slides” in:
- Settings/Preferences/Project/Default Options for New Slides/Keep Full Slide Duration.
- If the option is OFF the Video Clip ends at the beginning of the following transition
- If the option is ON the Video Clip ends at the end of the following transition
Video Clips can also be added in Objects and Animation via the Movie Icon or the Right Click Menu. In this case all adjustments to the Slide and Video Durations must be made manually.
Optimization and File Size
Optimized video clips can have larger or smaller file size than the original video clip. It depends on the bitrate of source file. For example digital cameras use high values - about 40 mbit per second for 1080p video. Whereas video editors can suggest 15-25 mbit by default.
Digital cameras have to record video stream in realtime, they have limited battery and slow hardware to compress video. High bitrate compensates these restrictions. In a software encoder we have much more powerful CPU and more time to analyze video stream to more optimally compress video picture.
Video Clip Properties
Properties Tab
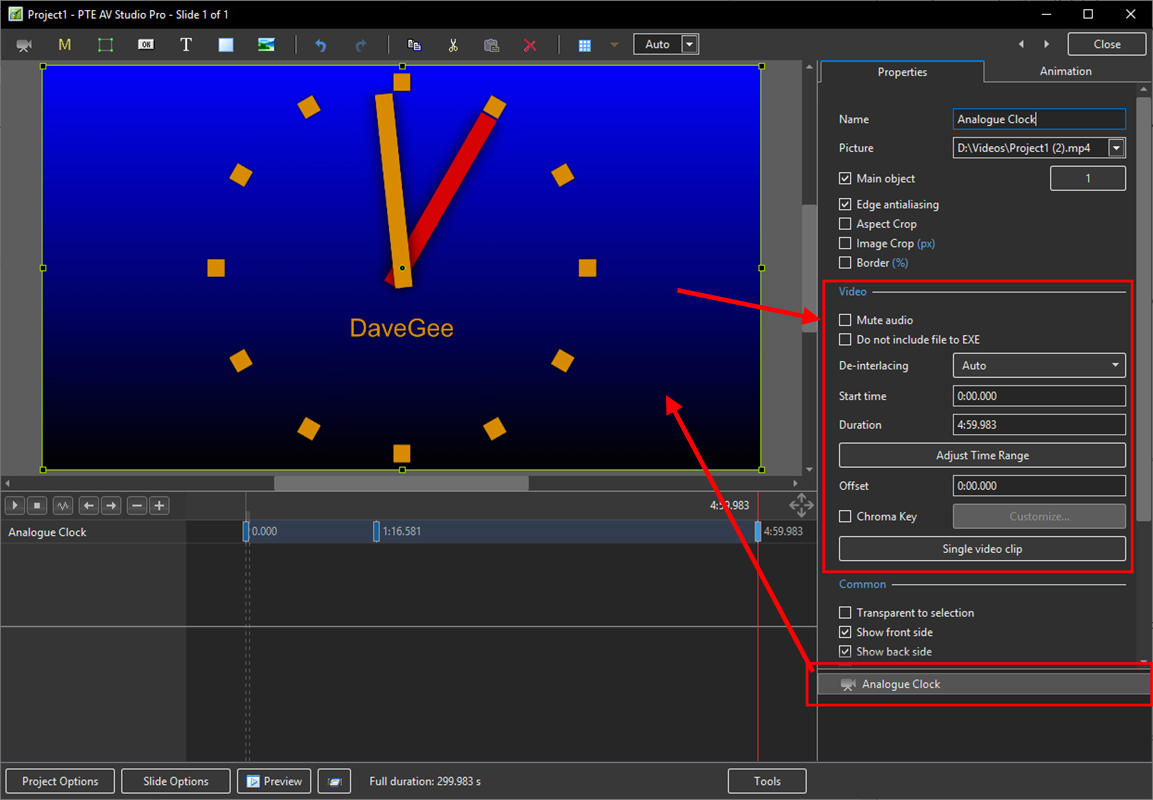
- Video - The location of the selected video clip is shown and the Video Clip could be changed here if required
- Main Object - Indicates Main Object of Slide and its index number (1) e.g. for using in a Style
- Edge Anti-aliasing - Reduces the effects of Aliasing - Further reading - External Link
- Do not include file to exe - Allows the file size to be kept low by linking to an external folder
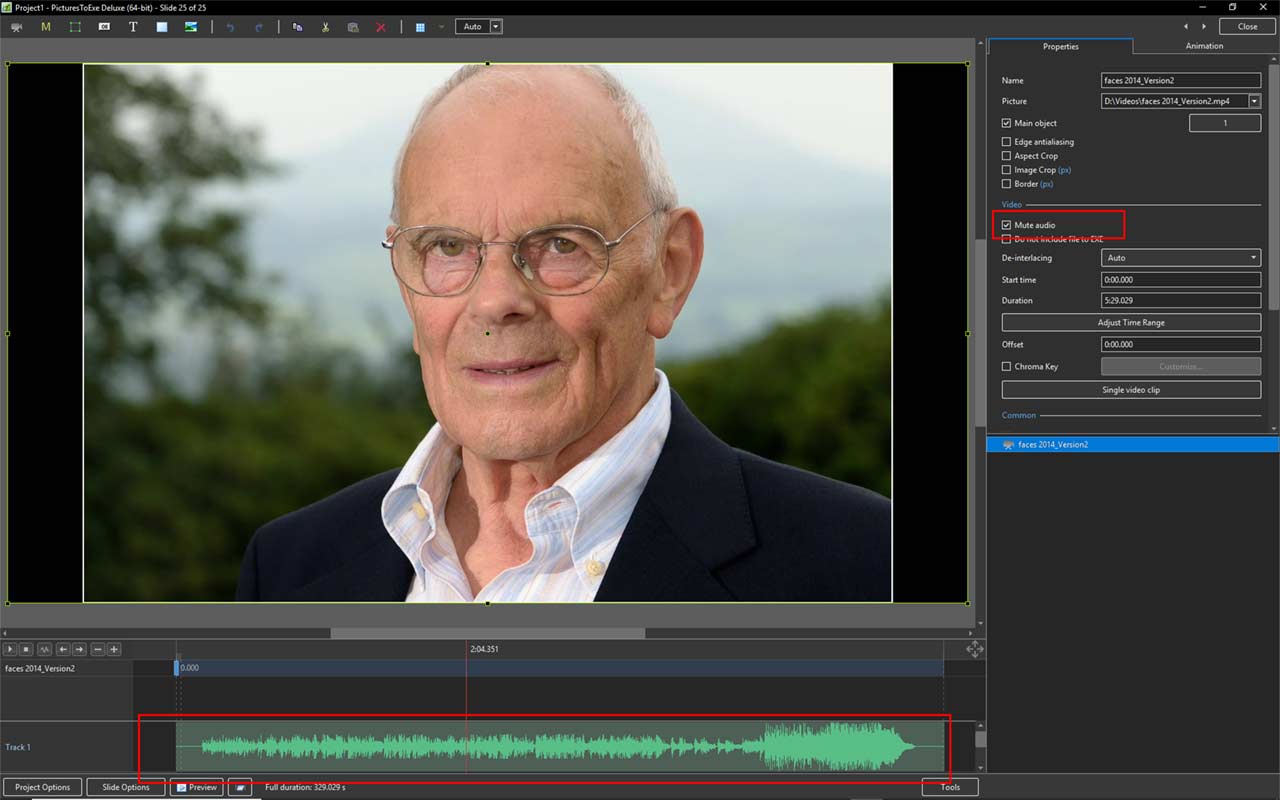
- Mute Audio - this can also be used when adding the Audio of the Video to an Audio Track to apply an envelope
- De-Interlacing - three options - Further reading - External Link
- Offset - Off sets the Start of the Video Clip with respect to the Start of the Slide
Clicking on the Adjust Time Range Button displays the following:
Not available in the Essentials Edition
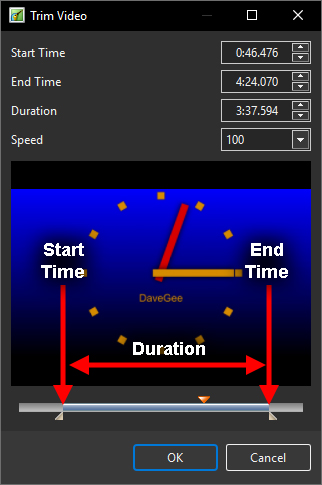
- Start Time - Adjustable via the Blue Trim Triangle
- End Time - Adjustable via the Blue Trim Triangle
- Duration - Video Clip Duration
- The “orange” triangle shows the current position (frame) in the video clip
- The Down/Up Buttons can also be used to adjust Start, End and Duration Times in 0.5/1 second increments
Speed - Slow Motion / Fast Motion Button
- Speed - The original Speed of the video clip can be changed. Variable between 50% and 100%. Note that it is interactive with Start Time, End Time and Duration (the Start and End Frames do not change)
Single Video / Master Video Button
- Single Video Clip plays only for the duration of the current slide
- Master Video track - If the same video is added to multiple slides the first instance of the video can be set to Master Video Track. All further instances on subsequent slides can be set to “Link to <the Master Video Track>”. The result is a Video clip running continuously over multiple slides.
Chroma Key
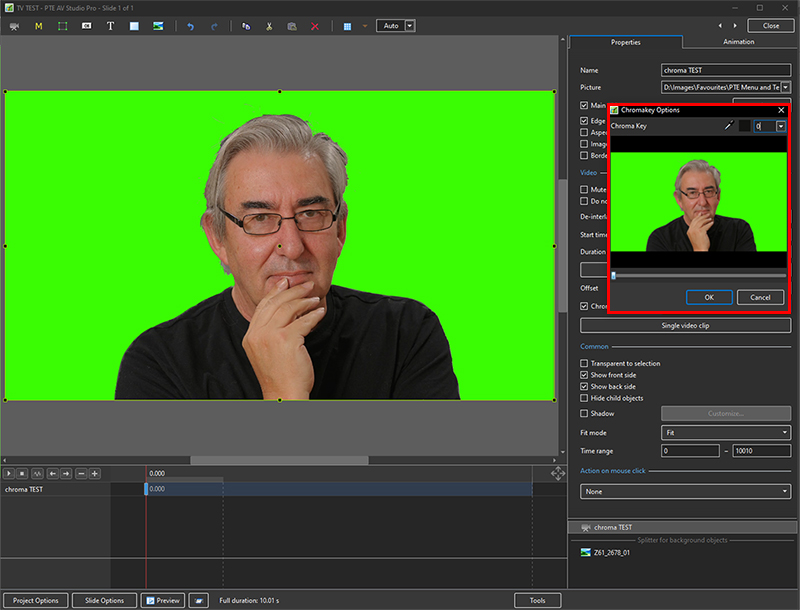
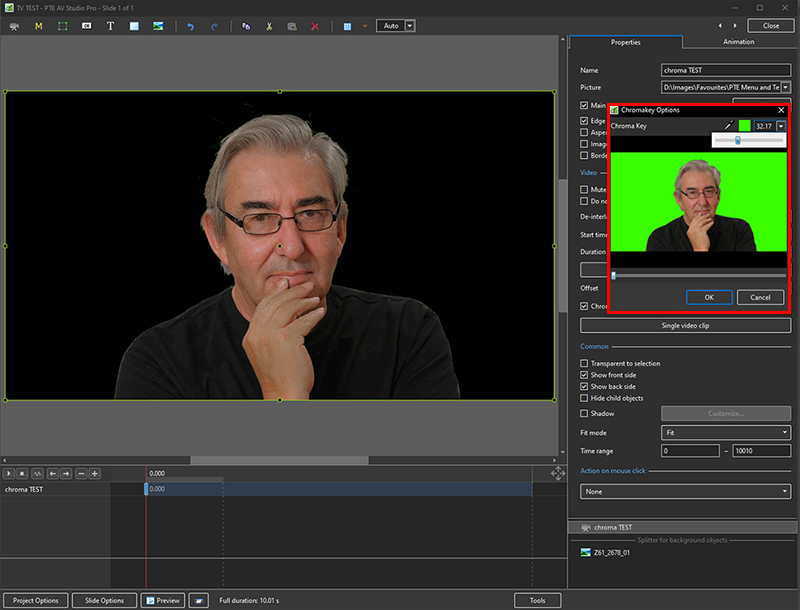
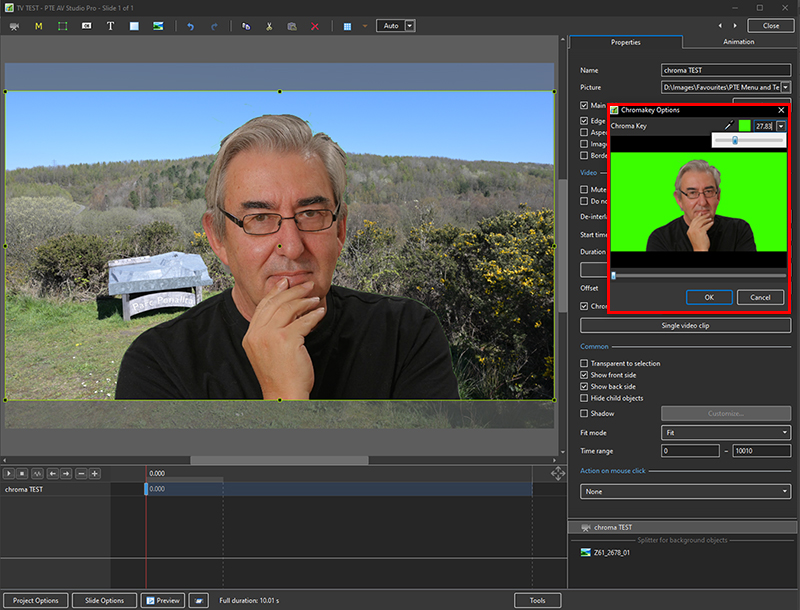
- Chroma Key allows for the placing of an Object in a Video Clip over an Image or another Video Clip by removing pixels of a chosen colour (range)
- In O&A, select the Video Clip and click on “Chroma Key” Customise in Properties
- In the Chroma Key Options box drag the Colour Sampler down into the Video Clip to select the colour to be eliminated
- Drag the dropdown slider to produce the desired effect (on black)
- Add an Image or Video Clip below the original Video Clip and continue to adjust the slider in the Chroma Key Options box for optimum effect
Adjust Video and Border
- Same as Framing
Separate/Extract Audio From Video
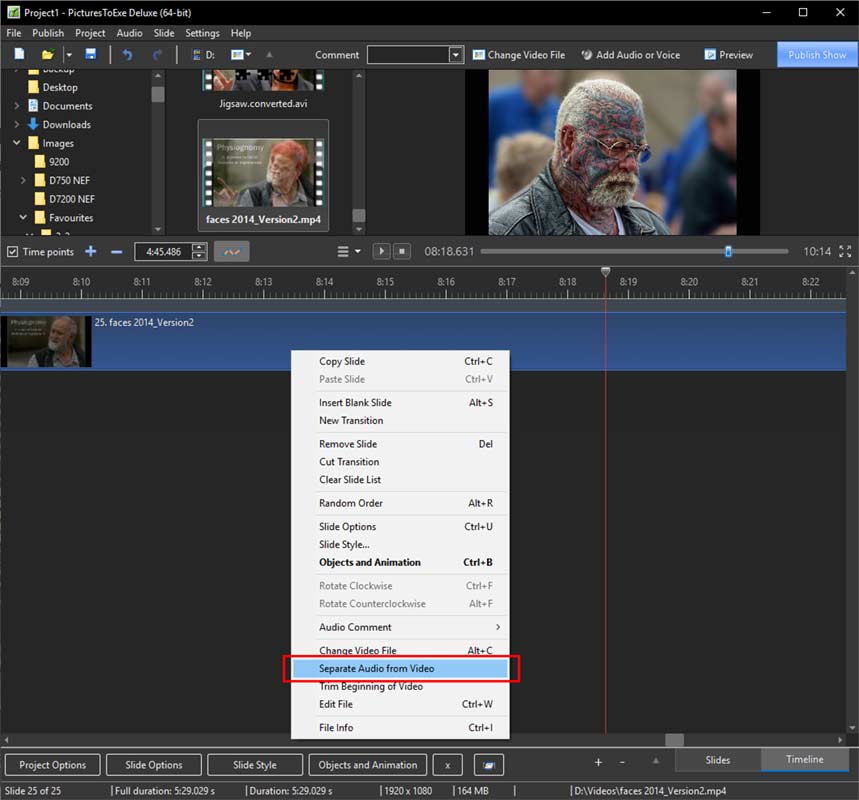
- Right click on Video in the Timeline
- Choose Separate Audio from Video in the pop-up menu
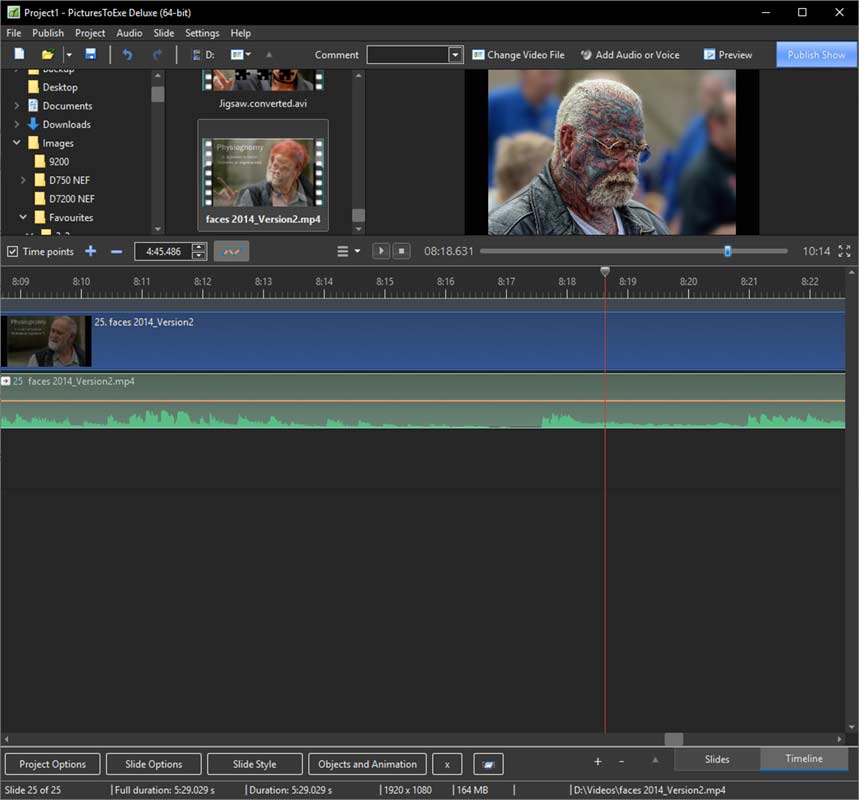
- The Audio of the Video is added to the first available Audio Track and the Audio contained within the Video is Muted in O&A Properties
- The Audio of the Video in its own track is linked to the Slide containing the Video
The Timeline View:
The Objects and Animations View:
