Table of Contents
Project Options
Main Tab
General
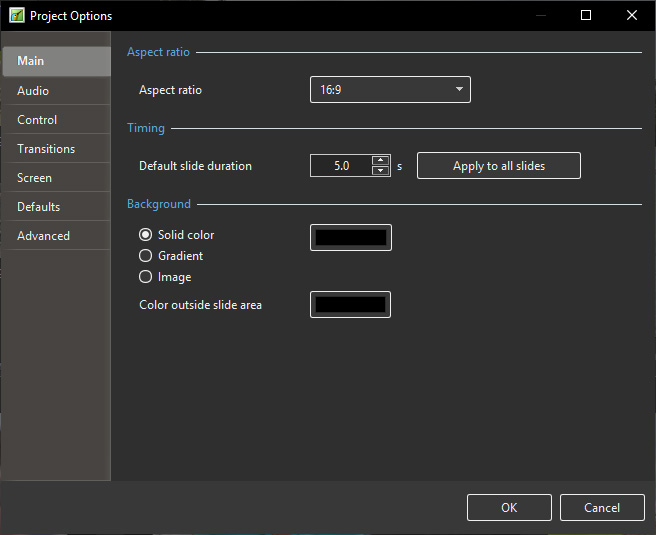
The “Main” tab is shown below :
- “Aspect Ratio” enables the desired aspect ratio of the display screen to be selected. Users should consider the parameters of the main display for the show when selecting aspect ratio.
- “Timing” allows setting of the default time for all new slides and can be applied to all existing slides. A useful technique for certain types of show is to start with a standard duration and then modify the times of individual slides to suit the required application.
- “Background” allows the user to specify the type and/colour of the Background for all slides.
Aspect Ratio
Aspect Ratio of Images
The aspect ratio of images from current cameras are normally:
- 3:2 - Typically 3000×2000; 6000×4000
- 4:3 - Typically 1024×768; 1600×1200; 4000×3000
- 16:9 - Typically 1920×1080
Aspect Ratio of Monitors
- 4:3 - Typically 1024×768; 1440×1080; etc
- 16:9 - Typically 1280×720; 1920×1080; etc
- 16:10 - Typically 1280×800; 1920×1200; etc
The Aspect Ratio of the Project
Typically, this chosen to suit the Aspect Ratio of either:
- The Camera Image's Aspect Ratio
- The User's PC Monitor
- The User's TV (Typically - 1920×1080 at the time of writing)
Matching these choices is a sometimes daunting task for the beginner. If you want the ease of inputting your camera's images into a show without cropping, then an Aspect Ratio for the Project is chosen to suit the camera. This might result in the Show having “black bars” at the sides or top and bottom of the Monitor or TV.
If you want your show to “Fill the Screen” on your monitor or TV then the Aspect Ratio must be chosen to suit. This might result in the Camera's Images not filling the width of the Project or being cropped at the top and bottom of the screen.
The example above shows the full screen view (left to right) of:
- A 4:3 image in a 4:3 Project on a 4:3 Monitor Screen
- A 3:2 image in a 3:2 Project on a 4:3 Monitor Screen
- A 16:9 image in a 16:9 Project on a 4:3 Monitor Screen
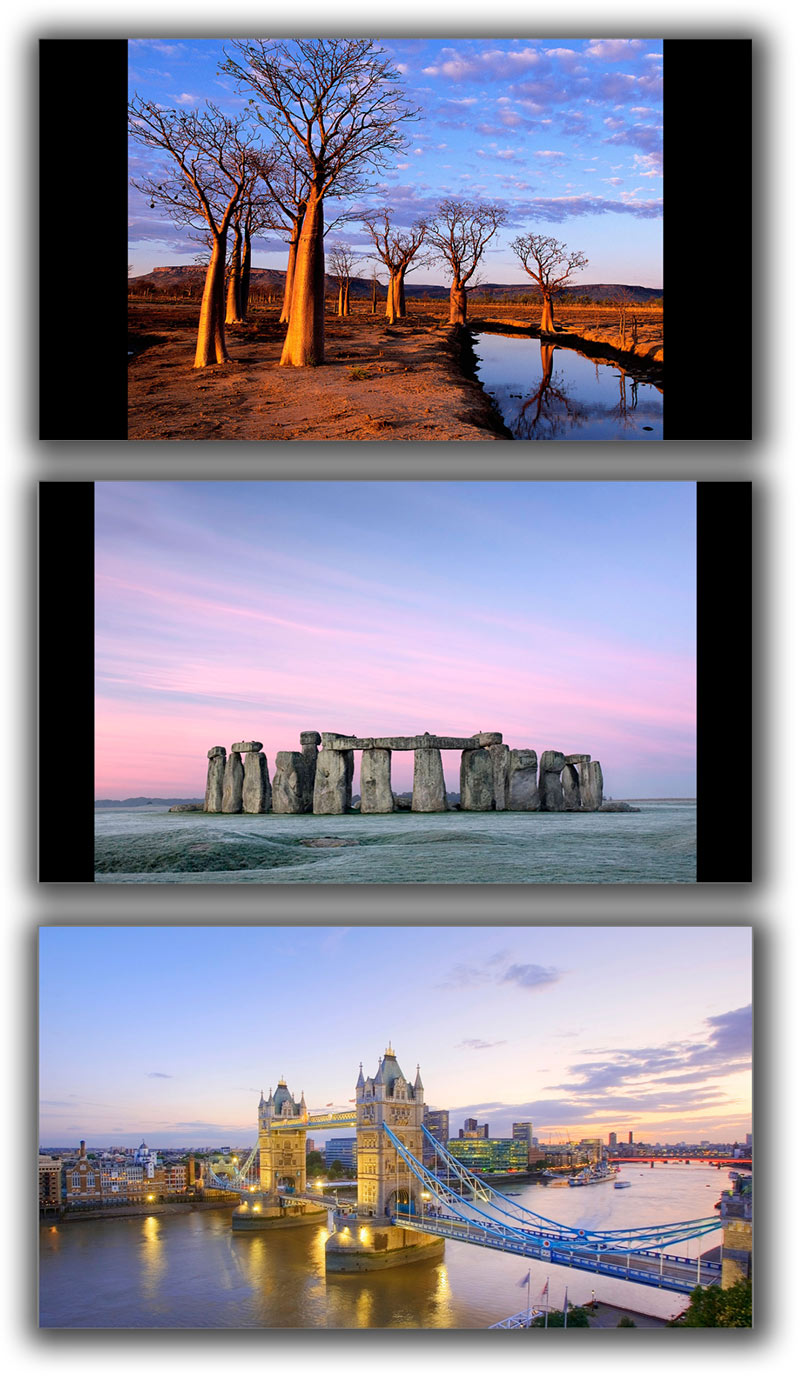
The example above shows the full screen view (top to bottom) of:
- A 4:3 image in a 4:3 Project on a 16:9 Monitor Screen
- A 3:2 image in a 3:2 Project on a 16:9 Monitor Screen
- A 16:9 image in a 16:9 Project on a 16:9 Monitor Screen
Which choice to make?
For the beginner, a starting point would be to make the Project Aspect Ratio the same as the Camera's Aspect Ratio. Images can then be dropped into a project without modification and immediately published as an EXE without further adjustments. As the user gets more proficient then choosing an Aspect Ratio to suit the output device (Monitor/TV) might be more appealing.
Audio Tab
Adding Audio Files:
In Project Options / Audio Tab
Supported formats are:
Audio MP3, M4A, FLAC, OGG, WAV, WMA.
Videos MP4, MOV, AVI, WEBM, MPG, WMV, and more.
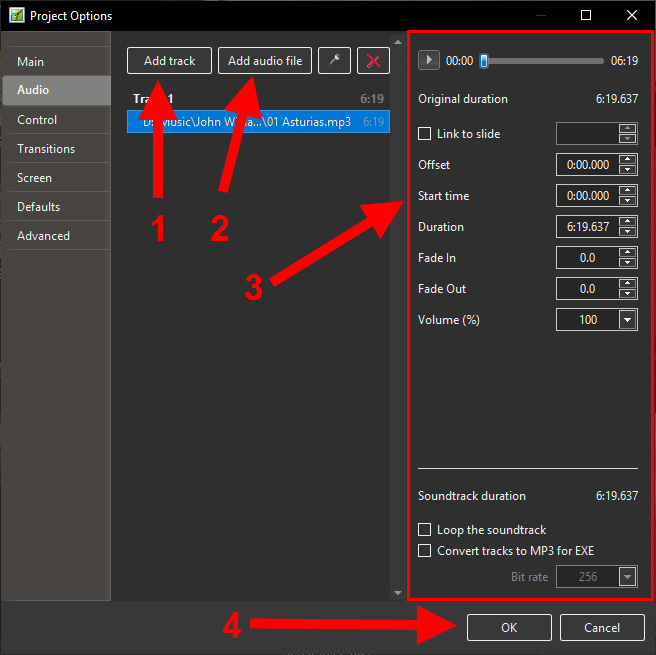
The following example shows a typical simple layout for the Project Options / Audio Tab:
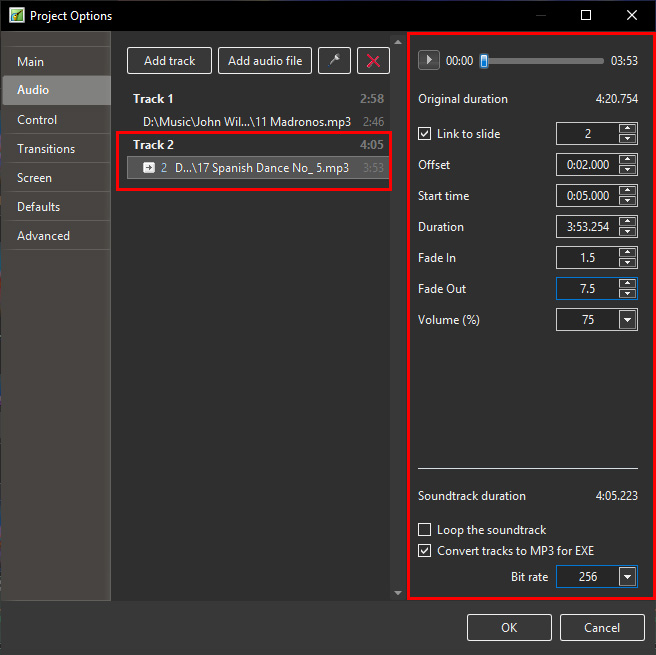
The Audio File in Track 2 can be seen to have the following properties:
The PLAY Button will play the 4min 20sec audio file in the highlighted Audio File for testing purposes
The Original duration of the file is 4min 20.754sec
The Audio File in Track 2 is linked to slide 2 and if slide two is re-positioned the Audio File will also be moved by the same amount in the Timeline (separate track).
(N.B. When an Audio Clip is initially linked to a slide its position may be adjusted manually using the “Offset” control - or dragged in the Timeline).
The Audio File is Offset by 2s with respect to the beginning of Slide 2 to which it is linked
The Start Time of the Audio File in Track 2 is 5s from the beginning of the original Audio File
The Duration of the audio file has been trimmed to 3m 53.254s
A Fade In of 1.5s has been applied to the Audio File in Track 2
A Fade Out of 7.5s has been applied to the Audio File in Track 2
The Global Volume of this track has been set to 75% of the original. Local variations are still allowed via the Envelope in the Timeline.
The total Soundtrack Duration is calculated as 3m 5.356s
All Tracks in the project will be converted to an MP3 at a Bit Rate of 256Kbps when an EXE file is created.(Not available in the Essentials Edition).
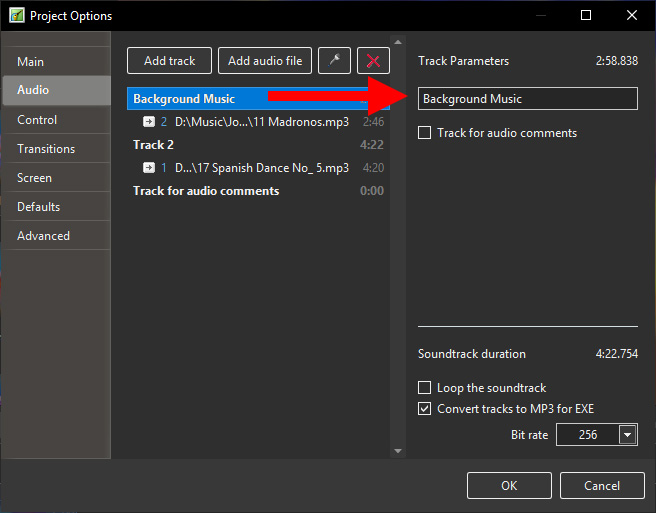
Renaming Tracks
A Track can be renamed and/or designated to be a “Track for Audio Comments”
Click on the Track to bring up the options
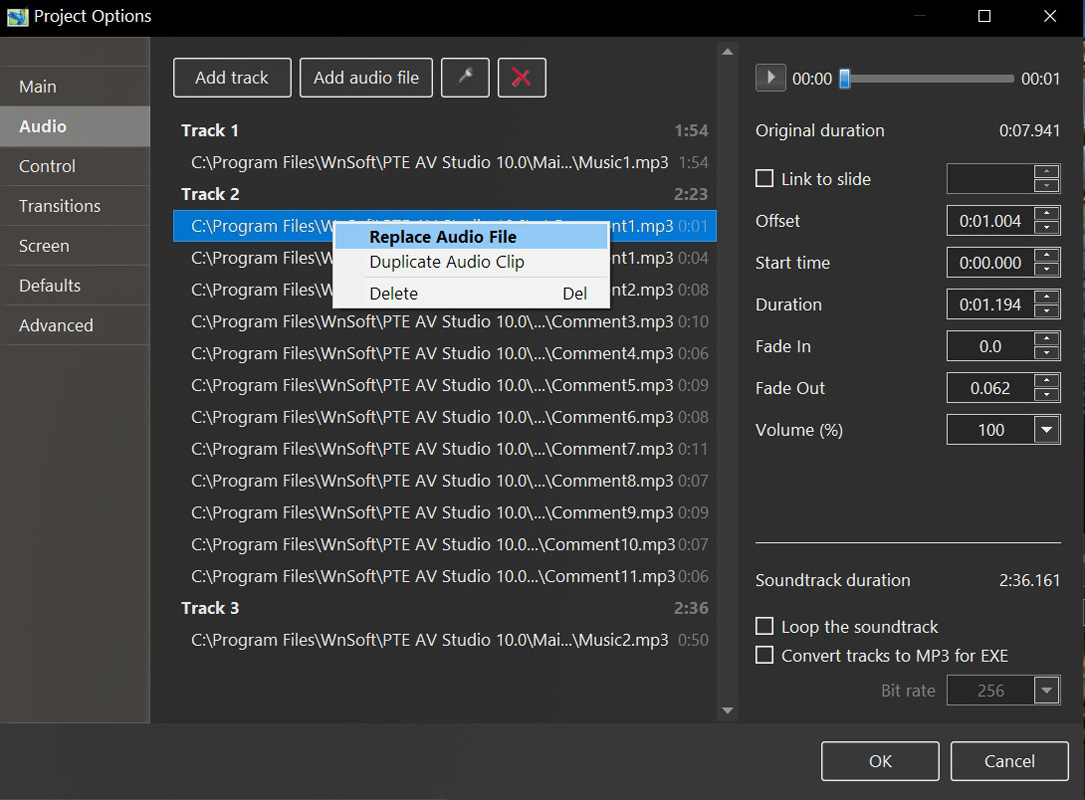
Right Click Menu
Convert tracks to MP3 for EXE
When this option is turned on, PicturesToExe automatically converts all audio tracks to a single MP3 audio for the EXE show. The Bit Rate of the converted file can be adjusted from 64 to 320Kbps. High values are better quality.
This option is useful if you work with audio clips in WAV format or adjust the duration of clips using the Envelope Function. See Envelope. For maximum efficiency when using this feature the use of WAV files is advisable, though not essential.
This option will optimize the size of the EXE file.
MP3 Recommendations
When preparing MP3 Audio files for use in PicturesToExe the following is recommended:
- Constant Bit Rate 128 - 256 Kbps
- Sample Rate: 44100 Hz
- Stereo
Separating the Audio of a Video Clip to an Audio Track
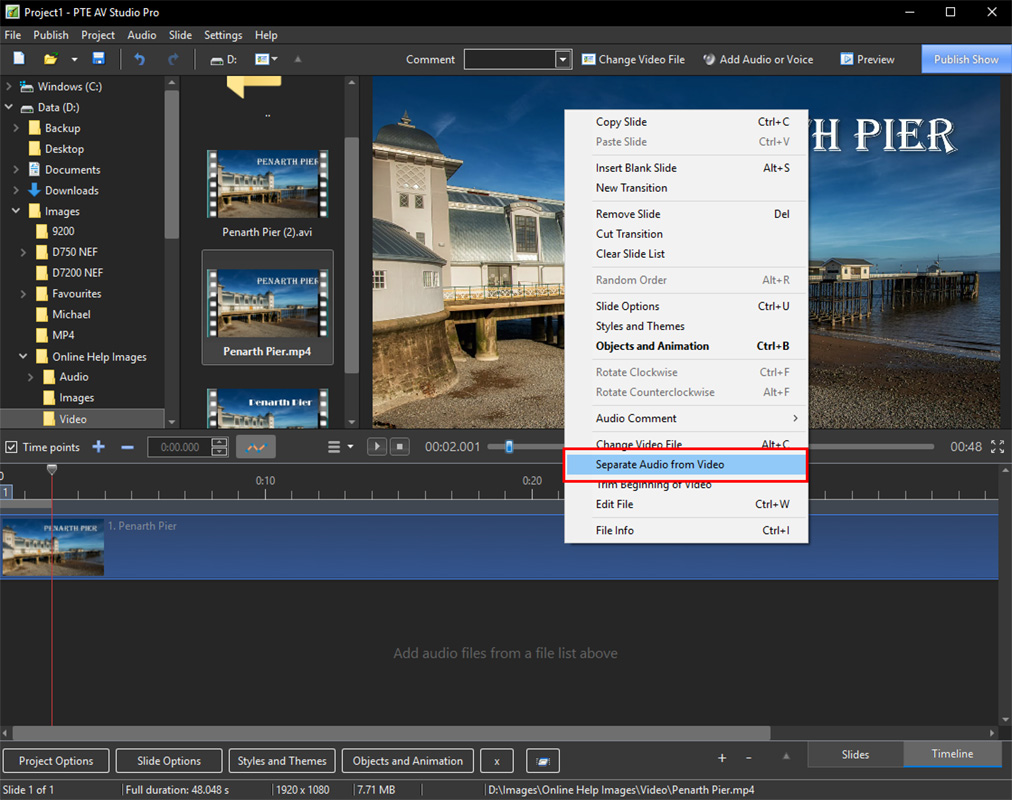
- The Audio of a Video Clip can be extracted from the Video Clip and added to a New Track in the Timeline for the purpose of Editing the Audio.
- In the Timeline, right click on the Video Clip and choose “Separate Audio from Video”.
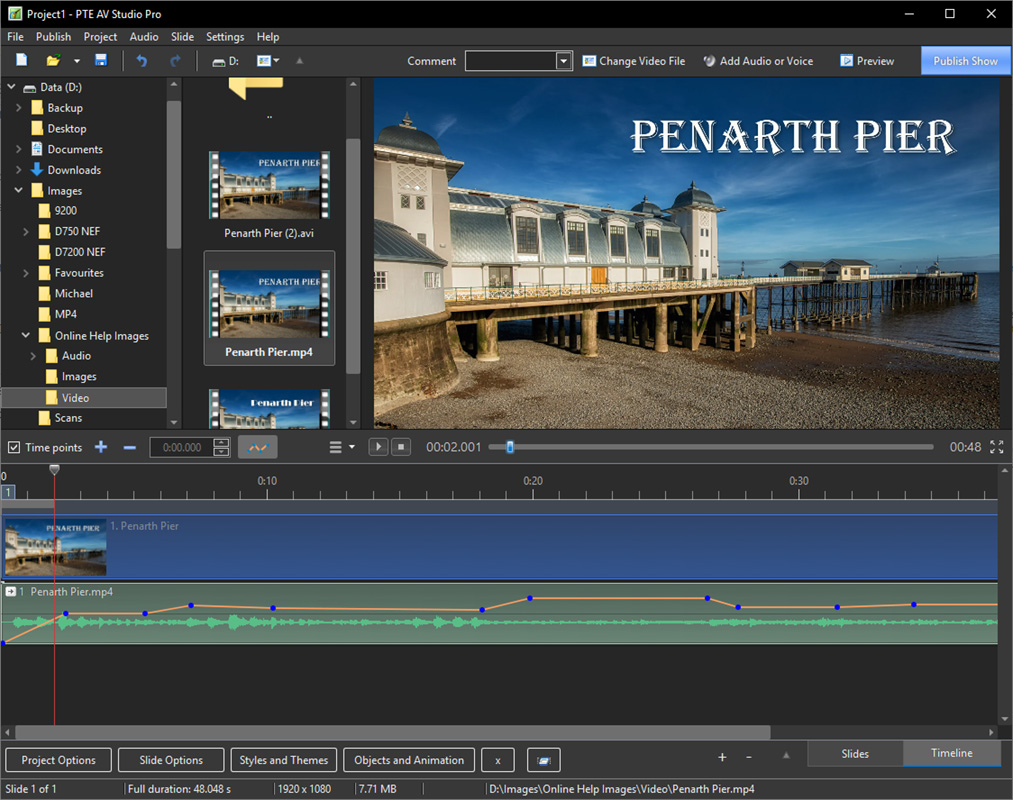
- The Audio of the Video Clip is extracted and added to a new track for editing with the Envelope etc
- The Audio in the Video is automatically MUTED in Objects and Animation
Adding Audio or Voice Comments
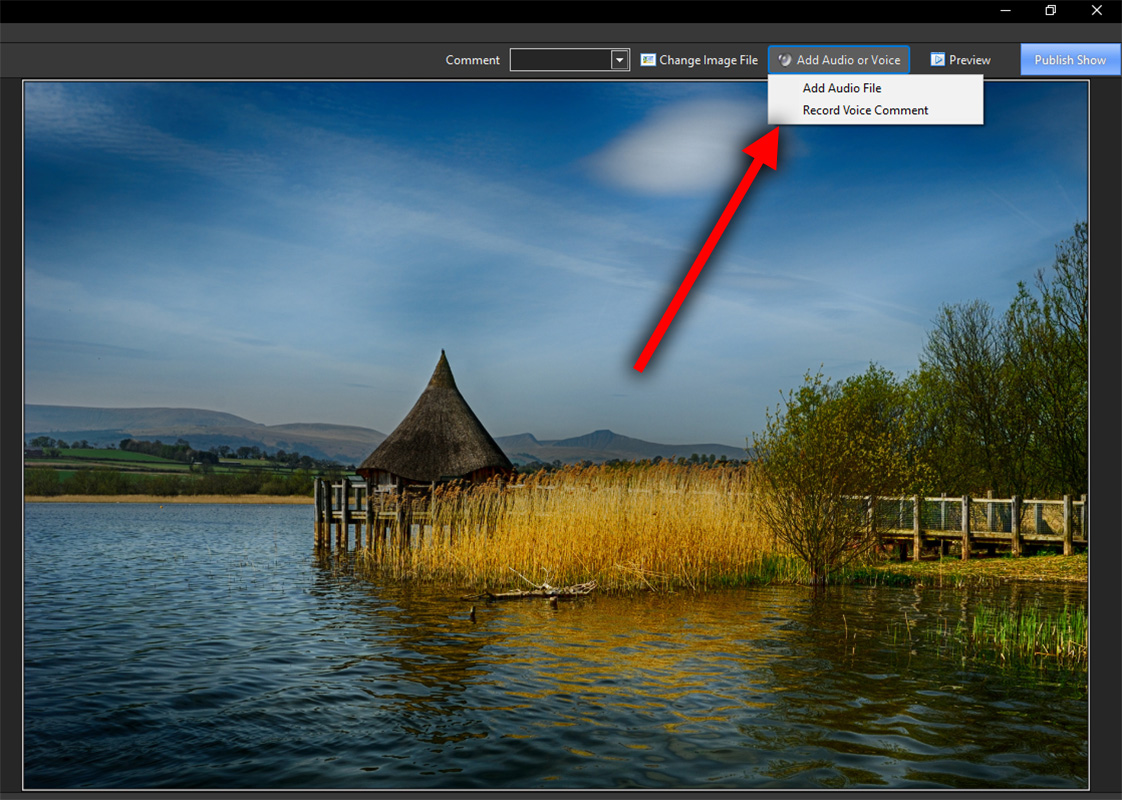
Audio Clips and/or Voice Comments can be added to a Slide using the “Add Audio or Voice” Tool or by clicking on the “Microphone” icon in the Project Options/Audio Tab.
Click on “Add Audio File” to browse for the required Audio File and clicking on “Open” adds the file to an empty track. It can then be positioned in the Timeline and its envelope adjusted as required.
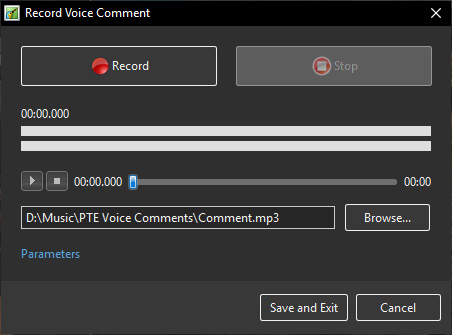
Click on “Record Voice Comment” to see the following:
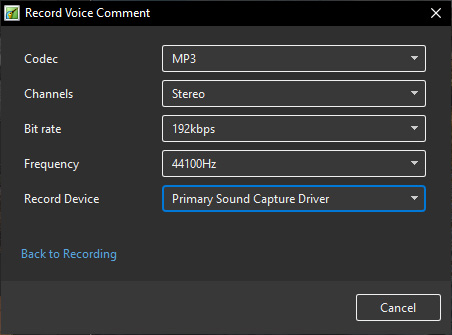
Click on Parameters to make adjustments to the File Type etc
- You can choose to record as MP3 or WAV
- You can choose Mono or Stereo recording
- You can choose Bit Rates from 32 to 320kbps
- The Recording device will vary according to the users system
When finished you can return “Back to Recording”.
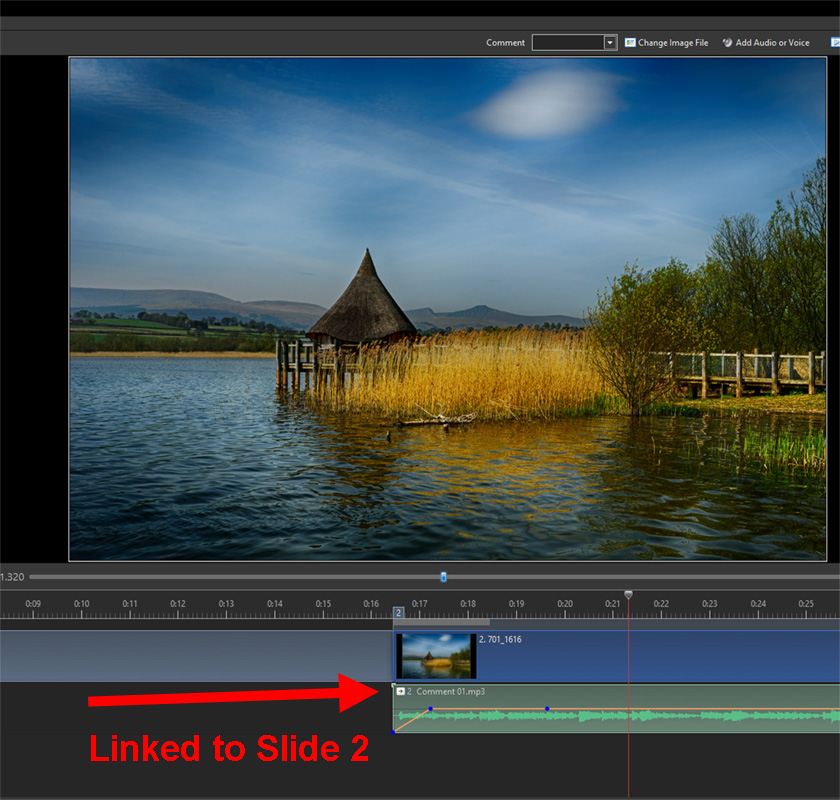
Click on “Record” to start the recording and “Stop” when finished. The Voice Comment is added to an empty track and linked to the current slide.
It is also possible to record the Voice Comment in “real time” while the Mini-Player is running or in the Audio Tab of Project Options.
N.B It is not possible to Automatically Adjust or Lower the Volume of the Background Track when a Voice Comment is added / played. Lowering or adjusting the Volume of the Backing Track must be done Manually using Keypoints in the Envelope Function of the Audio Track.
Also see Timeline View
Control Tab
Show Settings
- Action after last slide:
- Close Show
- Repeat Show
- Stop Show
Keyboard
The “Keyboard” section:
- Wait for key press …. - Selecting this option enables a show to be controlled manually and applies to the whole show. An alternative method is to use the settings in “Slide Options/Main”, but note that this applies to individual slides only. Note also that this option works whether the second option is selected or not.
- Permit control of show using keyboard - This second option is provided to enable the user to override the default time of individual slides. For example the slide duration may be 10s. By selecting this option the next slide in the Slide line can be made to appear before the 10s has elapsed.
For many shows, it is likely that a user would leave these two options un-selected.
Mouse
The second section deals with mouse actions. These settings are independent of the “Keyboard” settings.
Various alternative actions are available. Most of these should be self-explanatory. The “mouse wheel for rewinding” allows the show to be re-wound when in the play mode.
Navigation Bar
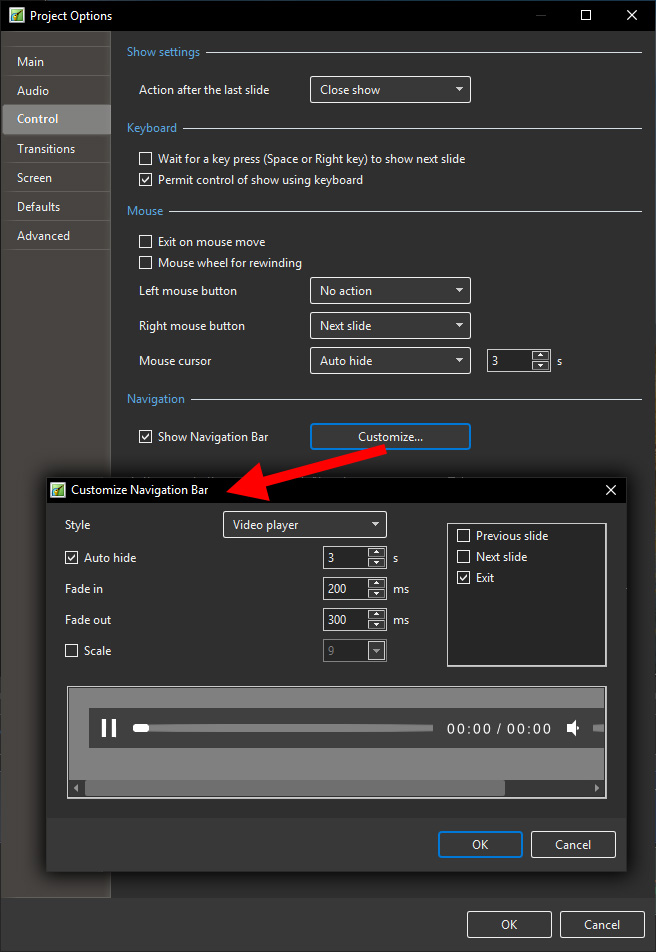
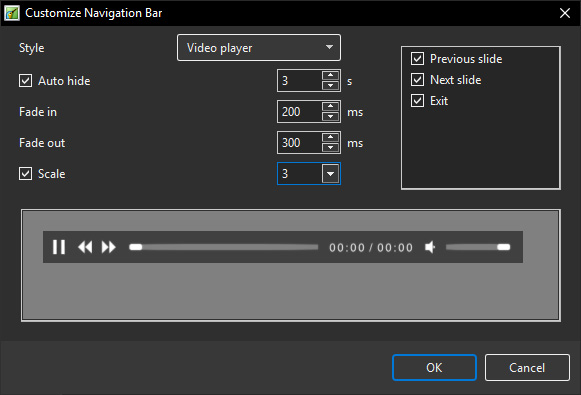
The last section controls operation of the “Navigation Bar”.If “Show Navigation Bar” is selected, an additional dialog box shown below opens when the “Customize” button is clicked and a navigation bar opens on screen during playback. This enables the user to perform various operations as specified in the customize dialog box. Note that the show needs to be set to “wait for keypress…” or individual slides set to “wait for keypress to show next slide”, if a manually operated slide show is required.
- Styles Options are:
- Air Style
- Sky Style
- Video Player Style
Transitions Tab
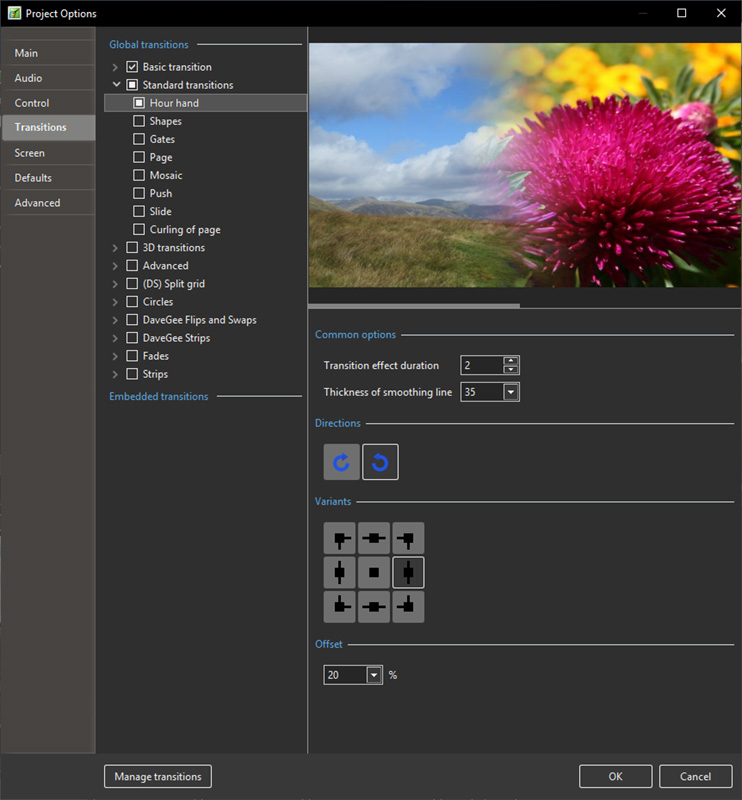
The “Transitions” tab is shown below with one of the various types of transitions selected to show the range of controls which can be applied to each transition. The range of parameters which can be controlled varies with the type of transition selected. The default transition is “Dissolve”. At the top righthand side is a viewer which shows the effect of the transition selected.
Selections made here become the Default Transitions for the Project.
See also:
Screen Tab
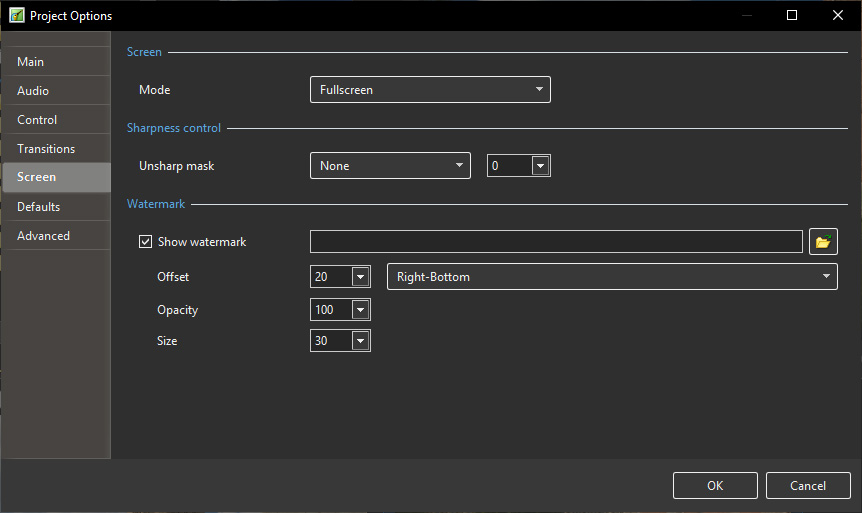
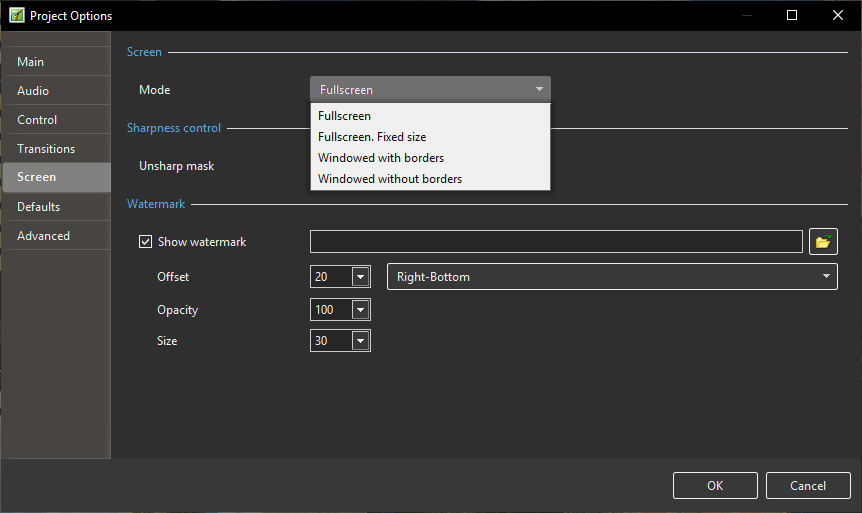
Mode
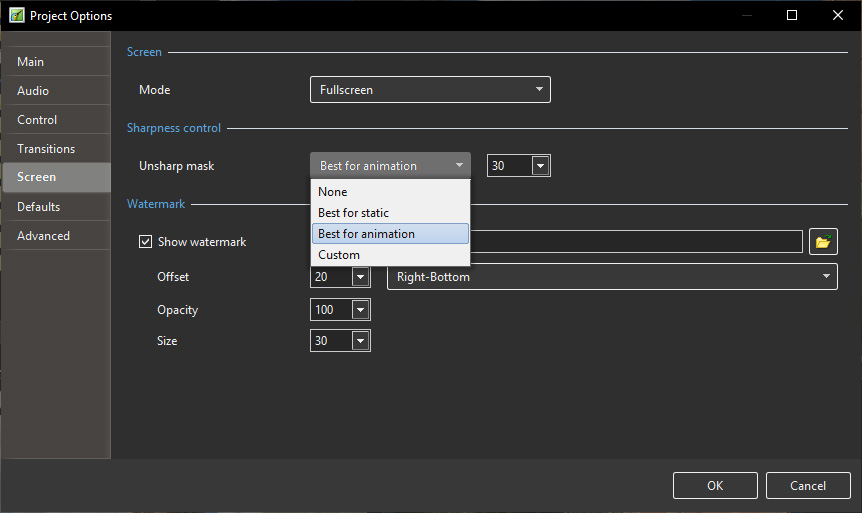
Unsharp Mask
- Unsharp Mask applied here will affect all objects in all slides in the whole Project
- The effect can be viewed in real time in the SLIDE VIEW
Watermark
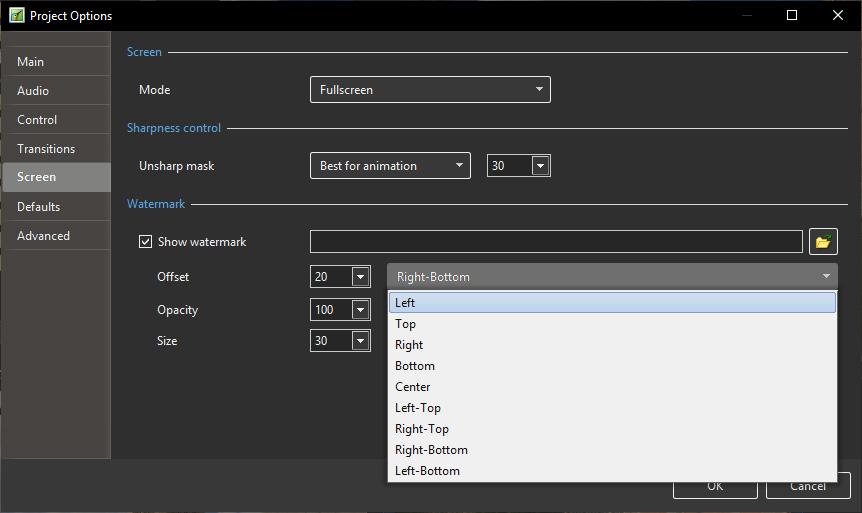
- Add a Watermark
This enables the user to add a watermark to all images. Select a file to use as a Watermark via the Browser and adjust the parameters as required.
Defaults Tab
This Tab is not available in the Essentials Edition.
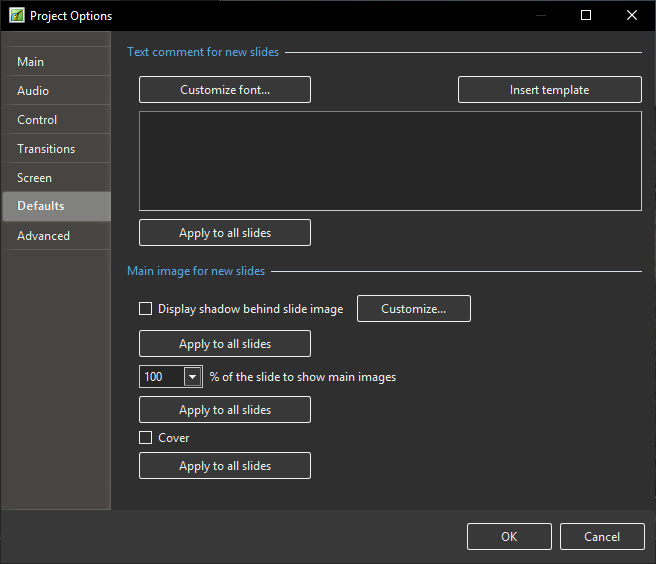
The “Defaults” tab with its 2 sections is shown below :
Main Image for New Sides
If “Display shadow behind slide image” is selected, the “Customize” button will allow the parameters of the shadow to be selected, e.g. color/size/shape etc.
The next control affects the size of the slide ; if the slide size is 100% then no shadow will be seen. Note also that this control can be used in conjunction with the “Screen/Background” tab to control the background color on which the slide appears. The “Apply to all slides” button should be used as described previously to apply the changes to all slides already inserted into the Slide line.
If Cover is ticked then all new slides will be in Cover Mode - (See O&A Properties / Fit Mode)
Apply to All Slides will make this setting for all existing slides
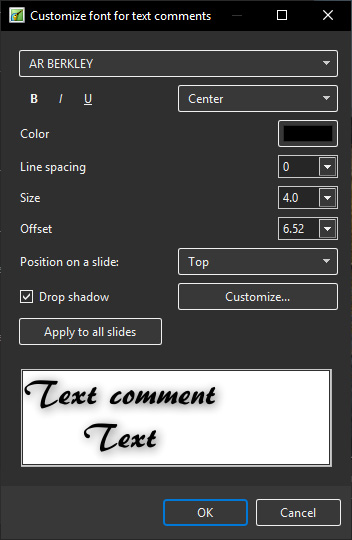
Text comments for new slides
This provides a facility to insert text into slides and control the text formatting. The normal practice is to click on the “Insert template” button and choose the text required to be inserted.
The code for this text will then appear in the box below the “Customize font” button.
Additional text items can be added if required. When all the text items have been added, clicking the “Customize font” button will reveal the dialog box shown below and the added text can be formatted as required.
A comment is required regarding the point in time at which this setting is applied.
If applied BEFORE any slide have been added to the Slide list, then the text additions will apply to all slide subsequently added.
If however this setting is selected AFTER slides have been added, then the “Apply to all slides” button must be clicked to ensure that the change is applied to all the currently added slides.
Note also that if the user wishes to remove the added text, it is necessary to go into the dialog box, deleted the text and then click the “Apply to all slides” button to remove the text from all added slides.
Advanced Tab
This Tab is not available in the Essentials Edition.
The “Advanced tab with its 3 sections is shown below :
Enter the properties required to Protect a show with Password etc
Advanced Options
Custom Window:
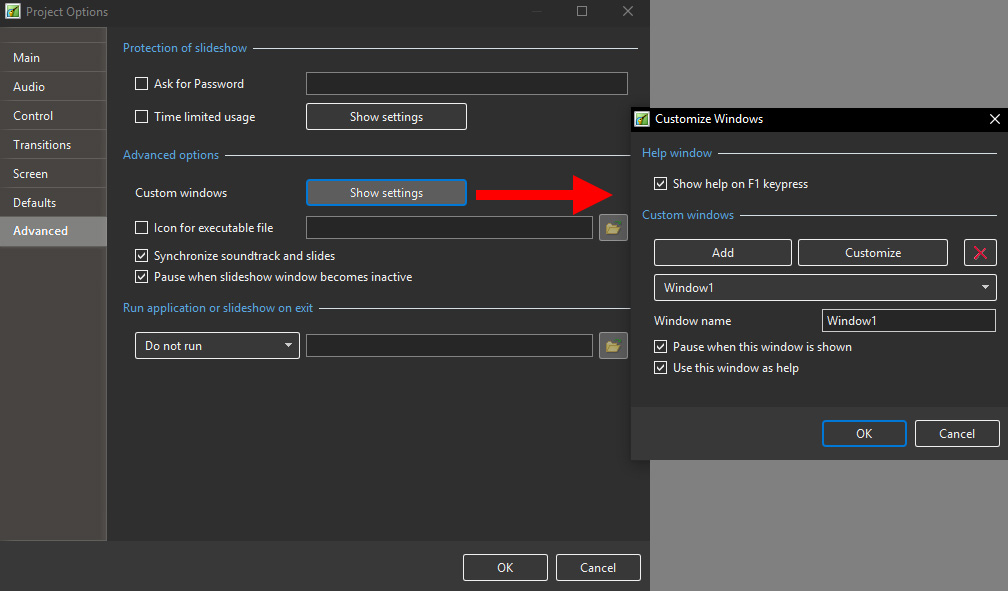 Click on “Show Settings” Click on “Add” to create as many Custom Windows as require
Use the Drop down Menu to select a Custom Window to Customize.
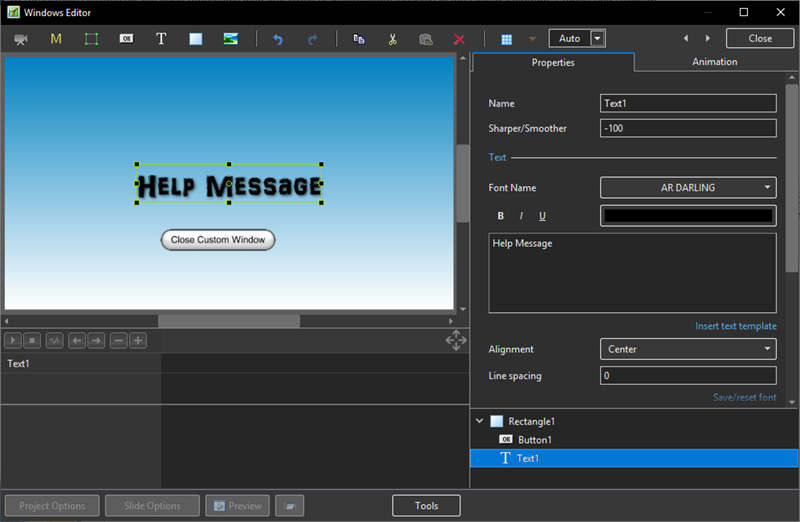
Click on “Customize” to create / adjust the appearance of the Custom Window - see illustration below
An “Action on Mouse Click” can be programmed to show the Window and configured in Objects and Animation
See also - Objects and Animations / Action on Mouse Click Properties Tab
Add a rectangle
Add a Text Box with the message that you want to display etc
Add a Button configured to “Close Window” when clicked
Click on “Close” and OK the action (twice)
Please go to Objects and Animation Properties Tab Display a Custom Window
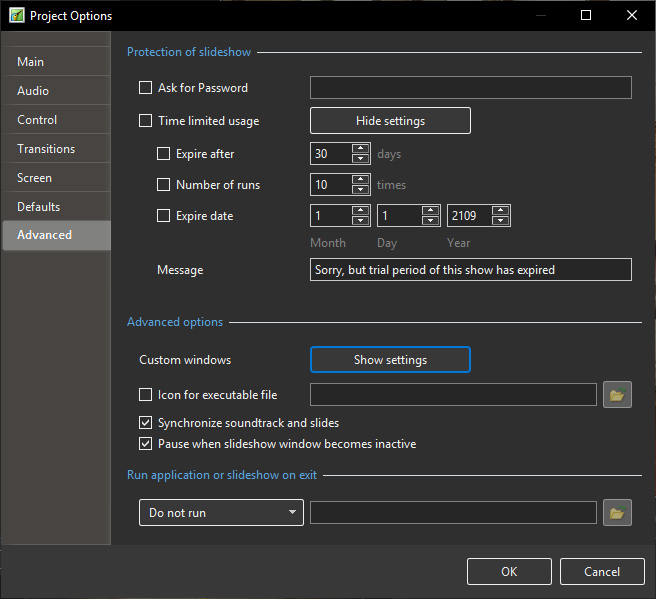 Time Limited Usage This enables a limit to be placed on how long a Pictures To Exe application can be run. If selected a dialog box opens which allows various expiry options to be selected.
Assign icon for executable file:This allows the user to select an icon from those stored on their computer or from an icon which has been created.
The chosen icon will be associated with any exe file created from Pictures To Exe
Synchronize soundtrack and slides: It is recommended that this option is ALWAYS selected. If not, when playing a show from part the way through, the associated audio tracks will start from the beginning whereas the slides will start from the chosen position;
Pause when slideshow becomes inactive: If selected, the slideshow will pause in its execution if the focus is moved to another application which is running.
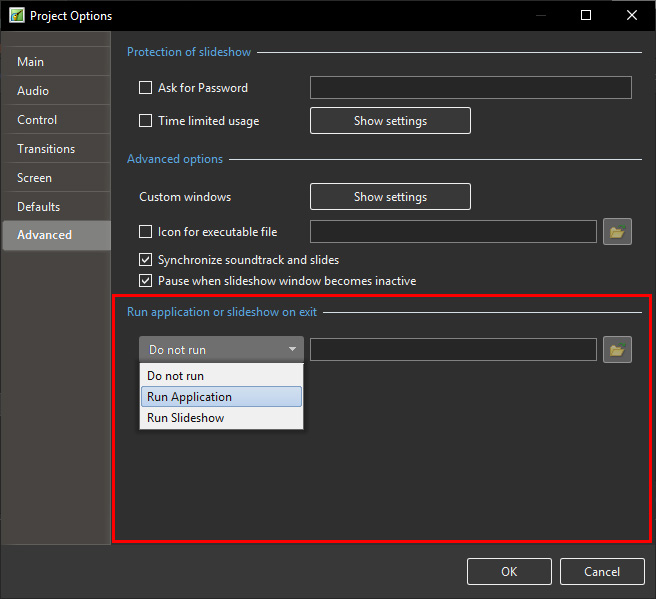
Run Application or Slideshow on Exit
The final section “Run application or slideshow on exit” provides a feature to enable a subsequent application to run on completion of a show. This feature can be used to chain a number of shows together into a single continuous process.
When Run Application or Run Slideshow are selected the follow Window appears and shows the Options available.
