Table of Contents
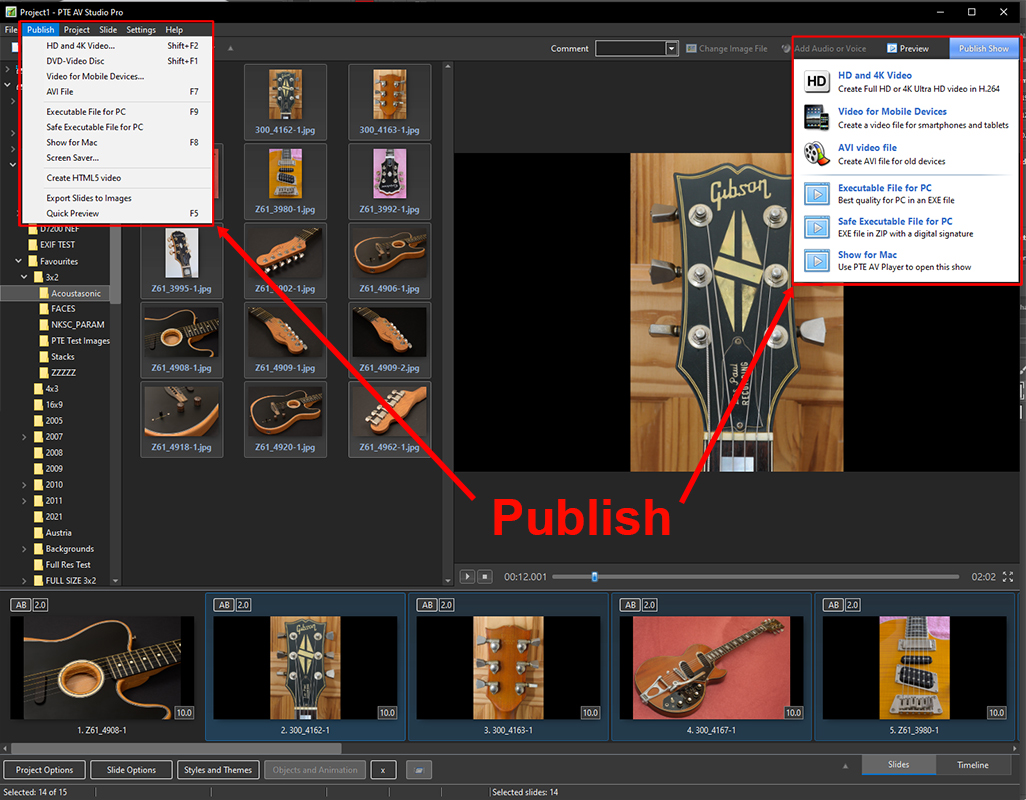
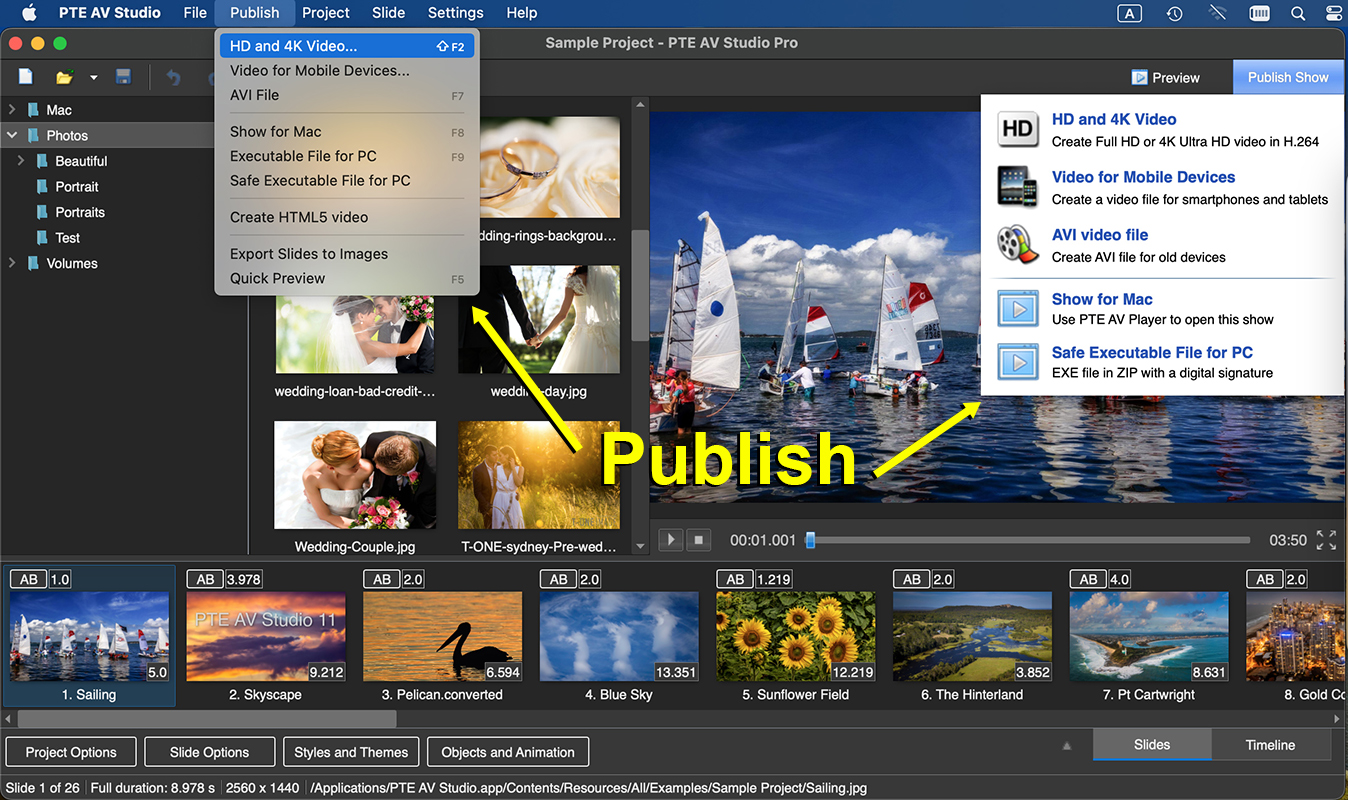
The Publish Menu
The "Publish Show" Button
(“Export Show”)
If selected from “Settings/Preferences/Toolbars”, a “Publish Show” button can be added to the Main Window toolbars. This provides further information on the “Publish” options and these are described below.
The Options are:
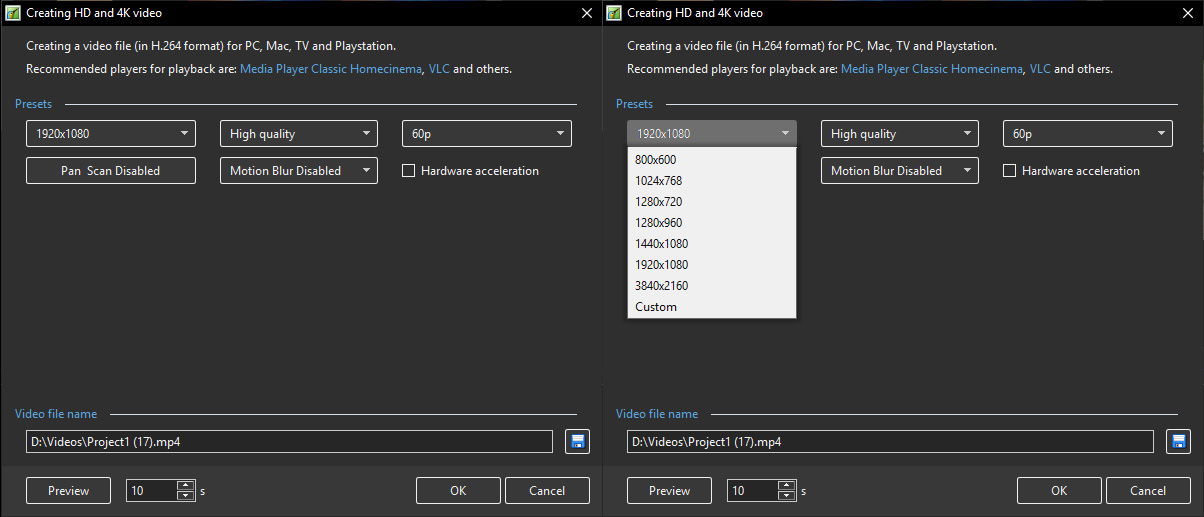
HD and 4K Video
PTE AV Studio supports Output of UltraHD 4K video (3840 x 2160).
Creates high quality MP4 Video File (H.264)
The Project should be saved before clicking on the option - if you have not done this you will be asked to Save the Project.
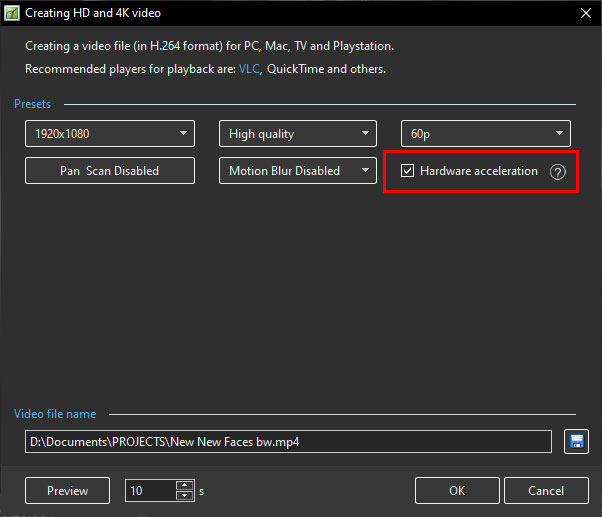
The available options are shown above.
- Normal settings for TV playback are 1920×1080 and High Quality
- All of the presets work well
- Please be aware that some older TVs do not support 60p MP4
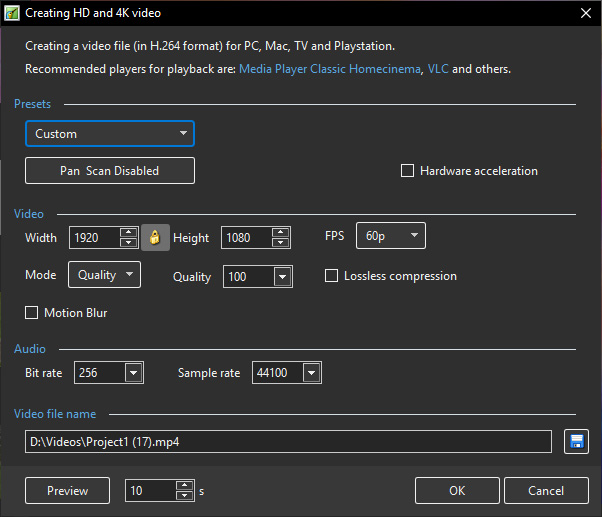
Clicking on Custom reveals further options:
Quality Mode - Set Quality 0-150
Bit Rate Mode - Set a Bit Rate
The Video File name is the same as the Project Name and the location will default to the same as the Project location.
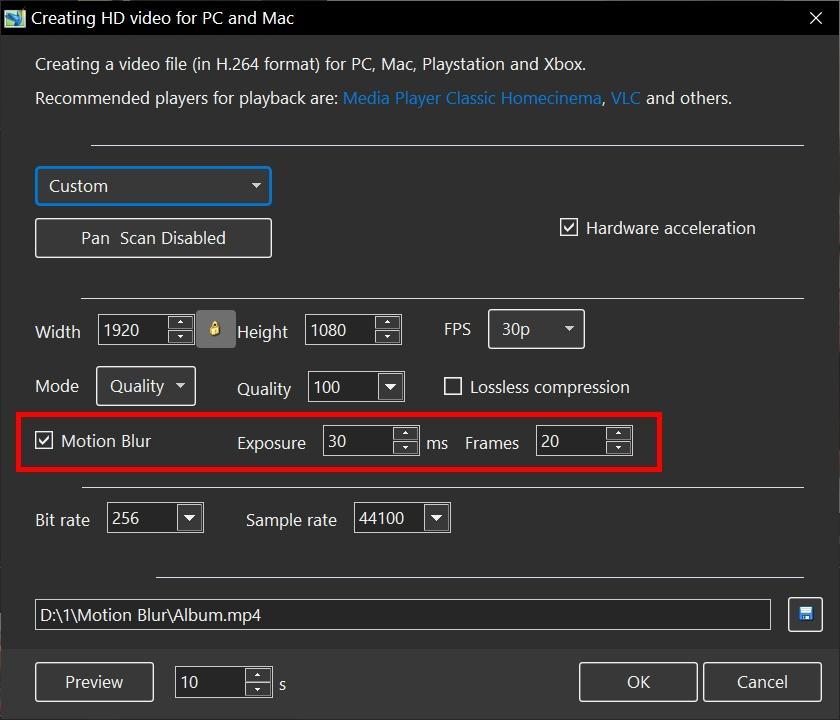
Motion Blur
Motion Blur simulates an exposure in a video camera and fast moving objects will be blurred.
Motion Blur option is applied only to animations of PTE objects (not for video clips).
You can adjust 2 parameters:
1. Exposure (in milliseconds). We recommend 10 ms.
2. This parameters affects to a quality of Motion blur. A higher value gives better visual result. I recommend to use 20-30 frames for normal cases.
Using of Motion Blur option slow downs video encoding by 2-3 times.
All professional video editors offer Motion Blur option for video output. All professional computer graphics clips and movies use Motion Blur effect.
You can use the PTE project to test Motion Blur: https://files.wnsoft.com/test/Push.zip
Examples:
Hardware Acceleration
With “Hardware acceleration” option PTE AV Studio uses hardware video encoder from graphics card (NVIDIA, AMD or Intel).
Benefits: usually works faster, CPU is not used, CPU stays cool and silent.
Negative effect: visual quality worse, file size larger by 5-10%.
Hardware acceleration gives better visual quality on NVIDIA graphics (Geforce 1030 or newer) than on AMD / Intel.
It is recommended to use Hardware acceleration for a draft (or preview). Or when you encode very long project and you want to save time. Hardware encoder is especially useful for producing 4K video to save time.
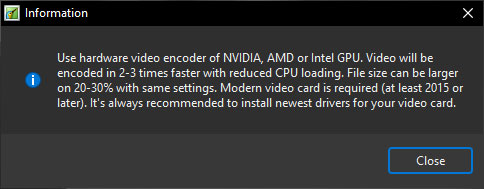
Note the Information:
HW encoder is available in Macs with Apple Silicon chips (M1, M2, etc).
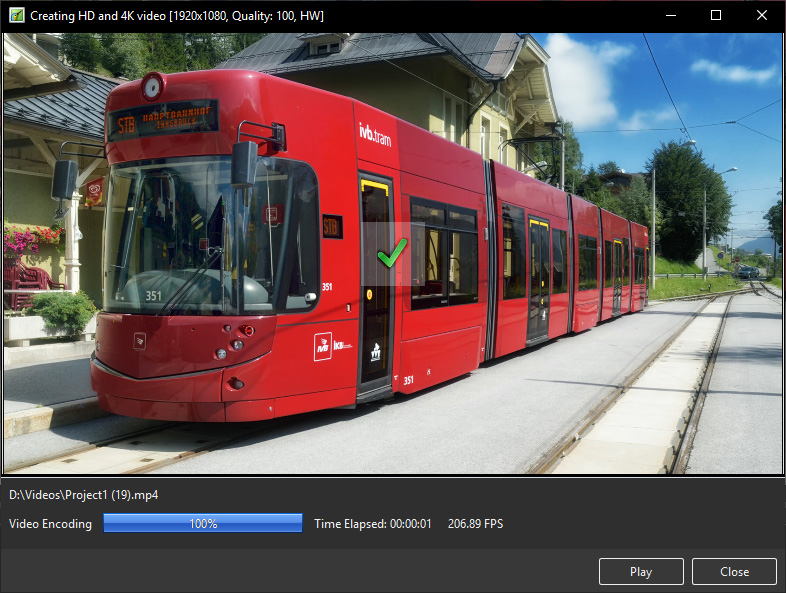
Click Convert to start the encoding. The Progress Window is shown below:
When the encoding is completed you can view the video on a PC. Media Player Classic - Home Cinema is recommended for PC. You can also transfer the file to a USB device and view the video with the USB Device plugged into a suitably equipped Television or Blu Ray Player connected to a Television via HDMI.
Video For Mobile Devices
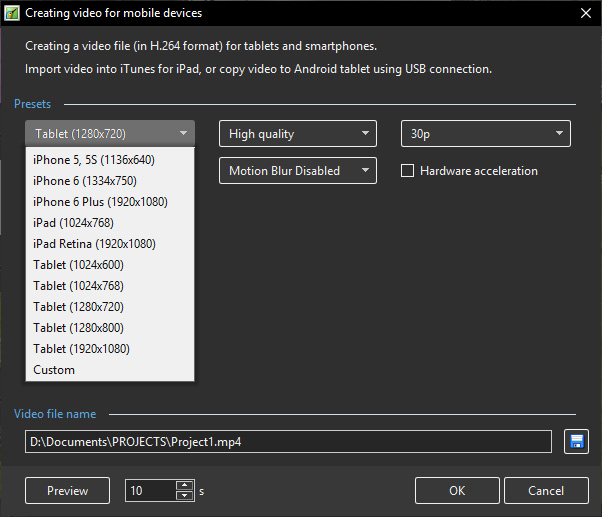
Creates a Video File for smartphone and tablets
The Preset Device Options (above):
- iPhone 5, 5s
- iPhone 6
- iPhone 6 Plus
- iPad (1024×768)
- iPad Retina (1920×1080)
- Tablet (1024×600)
- Tablet (1024×768)
- Tablet (1280×800)
- Tablet (1920×1080)
- Custom
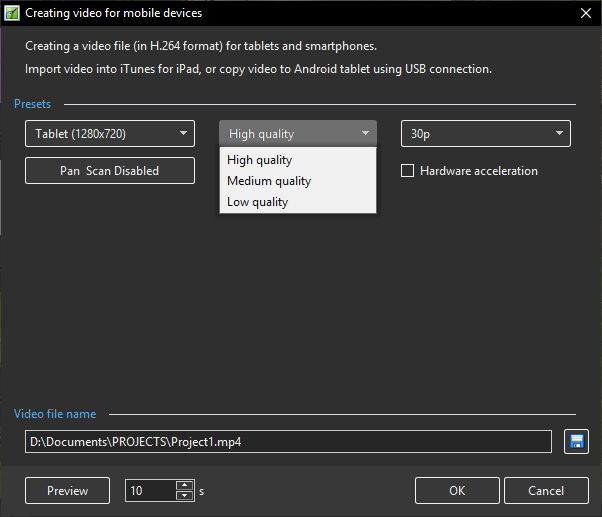
The Preset Quality Options (above):
- High Quality
- Medium Quality
- Low Quality
- Pan and Scan (Enabled or Off)
Pan and Scan
- Pan and scan is a method of adjusting widescreen film images so that they can be shown in full screen proportions of a standard-definition 4:3 aspect ratio television screen, often cropping off the sides of the original widescreen image to focus on the composition's most important aspects.
AVI Video File
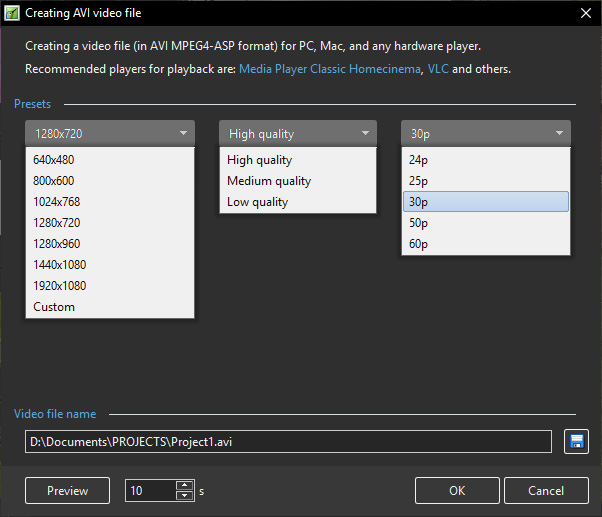
Creates AVI File with SD or HD Quality
The Presets:
The Presets for Resolution, Quality and Frame Rate are shown.
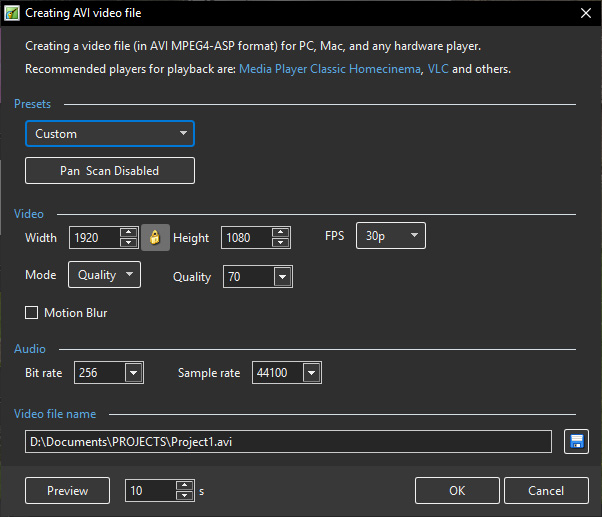
For the more adventurous, click on Custom:
Executable File For PC
- Best Quality for PC in an EXE File (F9)
- Give the EXE a Name and Location and press Save.
- Double click on the Saved EXE to run.
Safe Executable File For PC
- EXE File in ZIP with digital signature
- Give the EXE a Name and Location and press Save.
- The result is an Application and a digitally signed ptshow file in a Zipped Folder.
- This can safely be uploaded to a sharing site etc for Download. The Zipped File can be Extracted to a Folder in Windows and the slideshow can be run from the Application File.
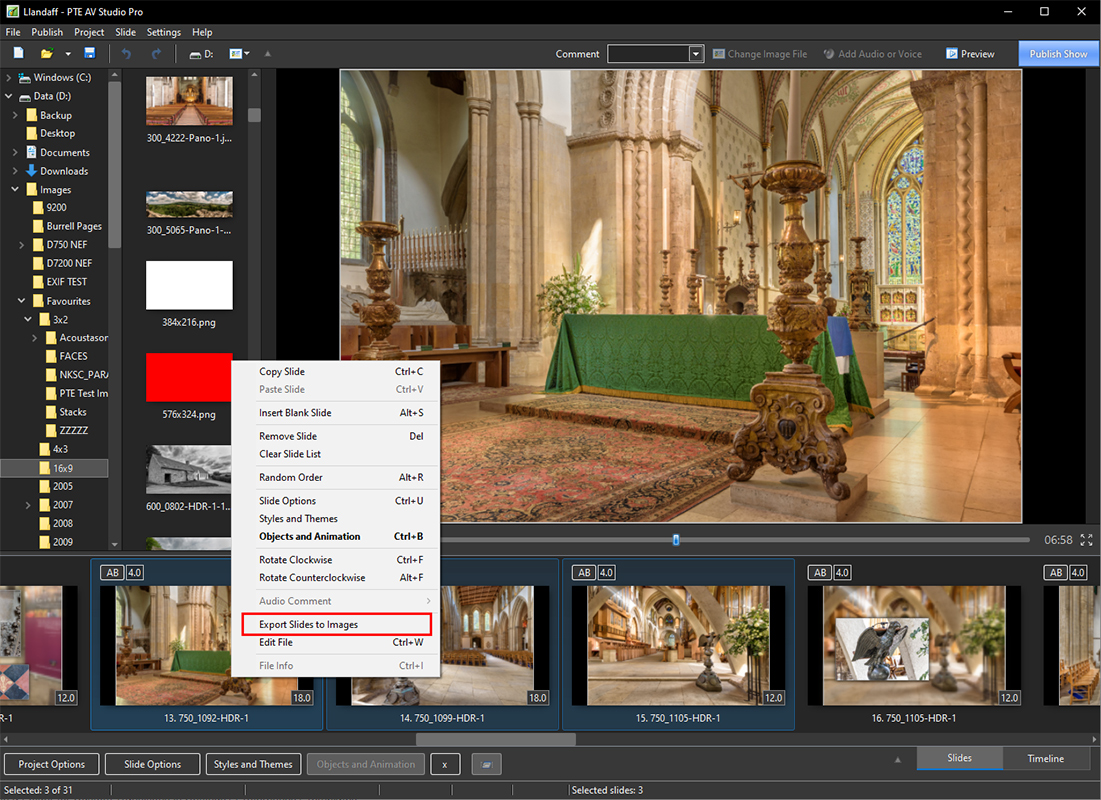
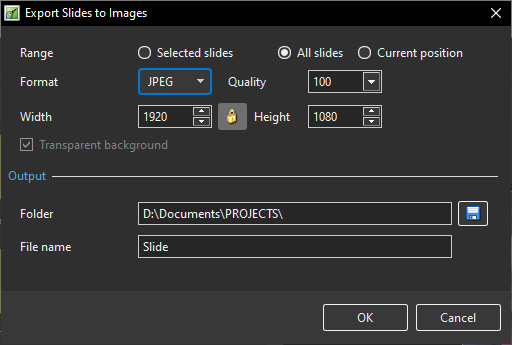
Export Slides as Images
- Range - choose from Selected Slides, All Slides or Current Position of Cursor for a single Slide
- Format - choose from PNG or JPG and set quality
- Set Width and Height of output
- Choose Transparent Background (on or off) for PNG output
- Choose Folder and File Name
The MAC Publish Show Menu
Command line options
Command line parameters in executable shows for Windows
You can pass some parameters for your EXE shows created in PicturesToExe.
For example,
myshow.exe -slide 5 - run slideshow from slide No. 5.
myshow.exe -slide x - run slideshow from slide No. x.
myshow.exe -cover - enlarge slide to cover all screen without black strips. For example, when screen is 16:9 and slideshow 4:3.
myshow.exe -display x - this parameter allows to run a show on secondary display. For example: -display 2
myshow.exe -nomouse - hides mouse cursor, disables mouse clicks, hides Navigation bar, disables double click. This option can be useful for a projection of EXE shows on AV competitions.
myshow.exe -icc auto | sRGB | AdobeRGB | anyprofile.icc - set color space for your show according your display
myshow.exe -noicc - disables loading of color profiles from JPEG and PNG images.
Additional information:
On Windows use commands like this:
MyShow.exe -slide 2
On Mac in Terminal window:
open -a “PTE AV Player” MyShow.pteav –args -slide 2
Any supported PTE AV Studio options after prefix –args …
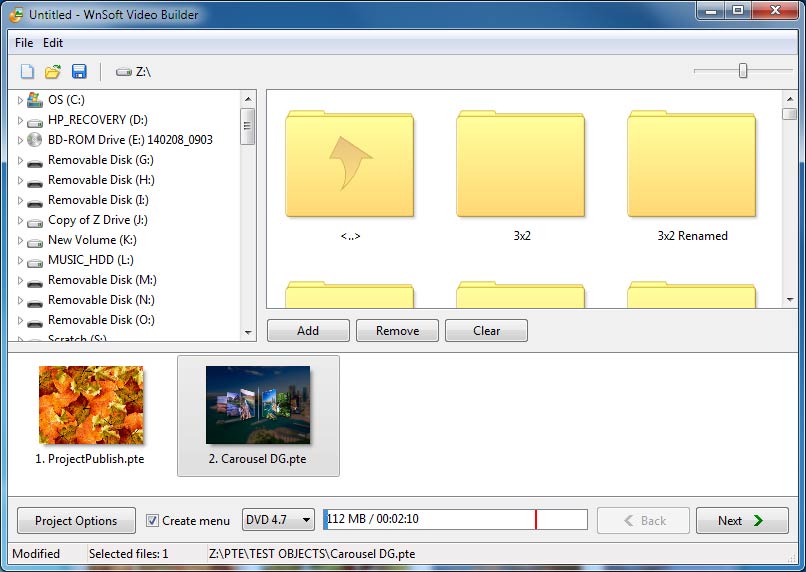
DVD-Video Disc - Video Builder
- PTE AV Studio doesn't include VideoBuilder for DVD output by default.
- For compatibility and for needs of existing users we included VideoBuilder as add-on:
- In the Main menu > Publish > click DVD-Video disc (Shift F1) - (not in the Publish button menu)
- PTE will offer download and install VideoBuilder in one click. It will take 5..20 seconds
- Now DVD-Video output option will appear in the Publish button menu and in the main menu > Publish
For Players connected to a Television.
Click on Publish and DVD-Video Disc.
If the currently open project has not been edited since opening then you will be taken directly to the VideoBuilder interface. If the currently open project was created in an earlier version and not edited, it is recommended that you Save As a different version before entering the VideoBuilder.
If the currently open project was edited after opening then you will be prompted to Save the Project before continuing. You cannot proceed without saving so if you want to keep the original project intact then a Save As is required.
Add one or more Projects to the Project List by dragging from its location. The current project is added by default.
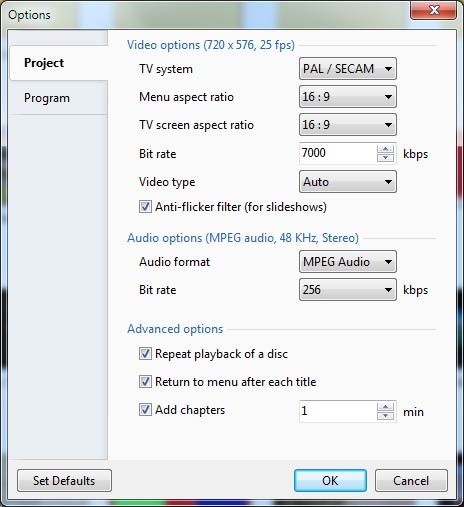
Click on (VideoBuilder) Project Options:
- In the above example the Menu Aspect Ratio (AR) and the TV screen Aspect Ratio have both been altered from the Default 4:3 AR.
- Repeat playback of a disc is possible
- Return to menu after each title is also possible
- Chapters can be added at any desired interval.
- You can Restore Defaults whenever necessary
In the Program Tab of (Video Builder) Project Options you can set
- Idle Priority
- Location of Temporary Folder
- Click OK to exit Project Options
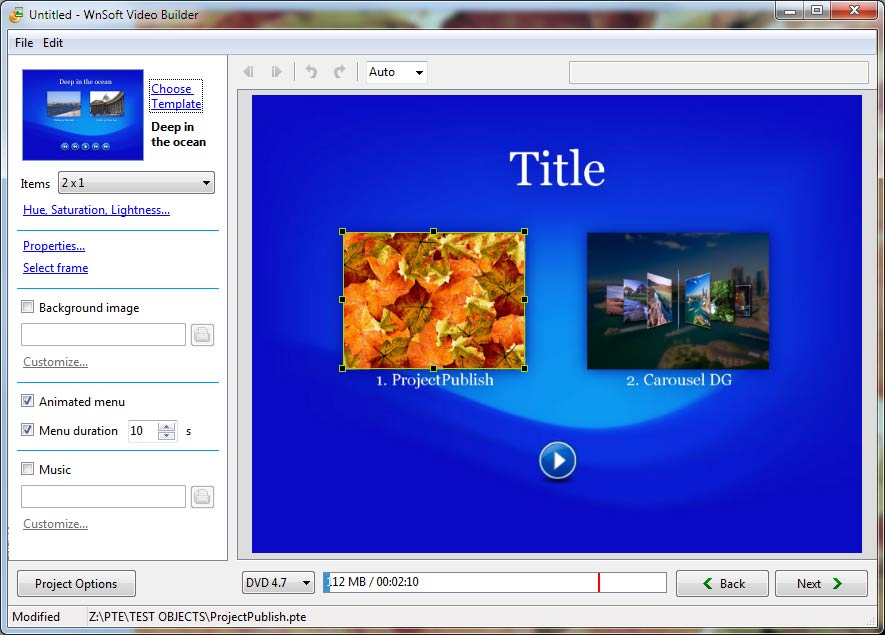
In the Video Builder Main Menu you can set “Create Menu”.
Click on “Next”.
- You can “Choose Template” from several presets and/or add your own
- Items allows you to organize multiple Project Icons into a variety of Column and Row configurations
- Hue, Saturation and Lightness allows you to change the color of the chosen Template
- Properties allows you to alter the Position, Size and Opacity of the Project Icon.
- You can also add a Drop Shadow
- Select Frame allows you to choose a frame in the video to show in the Project Icon
- You can add a Background Image to replace the Template and Customize it
- You can choose to Animate the Menu and set the duration of the menu
- You can add music to the the Menu and Customize it
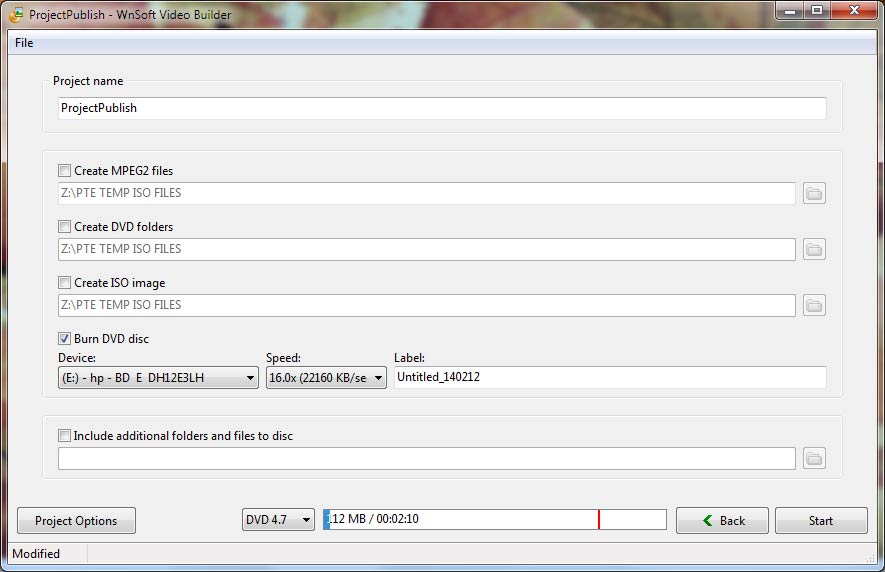
Click on “Next”
- You can give the Project a Name
You can select any of the following options:
- Create an MPEG2 file from the Project
- Create DVD Folders which can be burned to DVD in third party software
- Create an ISO File which can be burned to DVD in third party software (or played in Media Player Classic)
- Burn a DVD Disc. Details of your burner(s) and Speed of Burn are given.
- The DVD can be given a Label
- You can Include additional folders and files to the disc
- Click Start to begin the Burn
Add a User-Defined Template
In VideoBuilder:
- Tick the “Create Menu” box.
- In the Next Page, “Customize” an existing Template by adding your own Background Image in the Left Hand (Edit) section.
- Click on “Choose Template” and “Add a template” - Save in a suitable location with a suitable name and all of the components of the existing menu Template are saved with the renamed “bg.jpg” Background Image.
- It (the Template) then becomes a choice when you “Choose Template”.
- An alternative method would be to “Add Template” first and then edit it by changing the Background etc. The Button Style is determined by the current chosen Template when the “Add Template” is pressed.
- Buttons can be created and saved in the “New Template” folder. They must be named “Play” etc and overwrite the existing Buttons
Create HTML5 Video
Add a User-Defined Template
In VideoBuilder:
- Tick the “Create Menu” box.
- In the Next Page, “Customize” an existing Template by adding your own Background Image in the Left Hand (Edit) section.
- Click on “Choose Template” and “Add a template” - Save in a suitable location with a suitable name and all of the components of the existing menu Template are saved with the renamed “bg.jpg” Background Image.
- It (the Template) then becomes a choice when you “Choose Template”.
- An alternative method would be to “Add Template” first and then edit it by changing the Background etc. The Button Style is determined by the current chosen Template when the “Add Template” is pressed.
- Buttons can be created and saved in the “New Template” folder. They must be named “Play” etc and overwrite the existing Buttons
