Table of Contents
Animation Tab
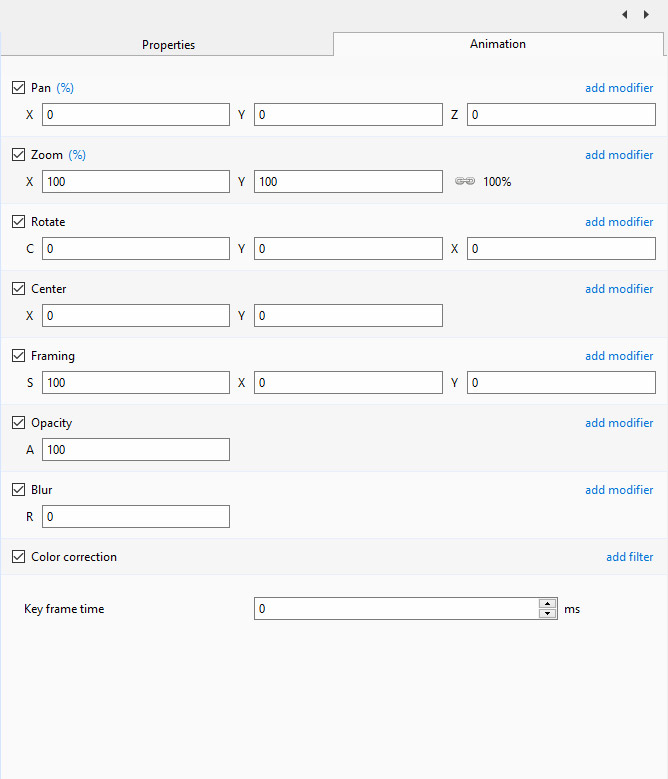
The Animation Tab is shown below.This provides the various adjustments and parameters to control animation of objects.
- For Pan and Rotate, adjustments can be made in three planes
- X,Y and Z for Pan
- C,Y and X for Rotate
- These adjustments replace the 3D parameters provided in Version 8.
- A new adjustment called Framing is provided (see Framing)
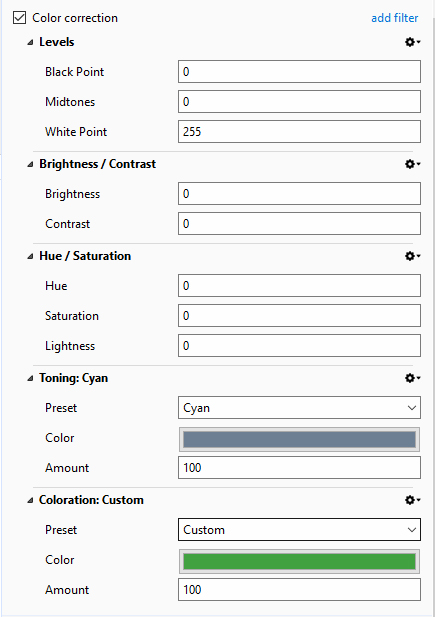
- The Color Correction parameters have been expanded in Version 9 (Color Correction)
- The “Key Frame Time” box shows the time (in milliseconds) of the selected Key Frame
Parameter Controls
Display Mode for Pan and Zoom
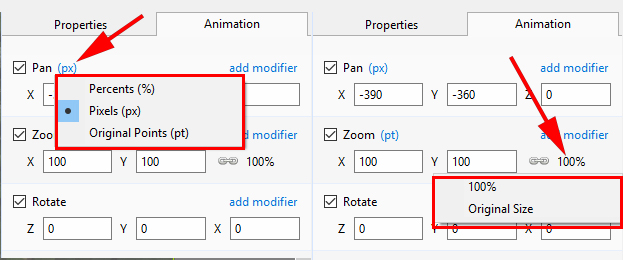
- Pan and Zoom values can be read in Percent (%), Pixels (px) or Original Pts
- Click on the “%”, “px” or “pt” symbol to choose
- Click on 100% in Zoom to choose Original Size (Original/Actual Pixels)
Percentage / Pixels / Points
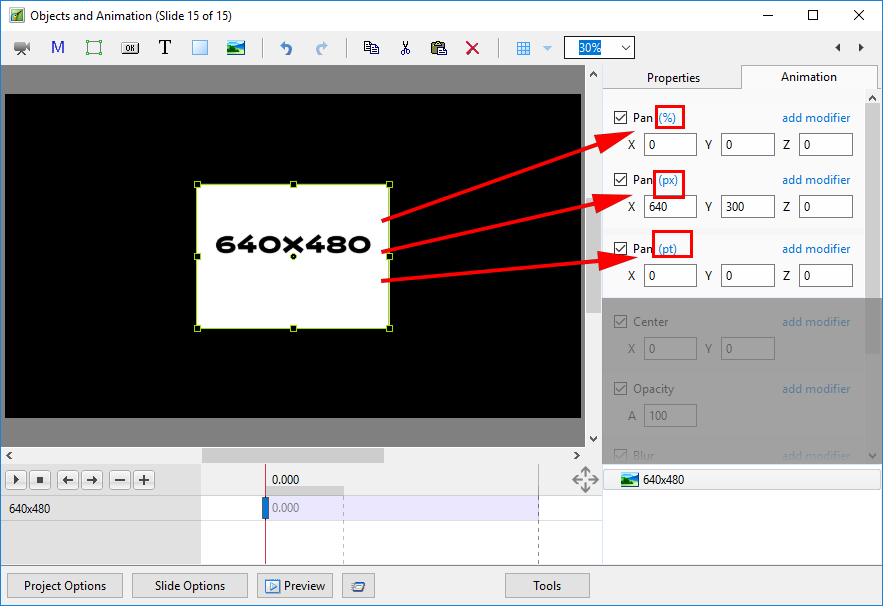
In Pan:
- In “Percentage” mode the “x” and “y” values are displayed from the Centre Point of the Object with respect to the Centre Point of its Parent
- In “Pixel” mode the “x” and “y” values are displayed from the Top Left corner of the Object with respect to the Top Left corner of its Parent
- In “Original Points” mode the “x” and “y” values are displayed from the Centre Point of the Object with respect to the Centre Point of its Parent
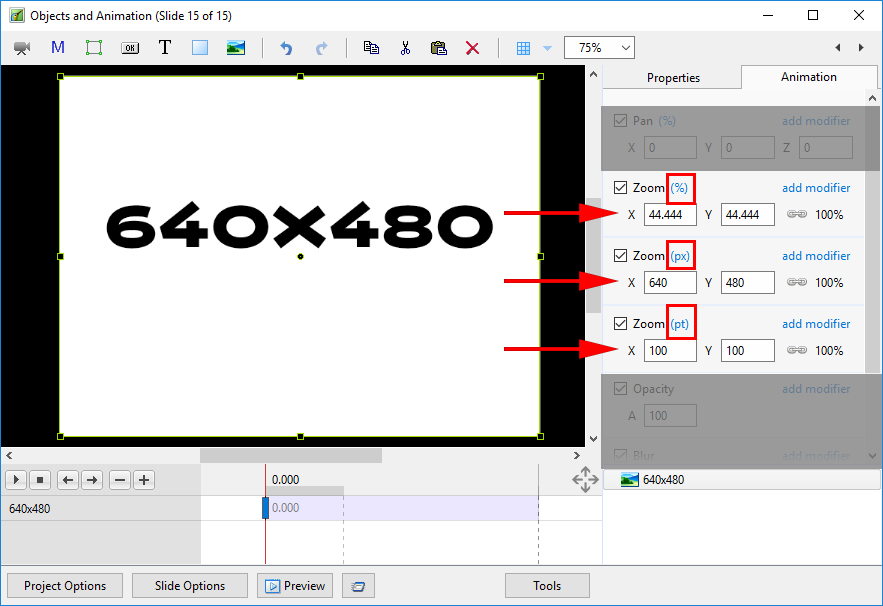
In Zoom:
- In “Percentage” mode the “x” and “y” values are calculated with respect to the Parent
- In “Pixels” mode the “x” and “y” values are the “Actual Pixels” of the Object after any Zoom has been applied
- In “Original Points” mode the “x” and “y” values are the percentage dimensions with respect to the Original Pixel Dimensions of the Object
Rotate
- Z - Rotate the Object about the Centre Point
- Y - Revolve about the Vertical Axis Centre Point
- X - Revolve about the Horizontal Axis Centre Point
Centre
- X - The horizontal Centre of Rotation of the Object relative to the Centre of the Object's Parent(%)
- Y - The vertical Centre of Rotation of the Object relative the Centre of the Object's Parent(%)
Changing Parameters with the Mouse
- Place the Mouse on any Letter (e.g. X,Y or Z in the Pan Controls) and click and drag left or Right
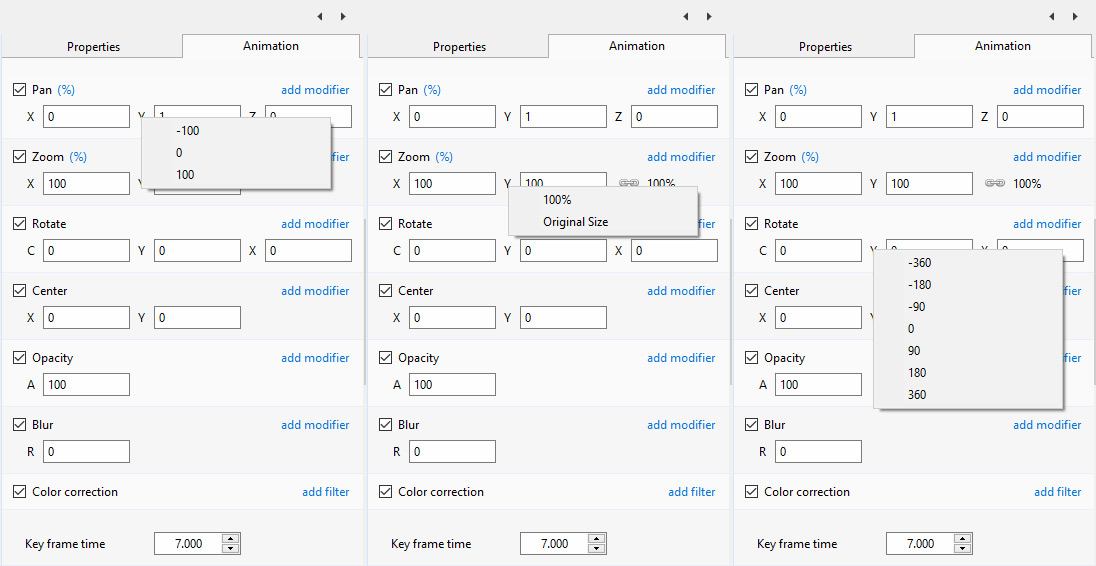
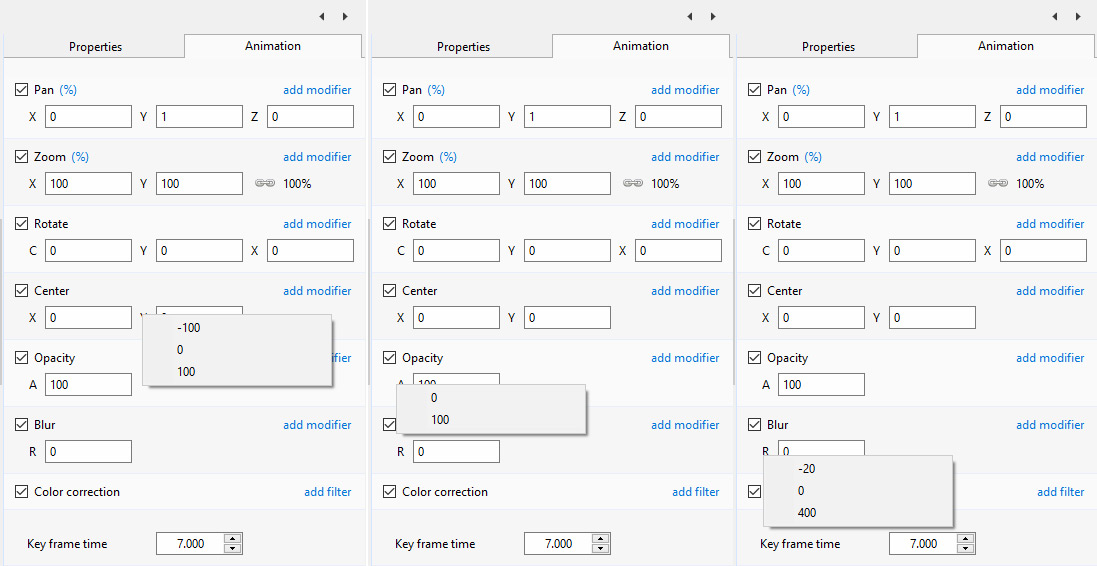
- You can also Right Click on any Letter and access commonly used Preset Values (See Right Click Menus below)
- You can “double click” on any letter to change the value back to its default state
Keyboard Entry
- In any box, highlight the existing value and type in a new value
OR Place the cursor in a box and:
- UP arrow on Keyboard increases the value by one unit
- DOWN arrow decreases the value by one unit
- Pg Up on Keyboard increases the value by ten units
- Pg Dn on Keyboard decreases the value by ten units
The UNITS depend on the chosen Display Mode:
- In % Mode the units will increase/decrease by 1% or 10% of the Parent Frame (or Background)
- In Px Mode the units will increase/decrease by 1 Pixel or 10 Pixels - relative to Project Size
- In Pt Mode the units will increase/decrease by 1 Pixel or 10 Pixels relative to the Original size of the Object
Pan
- The parameters can be read in Percentage, Pixels or Original Points
- X - Horizontal movement of the Object relative to the width of the Object's Parent Frame
- Y - Vertical movement of the Object relative to the height of the Object's Parent Frame
- Z - Zoom - “Closer to” or “further away from” the viewer
Zoom
- The parameters can be read in Percentage, Pixels or Original Points
- X - The horizontal dimension relative to the native size/resolution of the Object's Parent Frame
- Y - The vertical dimension relative to the native size/resolution of the Object's Parent Frame
- With the “Chain Link” deselected the object can be distorted
- With the “Chain Link” restored the distorted image/object can be scaled
- Click on 100% to return to default settings (100%)
The UNITS depend on the chosen Display Mode:
- In % Mode 100% = 100% of the Parent (Slide / Frame etc)
- In Px Mode the Pixel Dimensions of the Object are shown
- In Pt Mode 100% = 100% of the Native Pixels of the Object
Examples
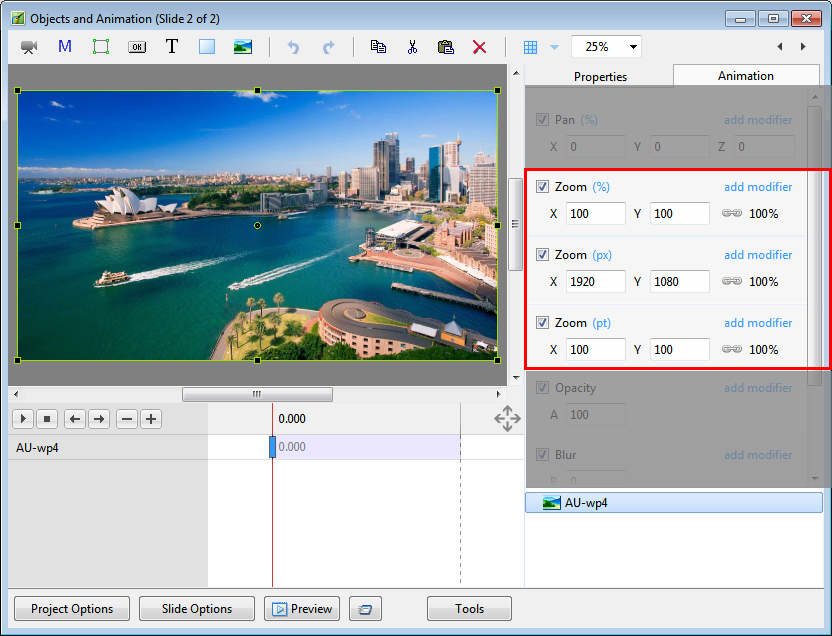
The first example shows a 1920×1080 Image inserted into a (default) 16:9 - 1920×1080 Project. Note the values for the %, Px and Pt Modes in the Zoom Box.
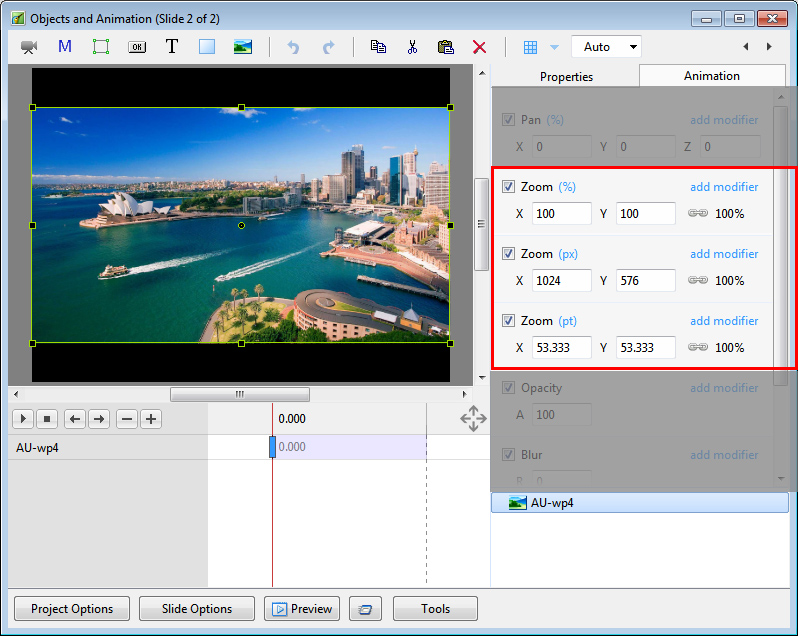
The next example shows the same 1920×1080 Image inserted into a 4:3 - 1024×768 Project. Note the values for the %, Px and Pt Modes in the Zoom Box.
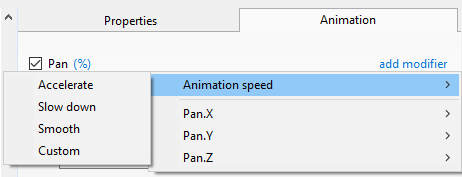
The Right Click Menus for X, Y and Z
Modifiers
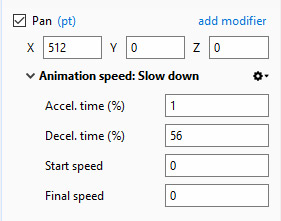
Animation Speed Modifiers
Acceleration Time and Deceleration Time can be set separately or together to produce the Speed Option effects of Version 8
Combinations of Acceleration and Deceleration will produce an almost infinite number of Animation Speed Effects
Start Speed will either Slow Down (Negative values) or Speed Up (Positive values) the Start Phase of the Animation Speed set with Acceleration and Deceleration Times
Final Speed will either Slow Down (Positive values) or Speed Up (Negative values) the Final Phase of the Animation Speed set with Acceleration and Deceleration Times
“Bounce Effects” are possible by using Negative Values of either Start Impulse or Final Braking
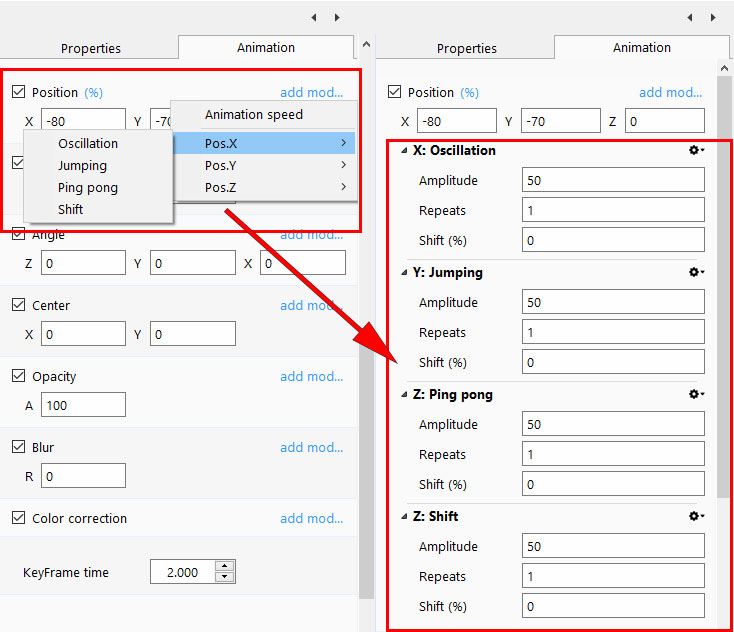
X, Y and Z Effects Modifiers
- Amplitude is a percentage of the dimensions of the Parent Frame of the Object (or the slide Dimensions where no other frame exists)
- For an X Modifier 100% Amplitude = 50% of the X Dimension of the Parent Frame
- For a Y Modifier 100% Amplitude = 50% of the Y Dimension of the Parent Frame
- For a Z Modifier:
- For a setting of 100 the Object is moved backward or forward (with respect to the viewer) by an amount equal to half of the height of the Project Resolution
- In a 1920×1080 Project the Object is moved backward or forward by an amount equal to (1080 x 0.5) = 540 Pixels
- Repeats is the number of times that the Effect is performed between two Key Frames (or from the KF with the Modifier to the end of the slide)
- Phase Shift is a percentage of the duration of one repeat of the effect between two Key Frames (or from the KF with the Modifier to the end of the slide)
Other Adjustments
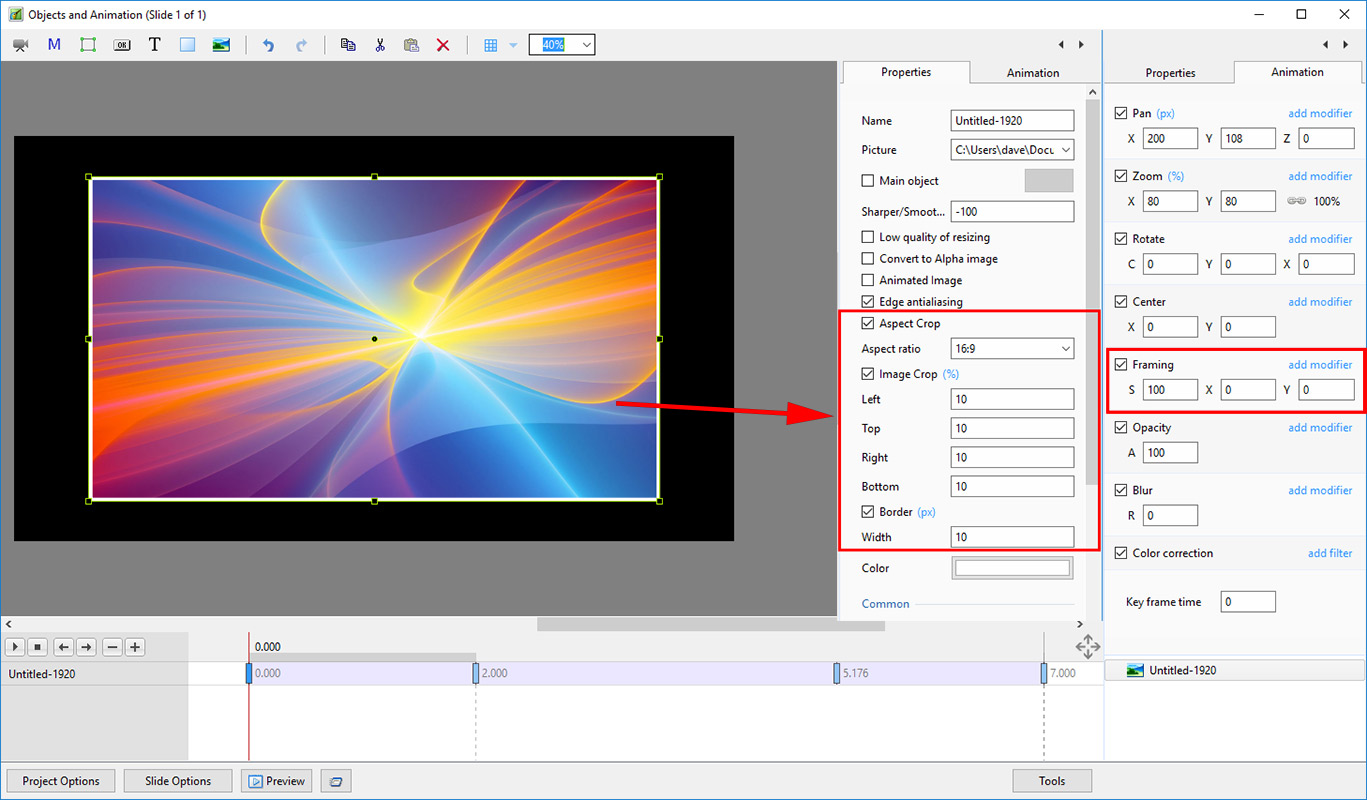
Framing
- S = Scale
- X = X Axis Offset
- Y = Y Axis Offset
- Use in conjunction with the Border Control and Aspect Ratio Crop in Properties Tab
- S, X and Y can be set per Key Frame with Zoom and Pan etc
- Choose an Aspect Ratio for your image in Properties / Aspect Ratio Crop (Optional)
- Choose a Border Width in Properties / Border (Optional)
- In Animation / Framing use the Scale (S) slider to zoom into or out of the Image within the Frame
- Use the X and Y offset sliders to re-position the Image in the Frame
- The size of the Frame can be adjusted using the Zoom slider
- The Scale, Offset and Zoom controls can then be set for individual Key Frames to provide Animation of the Frame and its contents
See also: Framing
Opacity
- A -This adjustment controls the Opacity of an Object between 0 -100%
Blur
- R -This adjustment controls the Radius of the amount of Blur(+) or Sharpening(-) applied to an Object
Color Correction
Levels
- Black Point - Adjust the Black Point
- Mid Tones - Adjust the Mid Point or Gamma
- White Point - Adjust the White Point
Brightness / Contrast
- Brightness - Adjust the Brightness of the Object
- Contrast - Adjust the Contrast of the Object
Hue / Saturation
- Hue - Adjust the Hue of the Object
- Saturation - Adjust the Saturation of the Object
- Lightness - Adjust the Lightness of the Object
Toning
- Preset - Presently Cyan and Custom
- Color - Color Picker
- Amount - Fade the effect of the Toning
Coloration
- Duplicate of Toning
Negative
- Creates a Negative Image
Key-Frame Time
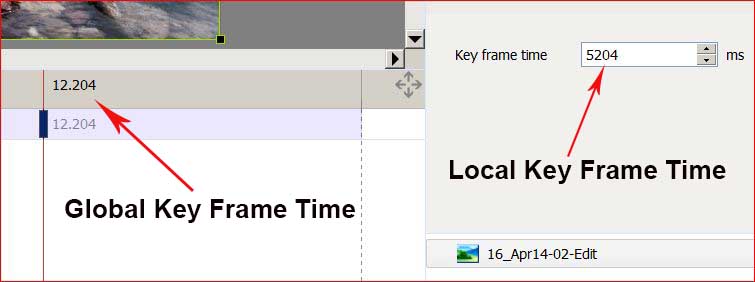
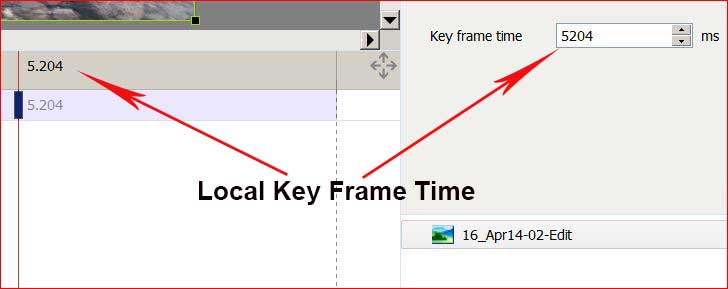
This box shows the Key Frame time in milliseconds. The value shown is always the time associated with the individual slide.
- If “Show Global Times of Key Frames” is selected in the “Tools” menu, the time shown above a selected Key Frame will be the global time in seconds
- The “Key Frame Time” box will always show the time associated with the Slide
- If “Show Global Times of Key Frames” is de-selected in the “Tools” menu, the time shown above a selected Key Frame will be the local or slide time in seconds
- The “Key Frame Time” box will always show the time associated with the Slide
