Table of Contents
Adding Video
Adding Video to the Project
Video can be added to a PicturesToExe Project in the same way as images can be added.
- Via the File List
- By dragging and dropping into the Slide List
- By adding as an Object in Objects and Animation
Whichever way the Video is added it is advisable to Convert the Video Clip before adding it to the Project. This can be done by “Right clicking” on the Video File in the File List and choosing “Convert Video Clip”.
Convert Video
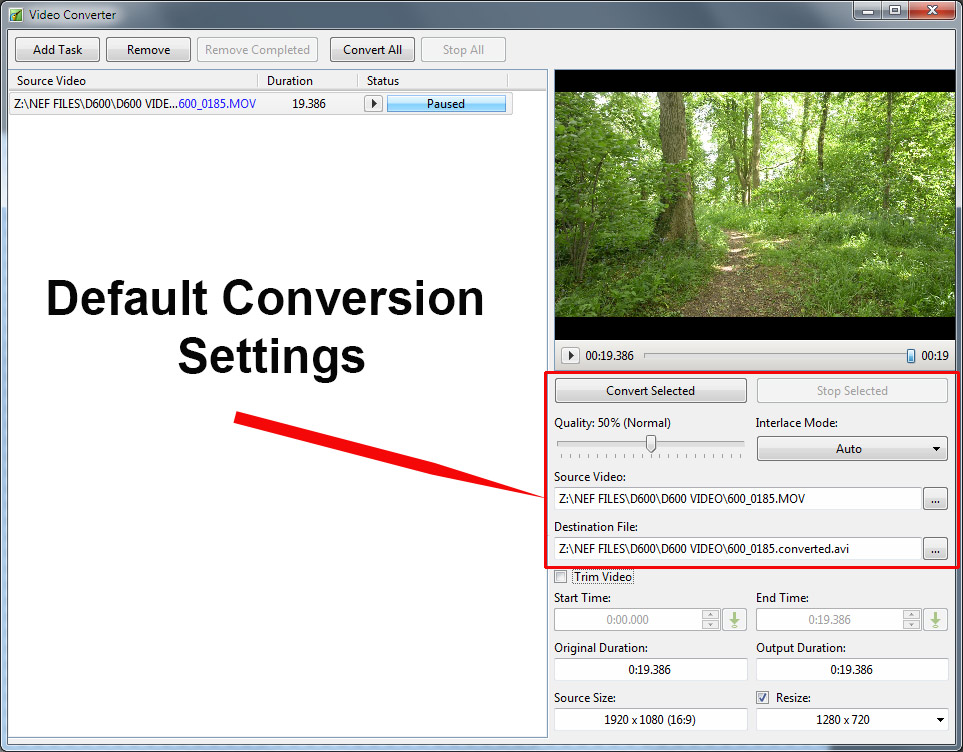
The Default Settings are:
- Quality 50% (Normal) - increasing the Quality also increases the Bit Rate
- Interlace Mode (Auto)
- Location of Source Video
- Destination of Converted Video - to change the file name click on the “Drop Down” Menu
- Converted video is <Filename>.converted.avi
- If multiple conversions of the same file are required the File Name can be changed in the Destination drop down menu. If this is not done then PTE assumes that you are repeating the conversion and will overwrite the previous conversion.
Press “Convert Video” to start the process of Conversion
Trim Video
Trimming Video
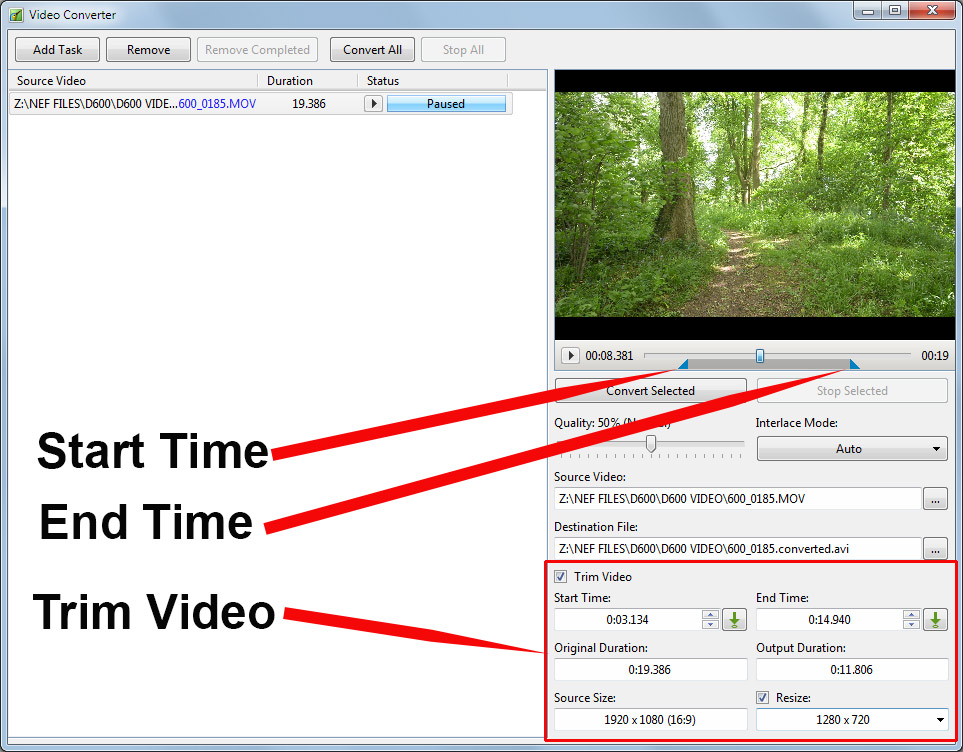
You can Trim the video Clip before conversion as shown above.
- Tick the “Trim Video” box
- You can move the blue cursors in from the edges to set the Start and End of the Trim
- You can enter times directly into the Start / End Time boxes
- The Original and Output Duration's are shown
- The Source Resolution and Aspect Ratio of the clip are shown
- You can Resize the Output Resolution if required (see drop-down menu for options)
Add Video to Slide List
This can be done as follows.
- Select an unconverted video (or videos) from the File List and Right Click on it. Choose “Add Selected Files to Project”. You are asked if you want to Optimize the file. Choose “Optimize”. The file will be added to the Slide list while the Optimization is carried out in the background. When Optimization is complete the Converted File is shown in the Slide List. (The conversion might take several minutes).
- Select a Converted Video (or Videos) from the File List and Right Click on it. Choose “Add Selected Files to Project”. The converted file is added to the Slide List.
- Drag an unconverted video (or videos) from the File List into the Slide List. You are asked if you want to Optimize the file. Choose “Optimize”. The file will be added to the Slide list while the Optimization is carried out in the background. When Optimization is complete the Converted File is shown in the Slide List. (The conversion might take several minutes).
- Drag a Converted Video (or Videos) from the File List into the Slide List.
When Video Files are added to the Slide List the Slide Duration is calculated according to the Video Duration and can differ according to the setting of the “Default Options for New Slides” in:
- Settings/Preferences/Project/Default Options for New Slides/Keep Full Slide Duration.
- If the option is OFF the Video Clip ends at the beginning of the following transition
- If the option is ON the Video Clip ends at the end of the following transition
Video Clips can also be added in Objects and Animation via the Movie Icon or the Right Click Menu. In this case all adjustments to the Slide and Video Durations must be made manually.
Optimization and File Size
The main purpose of the video conversion is to optimize playback of video clips in slideshows. Especially for shows in executable files. Optimized video clips require lower CPU usage and provide faster rewinding.
Optimized video clips can have larger or smaller file size than the original video clip. It depends on the bitrate of source file. For example digital cameras use high values - about 40 mbit per second for 1080p video. Whereas video editors can suggest 15-25 mbit by default.
Digital cameras have to record video stream in realtime, they have limited battery and slow hardware to compress video. High bitrate compensates these restrictions. In a software encoder we have much more powerful CPU and more time to analyze video stream to more optimally compress video picture.
Video Clip Properties
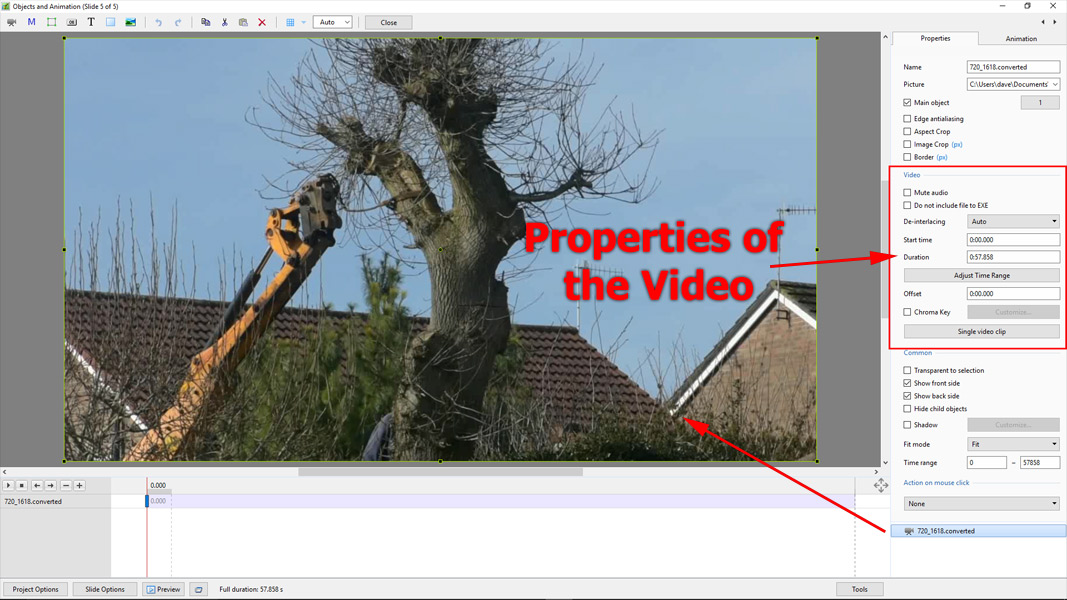
Properties Tab
- Video - The location of the selected video clip is shown and the Video Clip could be changed here if required
- Main Object - Indicates Main Object of Slide and its index number (1) e.g. for using in a Style
- Edge Anti-aliasing - Reduces the effects of Aliasing - Further reading - External Link
- Do not include file to exe - Allows the file size to be kept low by linking to an external folder
- Mute Audio - this can also be used when adding the Audio of the Video to an Audio Track to apply an envelope
- De-Interlacing - three options - Further reading - External Link
- Offset - Off sets the Start of the Video Clip with respect to the Start of the Slide
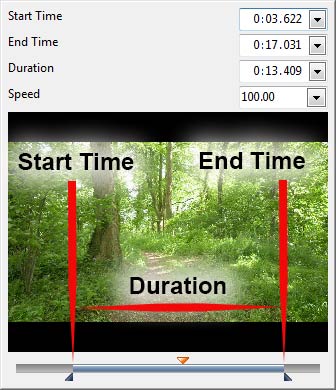
Clicking on the Adjust Time Range Button displays the following:
Not available in the Essentials Edition
- Start Time - Adjustable via the Blue Trim Triangle
- End Time - Adjustable via the Blue Trim Triangle
- Duration - Video Clip Duration
- The “orange” triangle shows the current position (frame) in the video clip
Speed - Slow Motion / Fast Motion Button
- Speed - The original Speed of the video clip can be changed. Variable between 50% and 100%. Note that it is interactive with Start Time, End Time and Duration (the Start and End Frames do not change)
Single Video / Master Video Button
- Single Video Clip plays only for the duration of the current slide
- Master Video track - If the same video is added to multiple slides the first instance of the video can be set to Master Video Track. All further instances on subsequent slides can be set to “Link to <the Master Video Track>”. The result is a Video clip running continuously over multiple slides.
Chroma Key
- See Chroma Key article: External Link
Adjust Video and Border
- Same as Framing


