skip to content
PTE AV Studio
User Tools
Log In
Site Tools
Tools
Show pagesource
Export to PDF
Old revisions
Recent Changes
Media Manager
Log In
>
Recent Changes
Media Manager
Sidebar
Search
Search Tips
Main Window
Terminology
Durations
Slide List View
Adding/Removing Images/Videos
Timeline View
Handling Audio Files
Configuring The Main Screen
Main Menu
File Menu
The Publish Menu
The Project Menu
The Slide Menu
The Settings Menu
The Help Menu
Project/Preferences/Slide Settings
Project Options
Preferences
Slide Options
Objects and Animation (O&A) Editor
Main O&A Window
Properties Tab
Animation Tab
Managing Key Frames
The Mask Menu
The Tools Menu
Slide Styles
Applying a Style
Creating a Slide Style
Import/Export a Style
Custom Transitions
Hotkeys
Adding Video
Version 9 How To's
Add a Button
Add a Frame Object
Add a Mask Object
Add a Text Comment to a Style
Add a Text Object
Add a Video Object
Add a Video to the Slide List
Colour Management
Create a Circular Image
Create a Simple Pan
Create Custom Transitions
Custom Transition Tips
Framing
Keep Full Slide Duration
Selection and Transparency
Slide Duration
Text Font Preview
Text Formatting Tips
Time-lapse Video
Tips
Visualising Modifiers
Version 8 How To's
Add Background to Text
Add Images in Real Time
Copy Slides Between Projects
Create a Basic AV
Create a Menu Slide
Create Audio Tracks
Custom Transition
Develop a Project
DVD Project
Executable File Size
Image/File Not Found
Inheriting Opacity
Ken Burns Effect
Linked Images
Link or Add an Audio File to a Slide
Menu Sequence Hints and Tips
Open PTE Projects
Perspective Effects
PicturesToExe and Mac
Preset Styles
Run "Safe Exe...for PC" on Mac
Screen Grabs to illustrate posts
Setting Default Font
Solid 3D Objects
Styles and Aspect Ratio
Styles for Multi Aspect Ratio
Synchronize Slides and Music
Templates
The Third Image
Toolbars
Transparent Background of Slides
Understand Full Slide Duration and KFSD
Use Alpha Channel Video
Links to Users Web Sites
Slideshowclub
What's New in Version 10
New Page
Table of Contents
Main O&A Window
Main O&A Window
The Grid
Add an Object
Main O&A Window
Main O&A Window
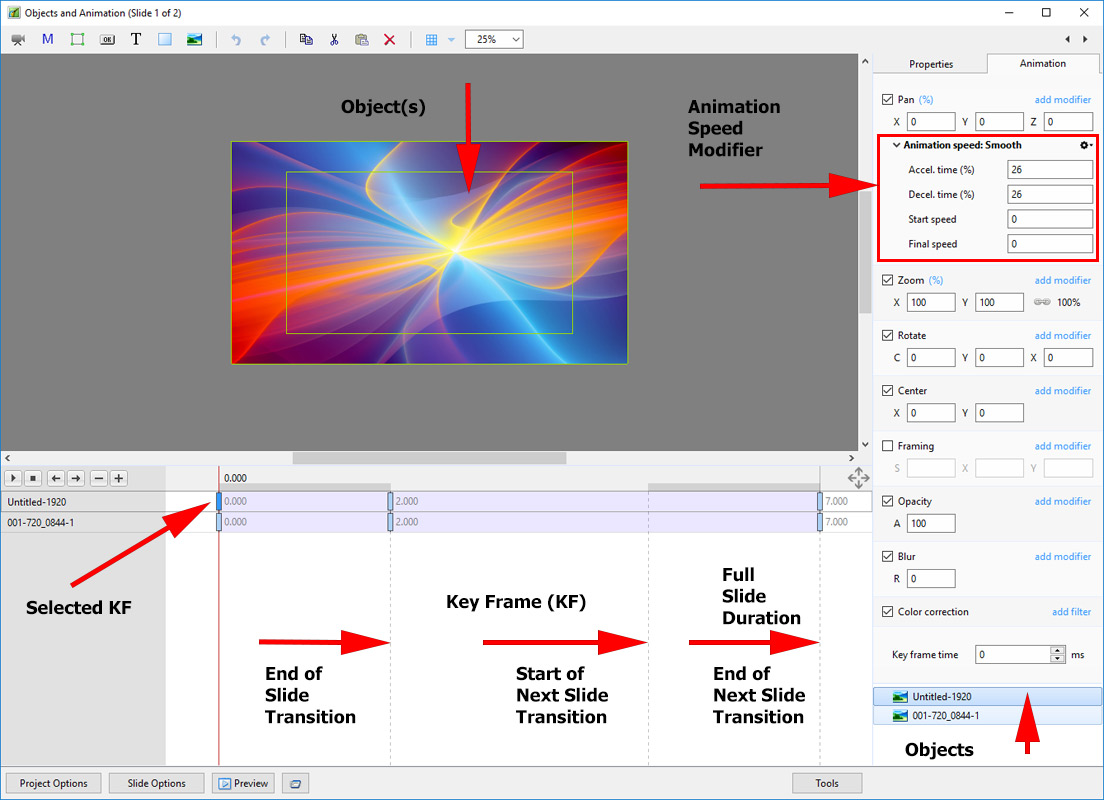
The Main Window of the Objects and Animation Editor is shown below.
The various elements of the window are identified.
There are two tabs for controlling actions in the Editor, “Properties” and “Animation”.
The Grid
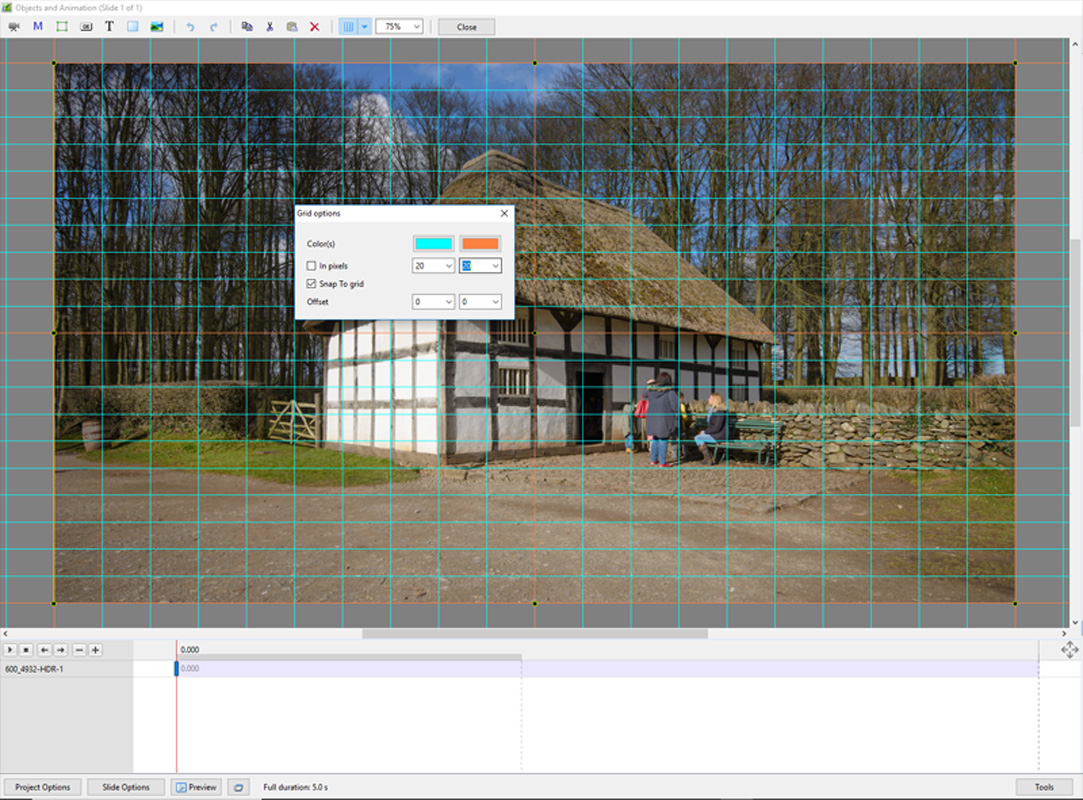
Click on the Grid Icon to apply the Grid
Click on the down arrow to show the Grid Options
Select the colours of the Minor and Major Grid Lines
Select “In Pixels” or in number of divisions per image
There are 10 minor divisions between Major Grid Lines in the X and Y directions
Select “Snap to Grid” on or off
Select “offset” in X and Y directions
In Pixels Mode the size and AR of the grids are set by entering a fixed pixel dimension
The Grid is therefore made up of squares
With “In Pixels” turned off the size and Aspect Ratio of the grid is determined by the numbers set
In the example above the Grid has been “Centred” by setting a 20×20 Grid
With “Snap To Grid” ticked the Image/Object will snap to a Major or Minor Grid Line in either direction if dragged close enough
Add an Object
Add a Video, Mask, Frame, Button, Text, Rectangle or Image Object
Please refer to Add Object articles in the
How To Section
of the Main Menu
en-us/9.0/objectsandanimation_1/main_window.txt
· Last modified: 2022/12/18 11:20 (external edit)
Page Tools
Show pagesource
Old revisions
Export to PDF
Back to top