Table of Contents
Create a Basic AV
Introduction
For experienced users of PicturesToExe this section may contain little of interest or relevance. They will have a well established methodology and workflow for producing audio visual shows which, to a large extent, will be dictated by their creativity, the software tools they have available and the end use for which the show is to be used. However for new or relatively inexperienced users, the first steps into the world of audio visual shows can be daunting. The following sections have therefore been written to provide some pointers on how to produce a show using the deluxe version of PicturesToExe. The methodology described is one that the author has developed over a number of years and suits the availability of certain software tools and the intended end use of the show : mainly for showing at photoclub nights and also forming parts of shows given to other organisations. It should be clearly understood that the workflow described below does not represent a definitive method for producing shows; there are probably as many different methods ofcreating a show as there are PicturesToExe licence holders. What follows just represents one particular method which it is hoped may provide some useful pointers for new users to consider when starting their first show.
First Steps
So, as a new user, you have returned from your holiday with a camera card full of images. You have purchased a PicturesToExe licence and you are dying to start your first show. Before doing anything, think what sort of show you want to make. Are you just doing it for yourself; do you want to show the family some holiday snaps; are you hoping to make a show that you can show at your local club? It helps to have a clear idea of what you are hoping to achieve before you start.
The first step is to move the images on your card onto the computer. There are various methods of doing this which are outside the scope of this article, but Lightroom is a useful tool as images can be taken directly from the card inserted into a card reader and transferred into a pre-prepared folder. File renaming and the attachment of keywords can also be achieved. But if Lightroom is not available, just use whatever means or software that is available.
Having established the images in a folder on your computer, the next step is to select those images you wish to use for the show. Again Lightroom or Adobe Bridge are useful tools if they are available as they allow images to be allocated labels (all images to be used can have green labels for example) and in Lightroon, there is the added facility to place the images in a “quick collection” for further processing. If neither Lightroom or Bridge is available, then just copy the selected images to another folder and use this as the master project folder.
Image Editing
Having selected the images required for the show (and remembering that additional images may be required and some discarded), it is good practice to edit these images in a photo editor such as Lightroom, Photoshop, Photoshop Elements or an editor of your choice. However good a show may be, high quality images always make a good show much better. If the images are jpg images from the camera, then a simple edit may be all that is required; levels, auto contrast and perhaps a straightening of those crooked horizons, whatever seems appropriate for the individual image. If the original images were taken in RAW, then they must be processed using either Adobe RAW or the RAW converter software provided with the camera. For insertion into Pictures To Exe, jpg files are required and thus edited RAW files must be converted into jpg versions. But this conversion can probably be coupled with the next step, which is resizing.
Image Resizing
Why resize ? After all if you insert a full size image (say 4288 x 2848 pixels, aspect ratio 3:2) into Pictures To Exe with the “Project Options/Main” tab aspect ratio set to 3:2, then PicturesToExe will resize the image to fit exactly into the slide window and the whole of the image will be visible. So perhaps the best way to explain the reasons for resizing is to look at an example.
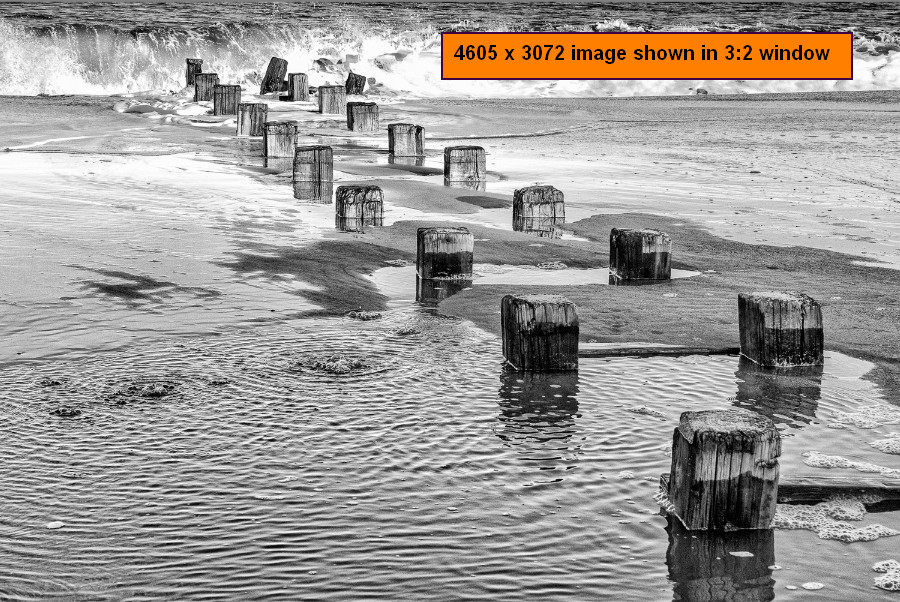
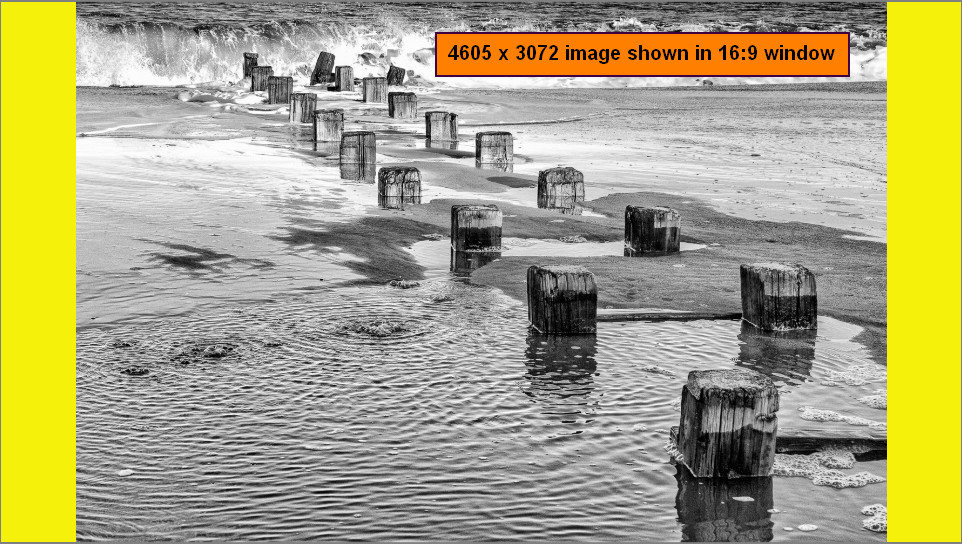
Suppose you have a digital camera whose RAW image size is 4605 x 3072 (i.e. an aspect ratio of 3:2). You want to show the final version of your PicturesToExe project on your high definition TV with a resolution of 1920 x 1080 (i.e. an aspect ratio of 16:9). If you do not crop the image to the same aspect ratio as your TV, the image will not fill the screen. The first figure below shows a 4605 x 3072(3:2) image in a window sized in PicturesToExe to an aspect ratio of 3:2. The image fills the available display area. The second figure shows the same image in a window whose aspect ratio is 16:9.
In the example above, the background color in “Project Options/Screen”, was changed to yellow to demonstrate the fact that the un-cropped image does not fill the screen. If the color had been left at black then the fact that the image did not fill the screen would not be so obvious. The same situation will occur with any variation between the original image size and the size of the display device used. The following display/image dimensions are those that might be found on typical display devices :
- Image from a 14Mp camera = 4608 x3072 (aspect ratio 3:2)
- HD TV screen = 1920 x 1200 (aspect ratio 16:9)
- Digital projector = 1400 x 1050 (aspect ratio = 4:3)
So it is desirable to think about the display unit you are going to use for your show and resize accordingly.
A second reason for resizing is to reduce the overall size of the finished “exe” file. As an example if 20 images, 4288 x 2848 are inserted into PicturesToExe and published as an “exe” file, the approximate file size will be 9Mb. If the same number of images are cropped to 1400 x 920, inserted and published, the “exe” file will be approximately 2Mb. So keeping image file sizes down produces a smaller “exe” file and thus is easier to publish on the web or as video for mobile devices.
A final word on resizing images. If you want to zoom in to an image, the file size should be typically larger than the final image size by the zoom factor, e.g. a 3 times zoomed file should be about 3 times larger than the final screen image size.
Insertion and Sorting
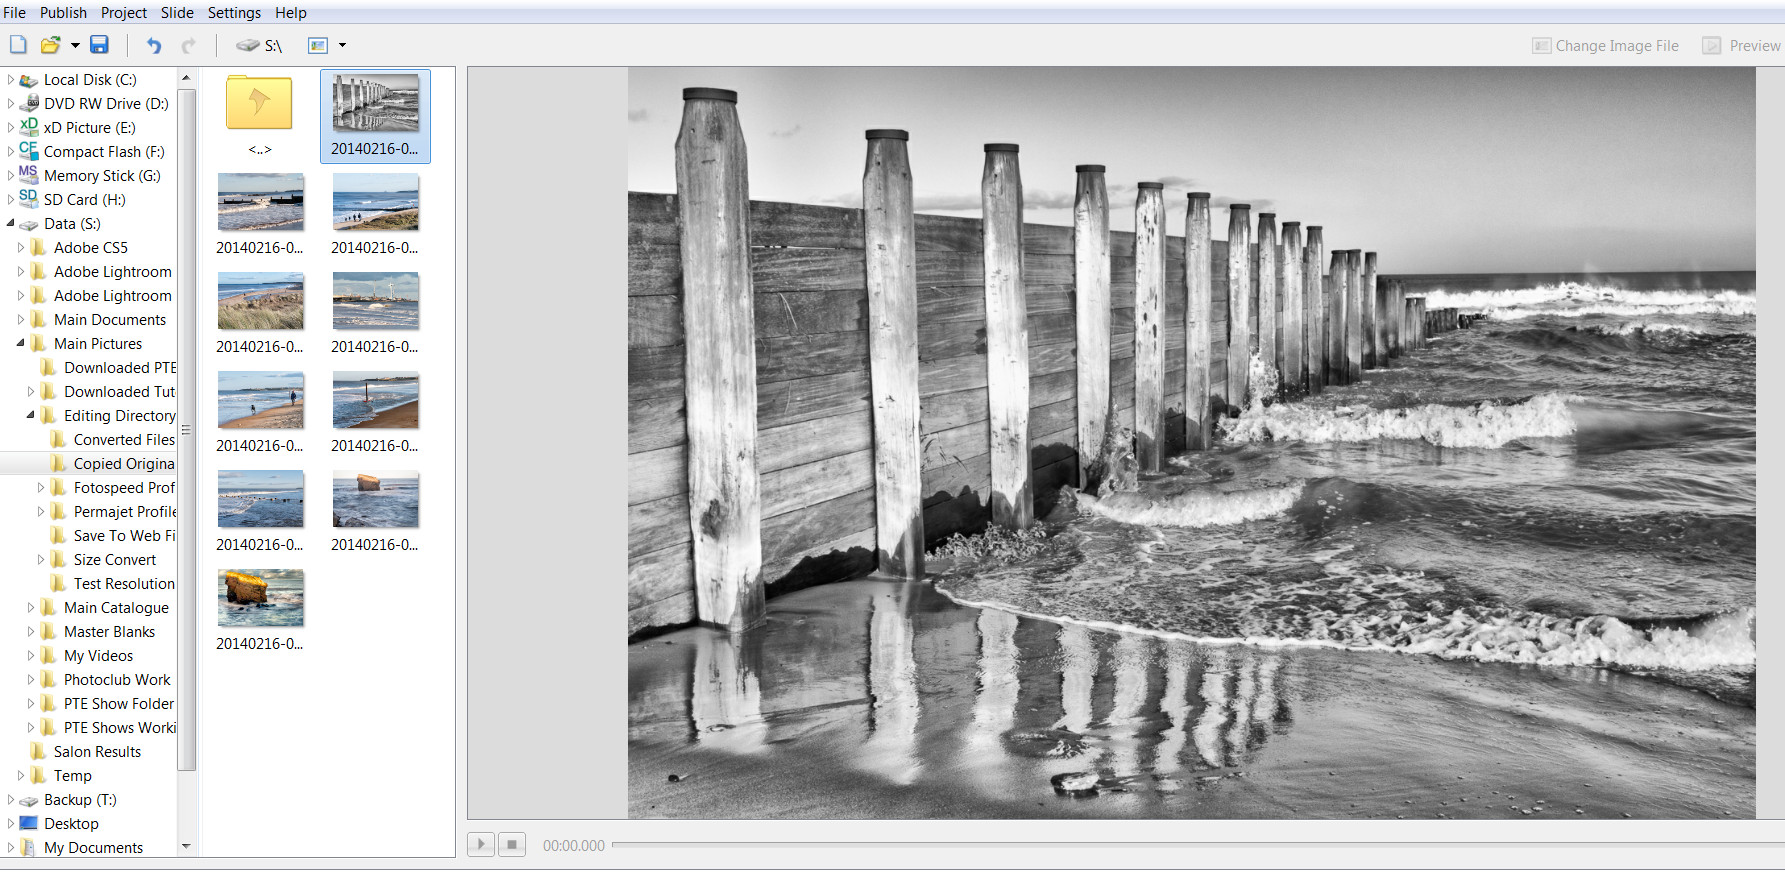
Once the images required for the show have been selected, edited, resized and saved as jpg files in the project directory, the next step is to insert them into PicturesToExe and sort them into the required order. Prior to insertion, it is good practice to set up any preferences or project options that are to be applicable to the show. Ideally a template has been set up with the required parameters and saved as a master template (see templates. Then all new shows will use the same parameters. The figure below shows PicturesToExe Main window, with typical “File List” and File Tree“ and the “Mini Player” showing a view of the first image in the “File List”.
To insert all images into the “Slide list”, either right-click in the “File List” and select, “Add all files to Project”, or press Ctrl + D and the selected images will be added to the “Slide list”. The figure below shows the “Slide list” with the images added.
A Note on adding images :If subsequently further images are added, they can be selected from the “File List”, left-clicked and dragged to the “Slide list”. They will be inserted at the position to which they are dragged and images to their right will be pushed along to the right. At the beginning of a project this may not cause a problem. However if images have been re-organised on the “Timeline” this may destroy the current sequence. If the “Timeline” view is selected first, an image can be dragged to a particular point on the “Timeline” and the images to the right can be carefully re-adjusted.
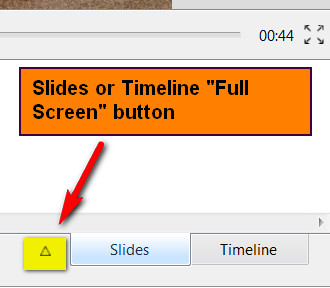
Once images have been added to the “Slide list”, they can be sorted into the desired order. This is easily achieved using the “Full Slide Window” opened by clicking on the small inverted triangle the left of the “Slides” button as shown below.
This will open a full screen view of all images (or a full screen view of the “Timeline” if in “Timeline” view) and individual images can be dragged into the required order. Once complete, the “Full Screen” button is clicked again and the screen returns to either the “Slide list” or “Timeline” view.
Note on renaming images :There can be a temptation to rename images early on in a project, perhaps at the sorting or editing stage. This can often be a mistake as invariably images will be moved as a project develops and renaming can remove a link to the original image and make it more difficult to go back to the original should a larger file size or further editing be required. It is suggested that original image names are retained.
The Commentary
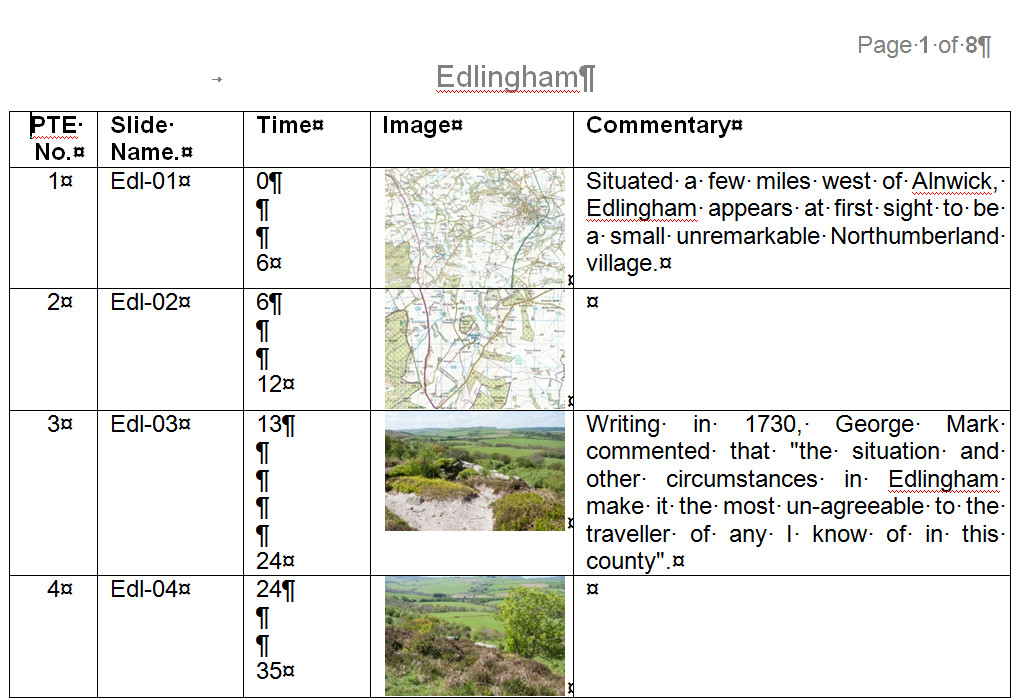
As already mentioned, it is best practice to have a clear idea of what you expect the end result of your show to comprise. In some cases, the author will have had a clear idea before starting, prepared a story line and taken images to match that story. However often the author will have taken a number of images and afterwards decided to use these to make a show with supporting commentary. Whichever situation applies, a useful method for creating commentary is to use whatever text editor is available and prepare the text taking into account the available images. An example is shown below where Microsoft Word was used to prepare a commentary for an AV about a local village. Using this method, Slide numbers, slide timing, and small thumbnails of the associated images are inserted into a table and the commentary added. In this way the commentary sections are clearly identified with one or more images and it is easy to edit the text or add or change image thumbnails. Of course there are many other methods that can be used and authors should select the most appropriate for their abilities and equipment available.
Once completed, the commentary needs to be recorded. A suggested method is to record the whole commentary in one go using a small portable recorder (for example a “Zoom H2” recorder whose SD card can be removed on completion and inserted into the computer to transfer the resulting audio file into the project directory). If during the “take”, a mistake is made, just say “correction” and repeat the section where a mistake was made. In this way the tone and timbre of the voice will have a reasonably even tone throughout. Experience has shown that a recording made over a period of time (say on successive days) can have quite a variation in timbre which becomes very obvious when the show is finally played.
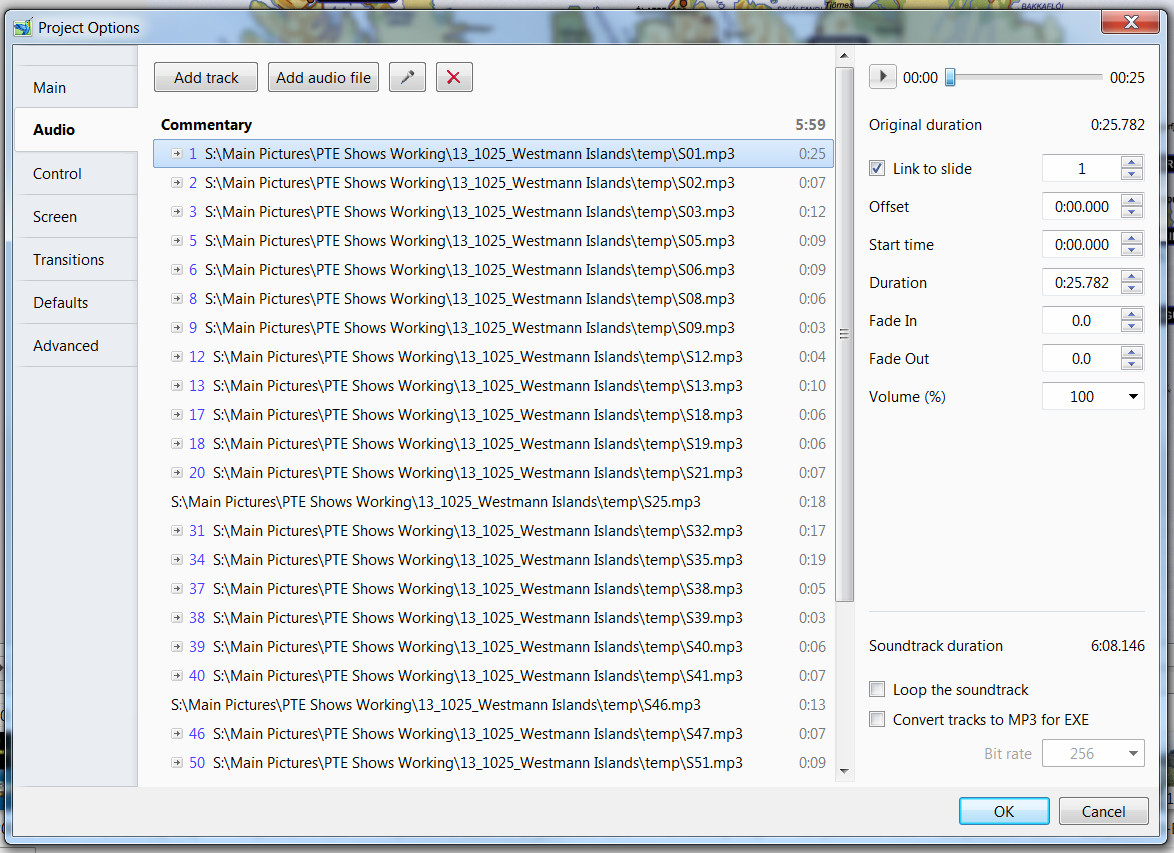
The next step is to insert the finished audio file into a audio editor. The Audacity editor which is free to download, is often a popular choice. Other possible audio editors include Adobe's Audition 3.0. As can be seen from the sample commentary file, sections of commentary are associated with one or more images. Thus a useful technique is to extract these sections of commentary and save them as separate files which can be inserted into the “Audio” tab of the project. The figure below shows a typical audio tab in which a number of commentary sections have been added.
As can been seen from the figure, each commentary section has been added to a single track called “Commentary”. Now each commentary section can be associated with its relevant slides in the “Timeline” window. Here one of the great features of PicturesToExe can be used : the ability to lock a clip to a particular slide. A portion of a typical “Timeline” view shown in full screen mode is shown below. There are 3 tracks ; a “Commentary” track, a “Music” track and a “Sound effects” track. The “Commentary clip “S25.mp3” is locked to Slide 24. This is achieved by ensuring the clip is underneath the appropriate slide, selecting the clip, right-clicking, and selecting “Link audio clip to slide XX”. Now although the clip can be moved along the timeline, it is locked to the slide so that if the slide moves, so does the clip. This makes the adjustment of slide and clip positions so much easier in any final editing of the project.
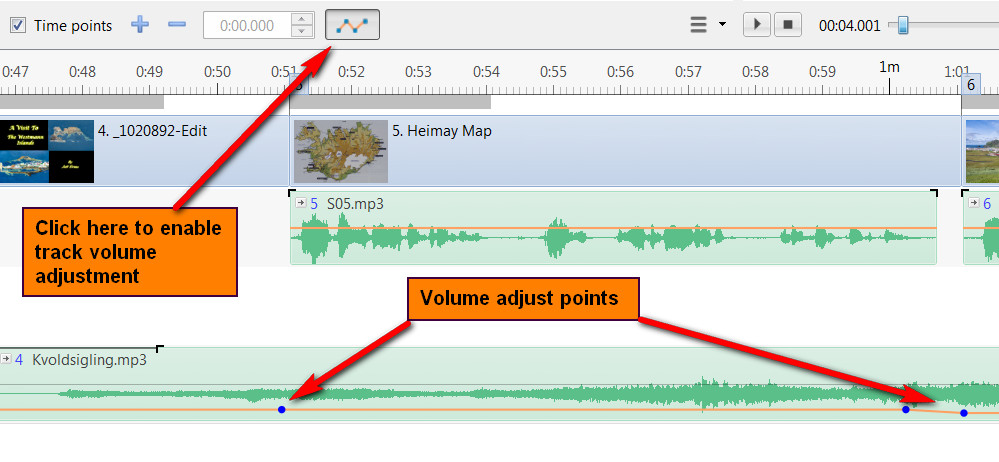
One other feature of the latest PicturesToExe version is the ability to alter the volume of tracks. As shown below, clicking on the icon enables volume adjustments and the blue points are where the sound levels have been increased or decreased. More information is given in the section on Timeline view (see the_timeline).
Music/sound Effects
Finding a suitable source of music and selecting track(s) which match the mood and intent of the images and composition of the commentary is perhaps one of the most difficult aspects of creating an audio visual show. Describing how an author might set about this task is outside the scope of this article. But there are many sources of royalty free music on the web, including music available under the creative commons licence. In any show, it may be desirable to select a number of different music items and, to avoid having to edit these in an audio editor, it can often be useful to place these on different tracks. In this way, music clips can overlap each other and be faded in or out as required. If the show includes commentary, two aspects of adding background music need to be considered. Firstly the sound level of the background music should be such as not to interfere with the commentary : there is nothing so irritating as trying to hear the commentary over loud background music. Secondly, there should not be too much background music. Look at places in the show where either just speech or even silence is required : do not feel that the background music needs to be continuous.
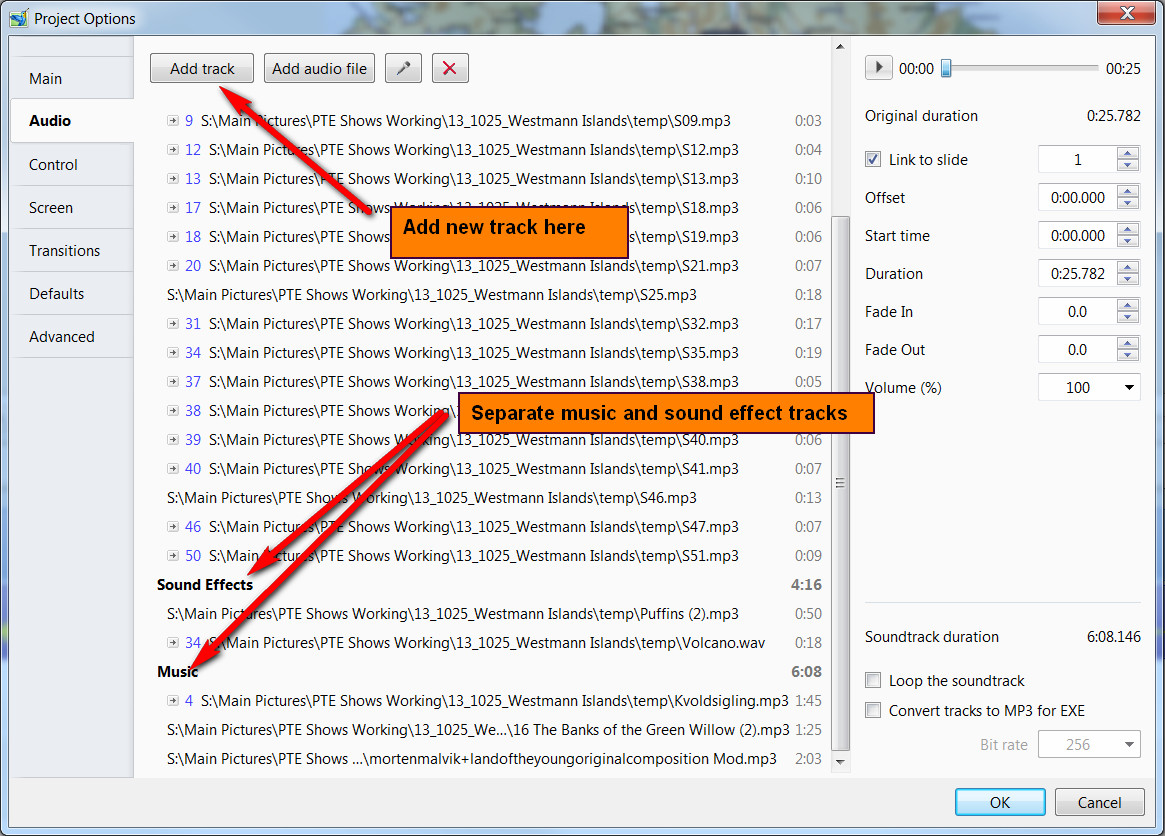
In addition to music and commentary clips, authors may wish to add appropriate sound effects or other background audio information. Ideally these should be placed on their own dedicated track so that they can be moved up and down the track without affecting any other of the added sound clips.
The process of adding music and sound effect clips is identical to that described above for commentary clips. Separate tracks are recommended and the figure below shows part of a typical audio tab with separate music and sound effect tracks indicated.
The Final Edit
Once all images and clips have been added, positioned and sound levels adjusted using keypoints has been completed, the show needs to be previewed repeatedly to adjust any aspects of appearance which the author may consider need improving. Also this is a good time to consider the transitions selected. As previously mentioned, a useful technique is to set the transitions for all slides to a default setting in “Project Options” (say dissolve) prior to adding images. Then while previewing the completed show, examine each image and adjust the type and duration of transition to suit: again this is a personal matter of individual creativity and little useful guidance can be given. Often after completing a show, leaving it for a few days and returning to preview it can result in flaws being detected which were initially missed.
Publishing
The Main Help menu covers the options for publishing (see publish) and no further comment is required here.
Tidying Up
During the process of creating an audio visual show, a project folder may have been created (this is recommended) and images and sound clips added. Some images may not have been used as main image items, but added as supplementary items to individual images. In The “File List”, images used as main images on the “Slide list” have their file name in bold and therefore it is easy to see which have been used and which rejected. But images added additionally to main images in the “Objects and “Animation editor are not so identified. This the final tidying up process should be to make a project backup using the “Create Backup in ZIP” (see file). This creates a single zip file which includes all elements (images and sound clips) used in the show, together with the original PicturesToExe project file (*.pte). this then can be stored and backed up if required and is an essential source for any future work on the project.
