This is an old revision of the document!
Table of Contents
Slide Styles
Introduction
A slide style is a template of animations with optional objects.
In most cases it is necessary for a Slide to have at least one “Main Image”. However if the Style is designed appropriately then it can be applied to a Blank Slide.
A Slide Style also includes a Transition. e.g. If the Style creates multiple slides, each slide's transition can be determined in the Style.
For example, you can choose a Slide Style which creates “Pan Left” or “Zoom Out” animation and apply this Slide Style to one or more slides.
Preset Styles
The Style Slide button in the Bottom-Left Toolbar opens the Slide Style window. (See The Main Window and Main Menu/Preferences/Toolbars) 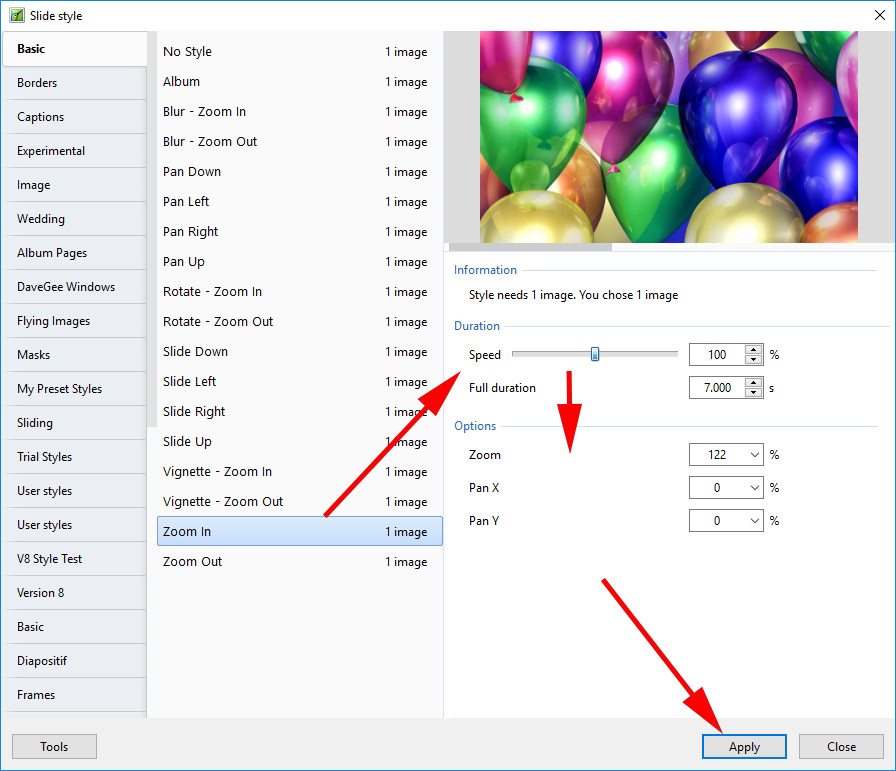
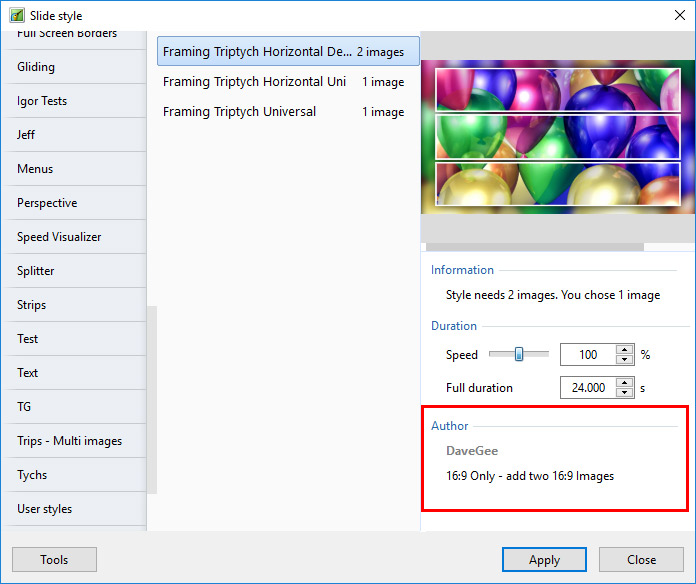
On the left hand side of the window we have the Slide Style Categories - Basic, Borders etc.
In the middle the Slide Styles in each category are listed. This also shows how many images are required to create the Style.
The image at the top right hand side is a Preview of what the Style will do.
Information
This tells the user how many Images are required and how many have been chosen (selected) in the Slide List. If the number of images chosen is not correct it will result in a Grey Image (or Images) in the Preview.
Duration
The Speed and Full Duration controls determine the Full duration of the Applied Style and are interactive. The Speed Control will increase or decrease the Full Duration of the Applied Style and the effect is shown in the Preview Window. The default is 100% = Full Duration of the Slide Style. Faster Speeds will decrease the Full Duration and slower Speeds will increase the Full Slide Duration. You can type a specific time into the Full Duration box.
Note that the Slide Style Full Duration will overwrite the Full Duration of the slide that it is being applied to.
Options
Options will vary according to the Style.
Size is a static Zoom percentage applied throughout the duration of a Style. Zoom is usually the amount of Zoom applied dynamically through the duration of the Style. Another example is Border which sets the thickness of a Border as a percentage of the Image Height.
Author's Name and Comments
- Custom Transitions may contain the Author's Name and Comments regarding the use and any restrictions which apply to the Style
Apply
The APPLY button creates the slide.
Applying a Preset Style
Please be aware that Applying a Style will overwrite any existing Animation. Slide Styles are NOT additive.
- Open the Slide Style Window
- Browse the Preset Styles to find the Style which you want to apply
- Note how many images are required for the Style
- Close the Style Window
- Drag the correct number of Images in to the Slide List and/or…..
- Highlight the correct number of Slides/Images
- Open the Slide Styles Window
- Highlight the required Style
- Check that the preview shows the Style correctly
- Make any changes that you require to the Duration and Option controls
- Note that any change made to the Duration of the Style will also increase/decrease the Style's default Transition Time by the same percentage
- Apply the Style
Creating Slide Styles
Not available in the Essentials Edition
Creating your own Styles
Any Slide (or Slides) to which animation has been added can be turned into a Style and saved in the User Styles Tab of Slide Styles. Highlight the Slide (or Slides) and open the Slide Style window by clicking on the Slide Style Tool. Click on the TOOLS button and select Create Slide Style.
Main Images
Styles use the “Main Image” concept (new in Version 8). When an image is dragged into the Slide List it is automatically assigned the Main Image Index of 1. See Objects and Animation / Properties Tab. An Image added to a blank slide in Objects and Animation requires that a Main Image Index is added manually.
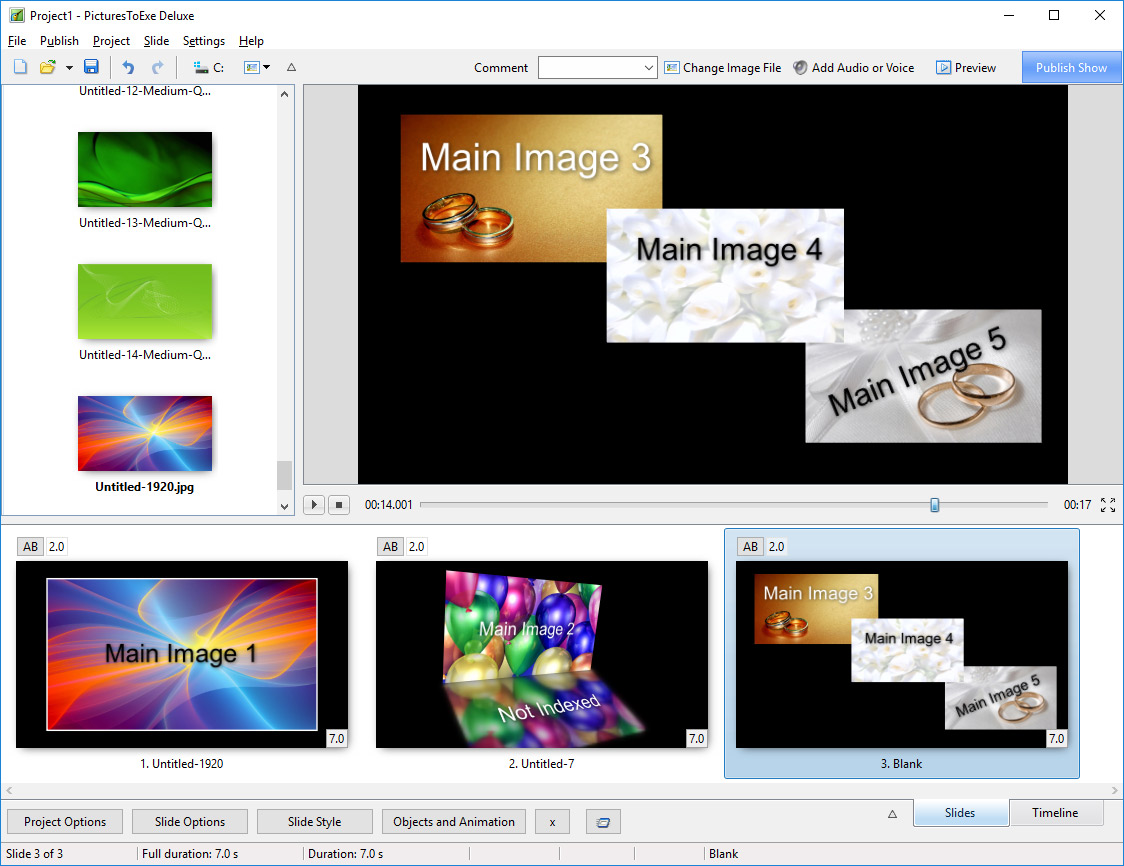
Where a Style includes more than one Main Image, the images should be indexed 1, 2, 3, 4 etc during the creation process (Objects and Animation/Properties Tab/Main Object). Then, at the application stage, the Slide one Image is allocated to Main Image one in the Style etc. If an image occurs in the Style in more than one position, only the first instance needs to be Indexed - all other instances are “referenced”. Example:
Note that the image in Slide 2 is Indexed (Main Image 2) but that its reflection is not indexed.
When applying a Style which requires two (or more) images, they can also be added to a single blank slide in Objects and Animation and assigned Main Image Indexes 1 and 2 (etc). The Style can then be applied to that single slide containing two (or more) indexed images.
Non-Main Images
Styles can contain objects which are not Main Images.
Objects created in Objects and Animations such as Rectangles, Frames, Buttons, Masks etc are included in the Style as “instructions” and add very little in terms of file size.
If an Image is introduced in Objects and Animation (not designated as being Main Image) and used as a Background or to create an object such as a Box then that is also included in the Style but will increase the Style file size significantly. JPEGs and PNG files can be used for this purpose.
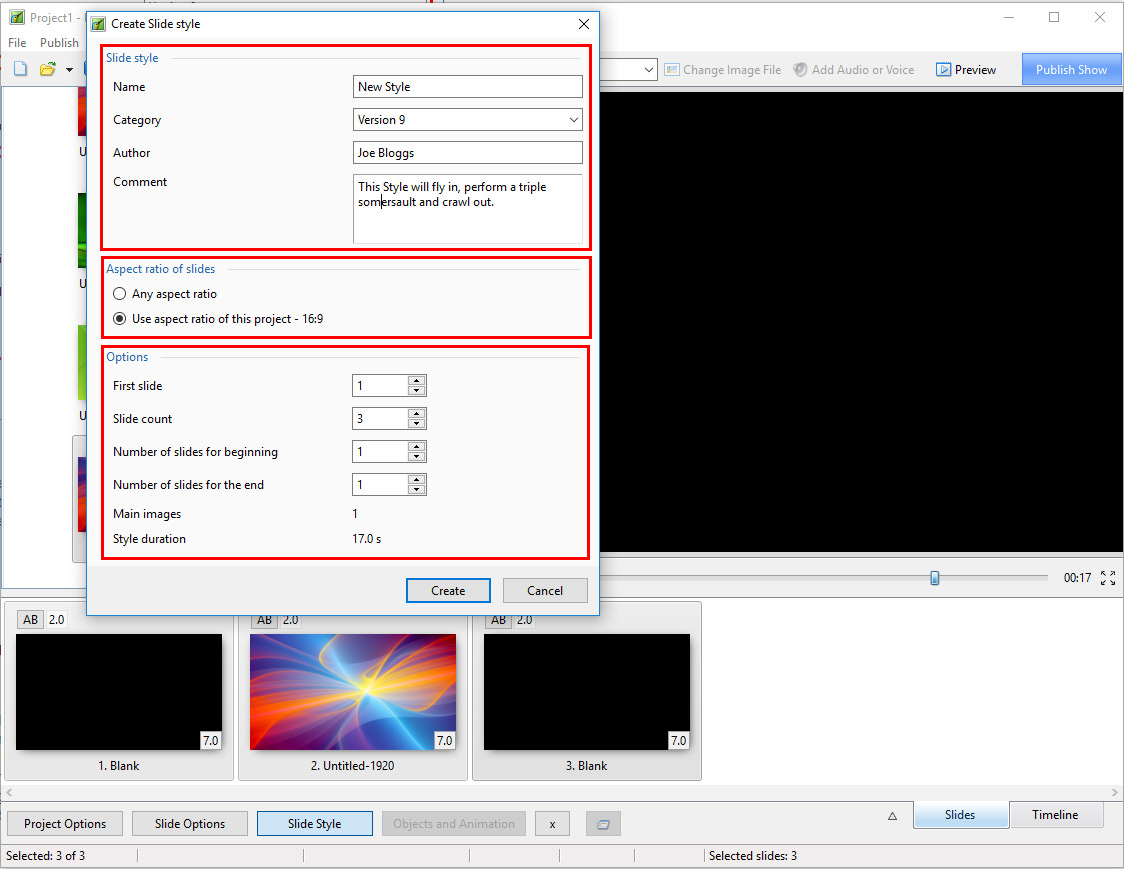
Slide Style
- In the example above the Slide Style is given a Name
- Its Category can be either “User Styles” or typing a new category name will create a new Category. See the Dropdown Menu
- The Author can enter his name
- The Author can add comments about the Use of the Style and any specific requirements
Aspect Ratio of Slides
Users create projects which have different aspect ratios of slides (4:3, 16:9, etc). You have to declare the supported variants of aspect ratio for your style:
- If the animation in your style is simple you can choose 'Any aspect ratio' option
- Or you can choose fixed aspect ratio - 'Use aspect ratio of this project - 16:9'
- The second option is also used when making Multiple Aspect Ratio Variants of styles
You can create two independent styles - for 4:3 and for 16:9. Set the same name for both styles (for example, 'My style'). PicturesToExe will automatically combine both styles into one style. And users will see one style in the list. When the user applies this style PicturesToExe will automatically choose the correct variant (16:9 or 4:3) according settings of user's project. If the style does not contain the necessary variant, PicturesToExe will choose the nearest variant (e.g. 4:3 for 5:4).
Styles Containing Several Slides
Adjust 'First slide' and 'Slide count' parameters to include the number of slides for the style.
Repeating Style
If you create a style which contains 3 slides and apply it to 6 slides it will be applied in the following order:
1,2,3,1,2,3 - because 'Number of slides for beginning' and 'Number of slides for the end' have a zero value.
A Style with a repeating Middle Part
Choose 3 slides, set 'First slide' as 1 and 'Slide count' as 3.
Set 'Number of slides for beginning' as 1 and 'Number of slides for the end' as 1.
Now this style will be applied to 6 slides in the following order:
1,2,2,2,2,3
- Slide 1 (of the Slide Style) will be applied to the first slide
- Slide 2 (of the Slide Style) will applied 4 times to slides 2,3,4,5
- Slide 3 (of the Slide Style) will be applied to last slide.
Example: Please download the following example of this application of a Style from the WNSOFT.com server
Import (see below) the Style and apply to three or more images dragged into the Slide List. The Style has “Beginning”, “Middle” and “End” sections.
Add an Audio Clip to a Style
This is a workaround suggested by Igor:
- Add an invisible video clip with sound to a slide as an object. Pixel size should be very small to reduce CPU loading (say 160×120).
- You can create such a video file in PicturesToExe from a special project with your audio file.
Add a Text Comment to a Style
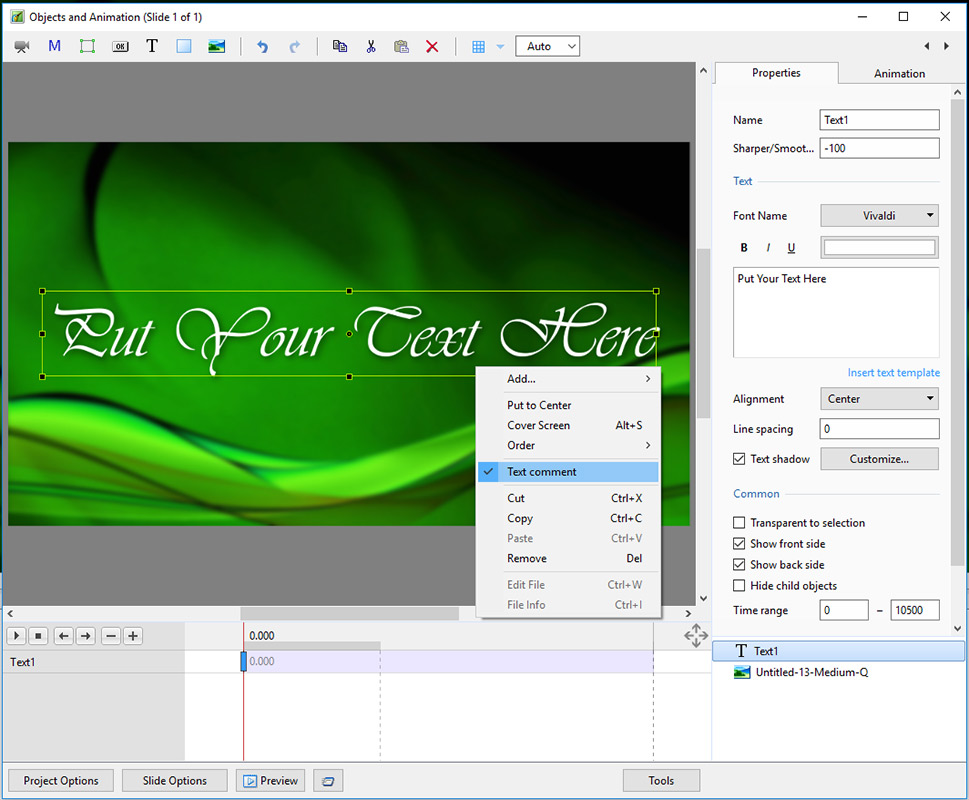
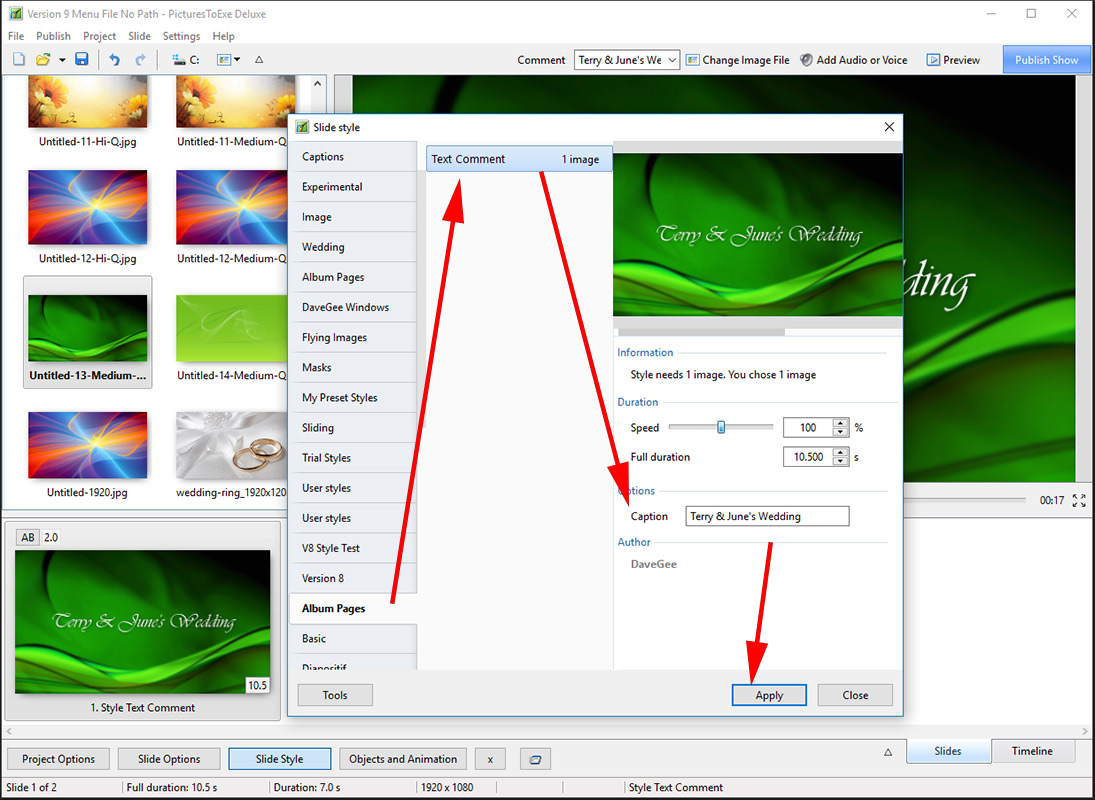
It is possible to add an editable text caption to a slide within a Style.
- Add a text object to a slide in Objects and Animation
- Right click on the text object to show the pop-up menu
- Choose Text Comment
- Create the Slide Style
- The Style will now have the parameter - “Caption”
Identifying a Style
If the Slide Name or Names are changed in Slide Options to a suitably descriptive name before Creating the Style then the Applied Slide Style will add an Identifier to the Slide or Slides.
Tip
Always save the Project from which you have made a Style as a Template for use at a later date.
Import a Slide Style
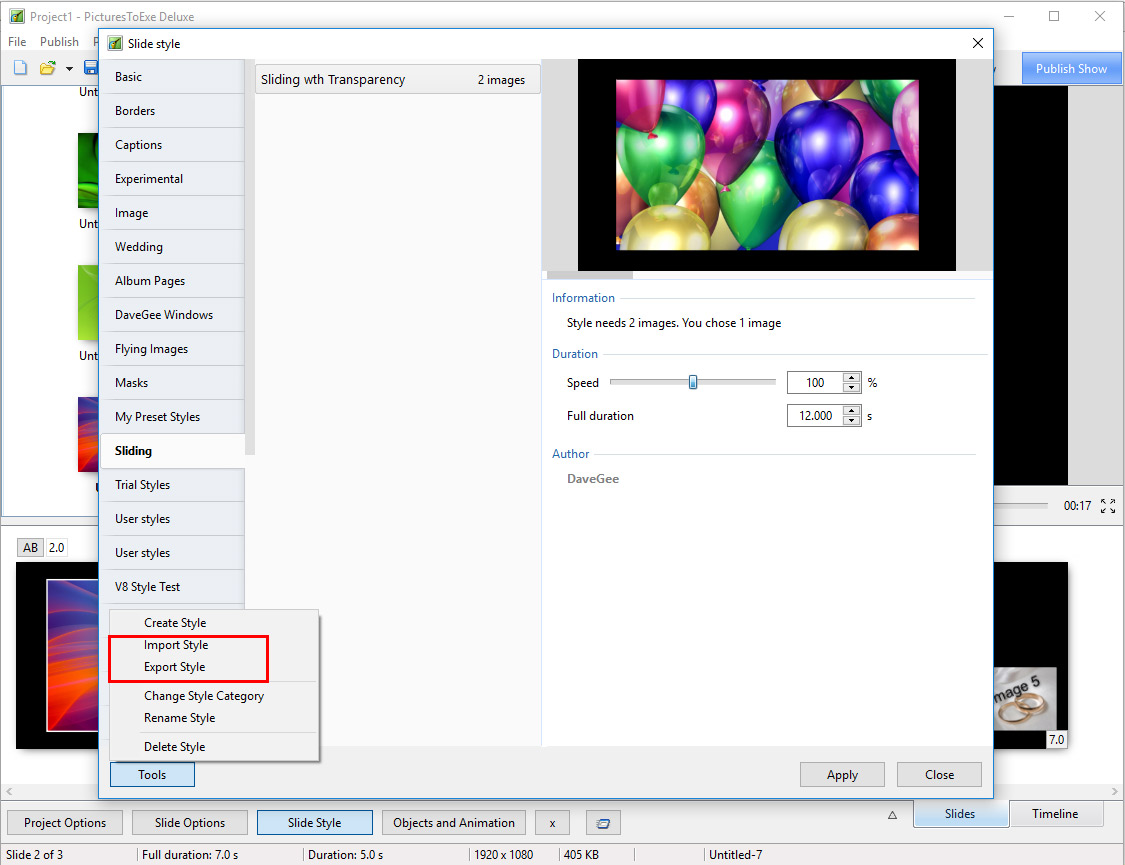
The Style (“xxxx.ptestyle”) can be imported from any source.
- Click on Slide Style
- Click on Tools
- Click on “Import”
Navigate to the source of the “ptestyle” file to be imported and highlight it and click on Open. The Style is then added to the User Category of Slide Styles or a Category specified by the author of the Style.
Export a Slide Style
In order to share User Styles or transfer them from your main Computer to your Laptop PC etc they first have to be Exported as “ptestyle” files.
- Choose the Style to be Exported
- Click on Slide Style
- Click on Tools
The Exported File is then saved in the folder designated in Settings / Preferences / Templates. This can be the default location or can be specified on a drive other than “c:” drive.
Any Non-Main Images in the Style are included in the Style - beware of the FILE SIZE of Non-Main Images!
Fonts - The Font used for any Text included in a Style is only honoured on another PC if it is present on the host PC.
The “ptestyle” files can be uploaded to the PicturesToExe forum or sent in Personal Messages as “ptestyle” files. When sending in e-mail they should Zipped before attachment.
Change/Move/Create Categories
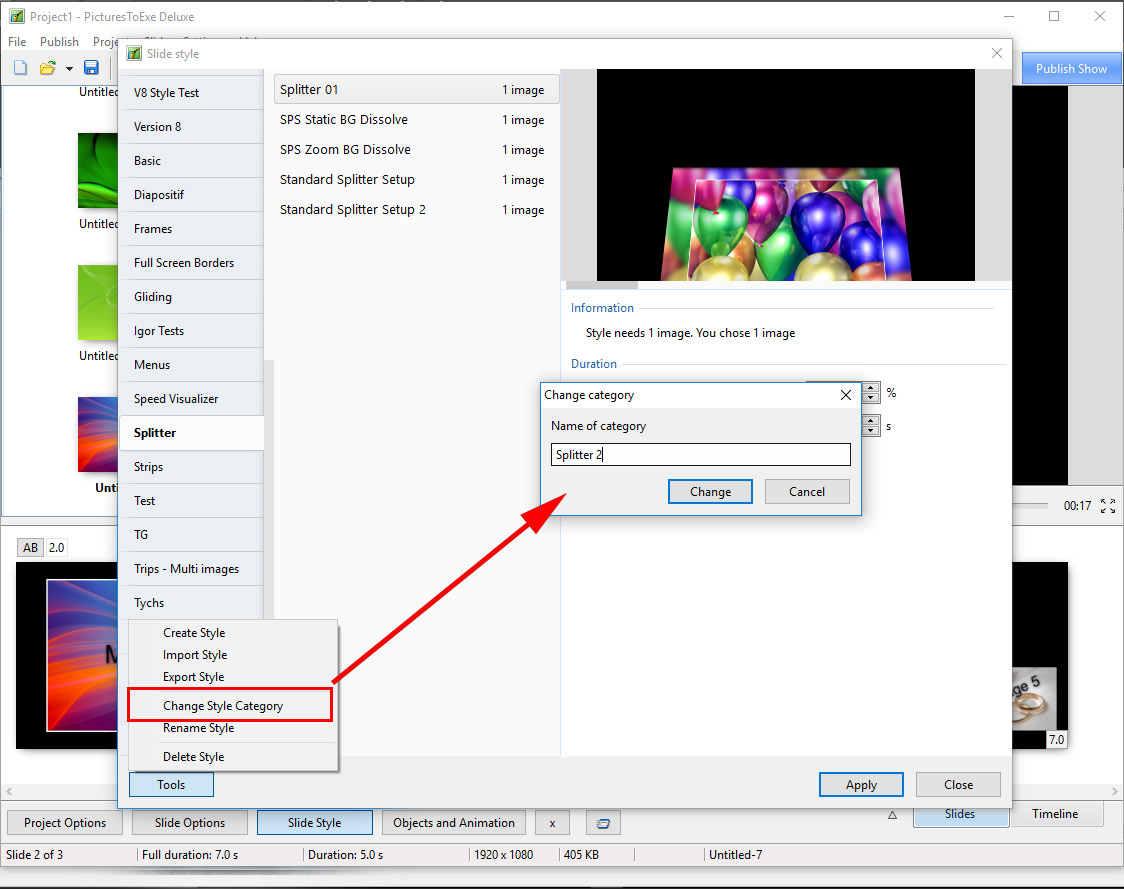
Change Category/Move to a New Style Category/Create a New Style Category
- You can create a New Style Category or rename any Category other than the Preset Styles Categories.
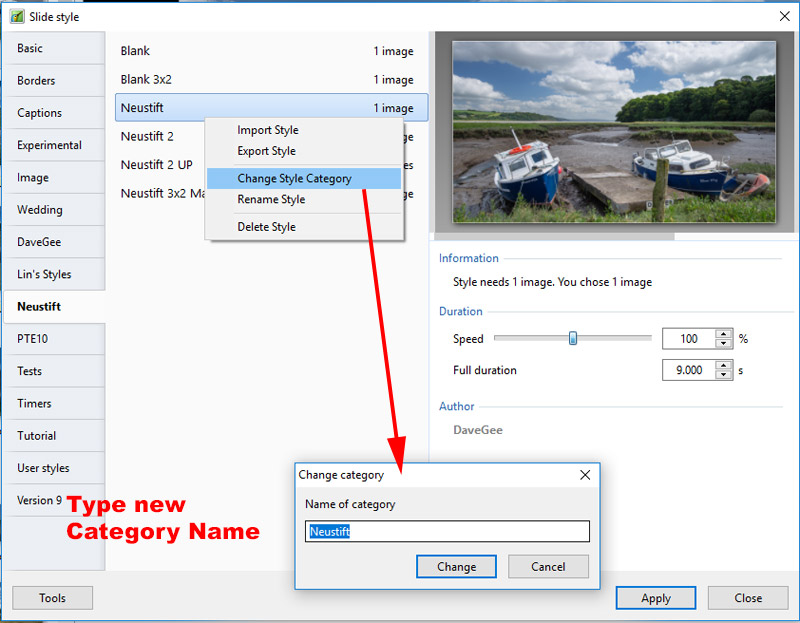
- From any other Category which you have created, the Change Style Category will Rename the Category.
The Right Click Menu
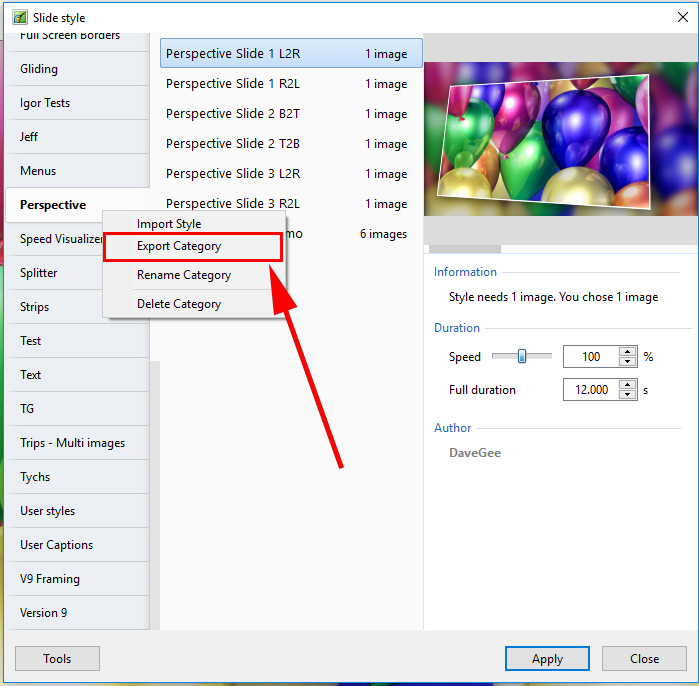
Export a Category
- To Export a whole Category containing multiple Style - Right Click on the Category
- Hotkeys for Styles: http://docs.picturestoexe.com/en-us/9.0/hotkeys/main#styles
